RS25i Riflescope
HOW TO VIDEOS
Unboxing & Overview
Diopter & Parallax
The RH2 Reticle & Illumination
Set the Zero
Setting the Zero Stop
Install a Ballistic Data Ring (BDR)
Ambi Throw Lever
INSTRUCTION MANUAL
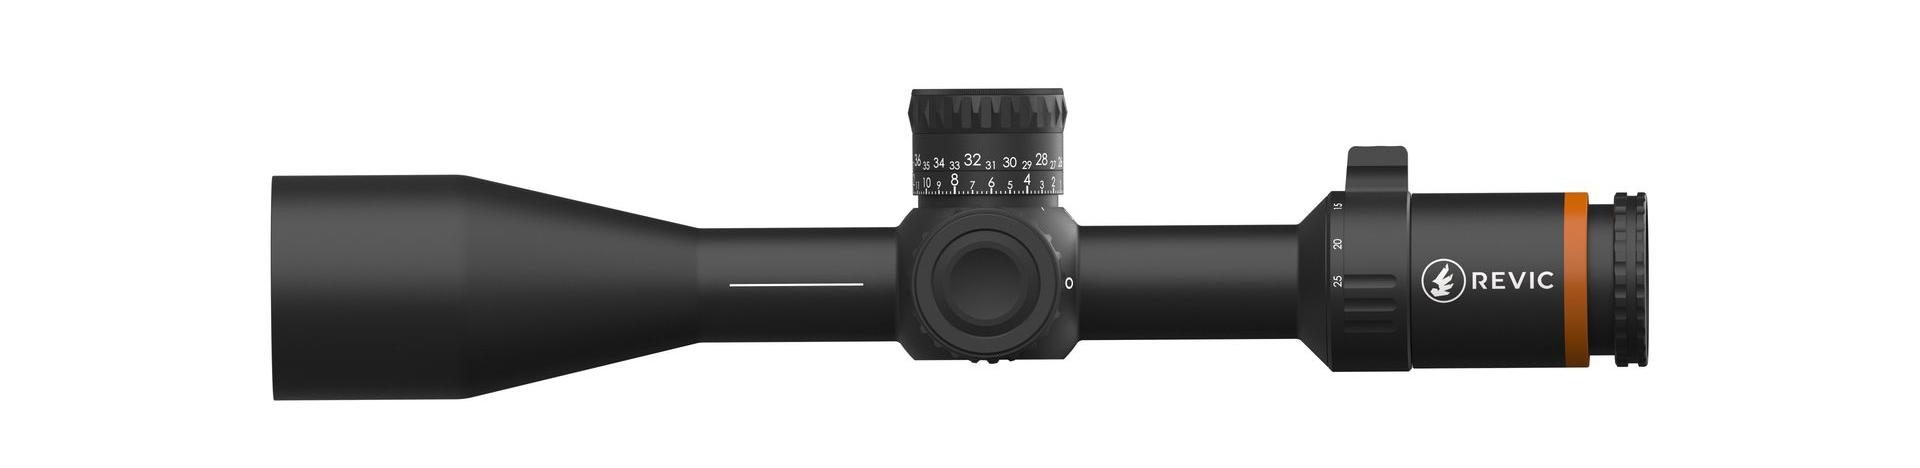
Introducing the RS25i
Congratulations on your purchase of the Acura RS25i Rifle Scope 5-25x50 with illuminated reticle! Your RS25i has all features you need for an all around long-range hunting scope, engineered to deliver fast adjustments for fast paced hunting conditions, with the right balance of size, features, and optical quality.
Featuring the next generation BDC turret, the quick change ballistic data ring with tool-less zeroing, and our adjustable magnification Ambi-Throw Level
™
allows you to optimally configure your scope to fit your rifle.
The RH2 reticle system of the RS25i is the ultimate first focal plane hunting reticle. It’s designed to deliver exactly what a hunter needs in all typical hunting situations.
All of the design elements built into this optic have one thing in mind, long range hunting.
Every detail of this scope has been carefully engineered and tested to deliver exceptional performance when it matters most.
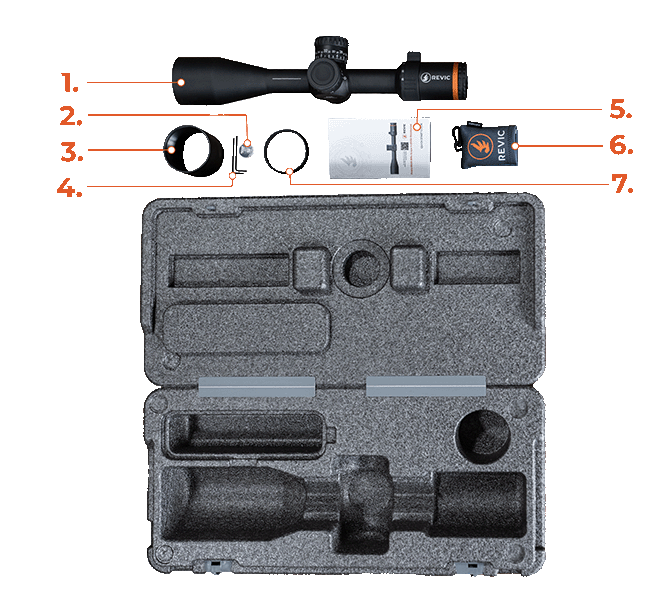
What's in the Box
-
RS25i Riflescope
-
CR2023 Battery
-
Sunshade
-
Adjustment Tools
-
Quick Start Guide
-
Cleaning Cloth
-
Objective Accessory Adapter

Product Identification
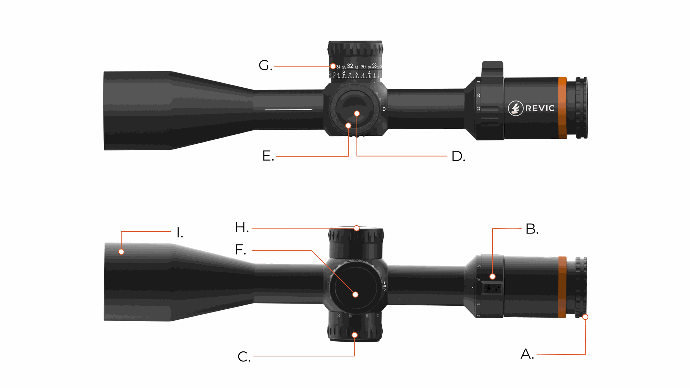
B. Adjustable Magnification Ambi-Throw Lever™
C. Parallax Turret
D. Reticle Illumination Button
E. Battery Cover
F. Elevation Turret
G. Interchangeable Ballistic Data Ring™
H. Windage Turret
I. Objective Housing
Safety Warning
The Acura RS25i is a magnified optical system, do not look at high intensity light sources such as the sun through the RS25i.
When mounting the scope to a rifle you must provide sufficient eye relief to prevent contact with the eye during recoil, especially during high (incline or decline) angle shooting.
Only use a CR2032 Battery as a power source for your Acura RS25i.
Keep your Acura RS25i out of reach of children.
Installation
It is recommended your RS25i be installed onto your rifle by a competent gunsmith. When mounting the scope:
Do not mount the scope rings onto the bellhousing, turret saddle, or ocular assembly.
Do not exceed a clamping force of 2800 lbs on the main tube of the rifle scope. Generally, scope rings with four clamping screws require a torque of 18 in-lbs (2.0 Nm) on each screw to exceed this specification.
General Operation
Adjusting Diopter
After mounting the scope on your rifle, safely aim at a light colored object (to avoid myopia), set the magnification to 25x, and the parallax to the infinity setting.
Adjust the diopter focus ring until the reticle image within the scope is clear. Allow your eye to relax by closing your eye, or looking away from the eyepiece. Repeat the adjustment of the diopter with a relaxed eye to ensure the reticle is clear when first viewed in the scope.
Reticle Features
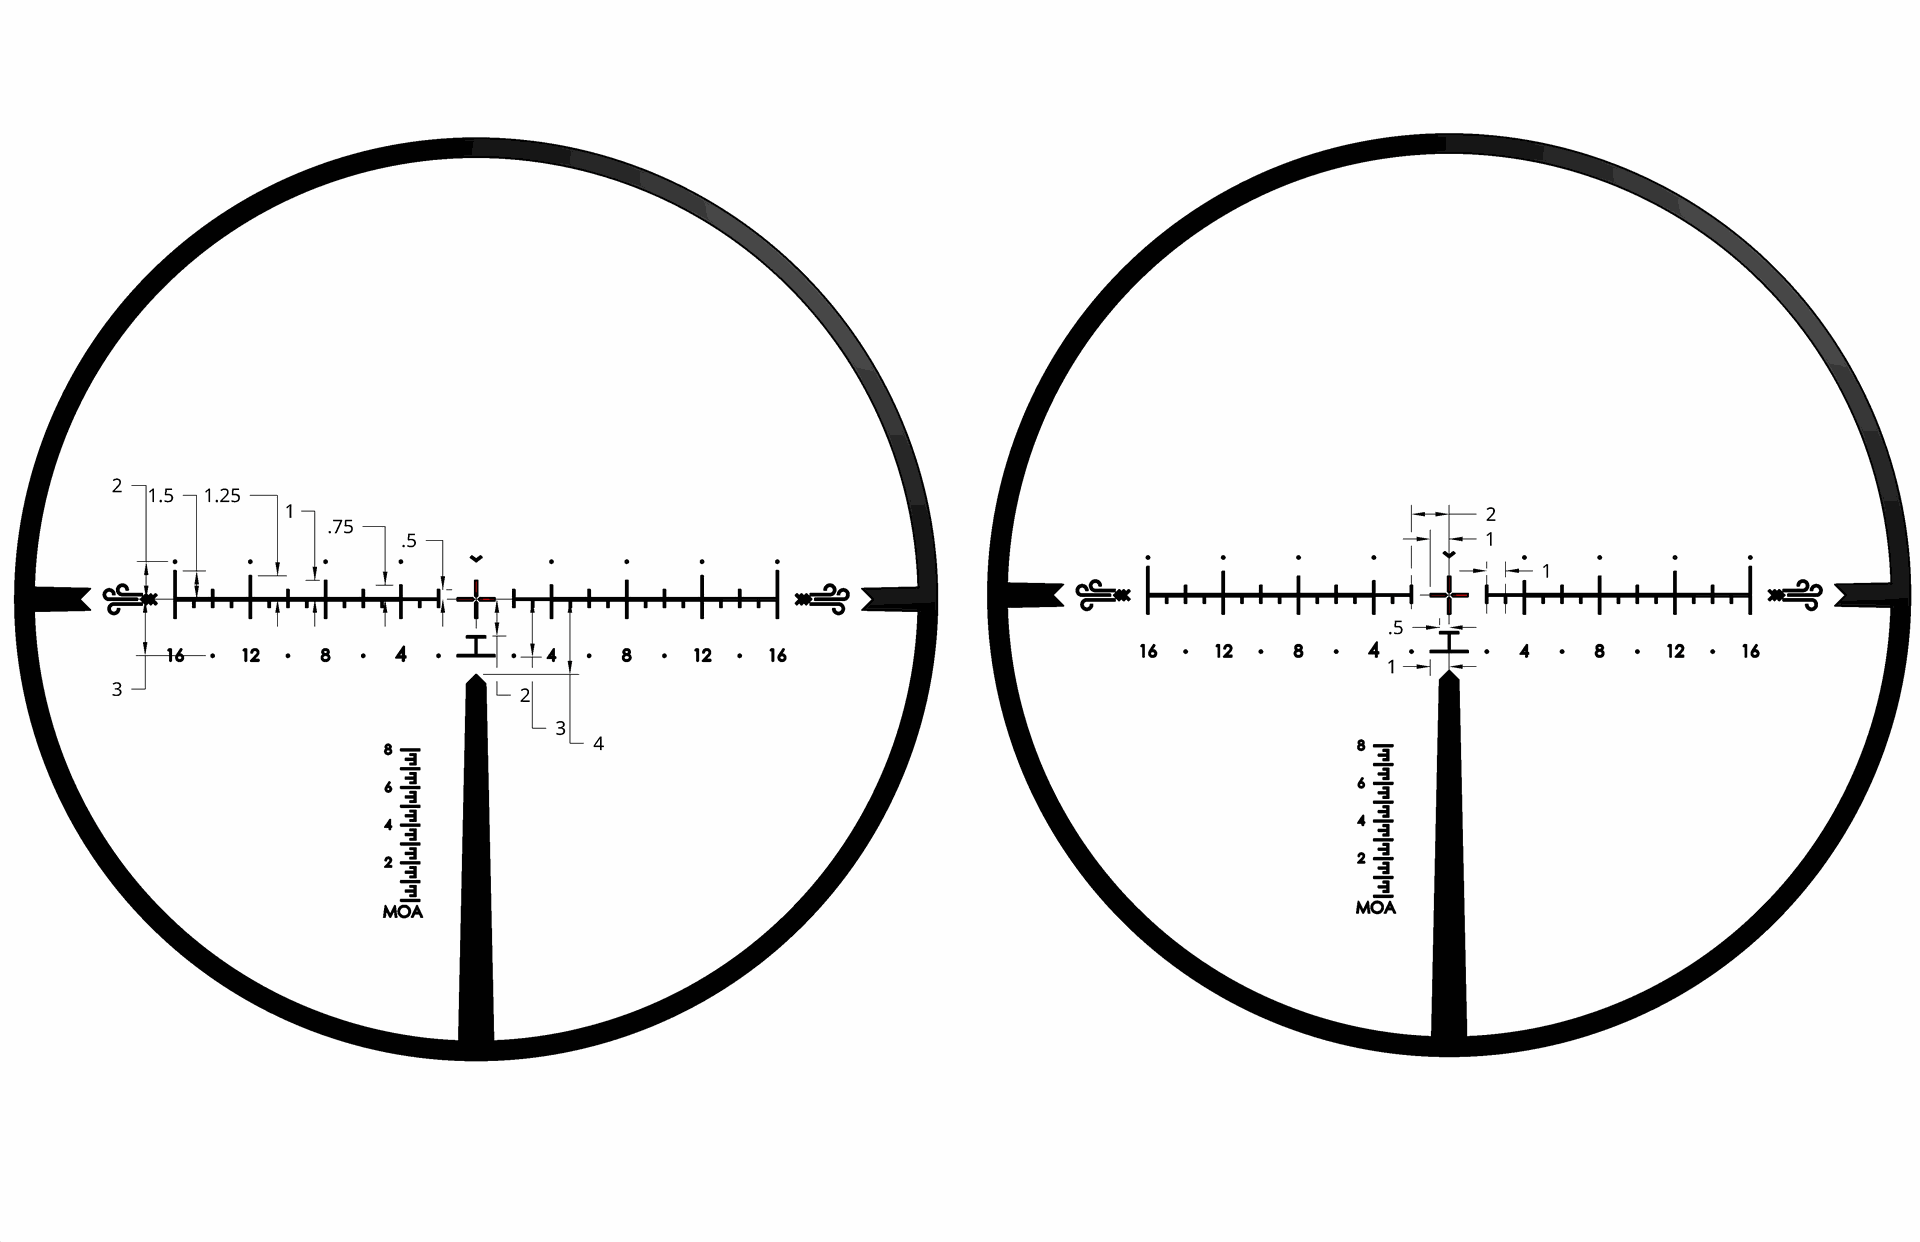
The RS25i features the RH2 First Focal Plane reticle for consistent reticle sub tensions throughout the entire magnification range, which simplifies shooting corrections when the action is fast.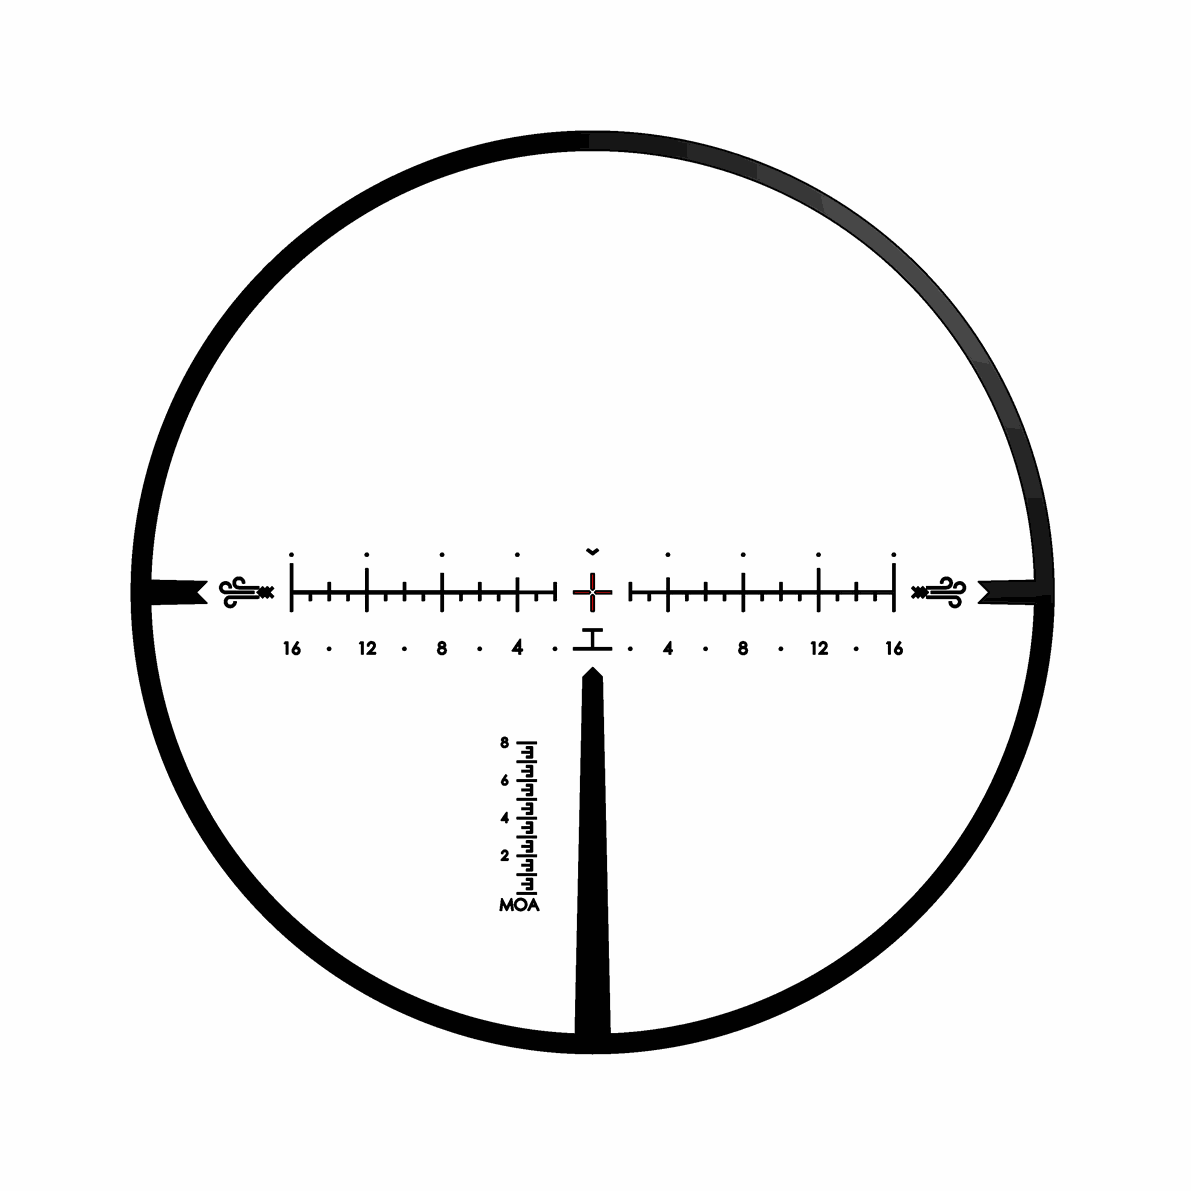
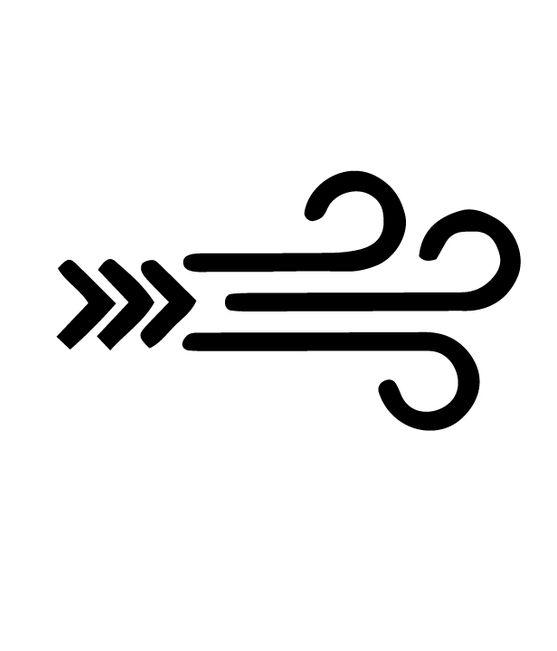
The Wind Assist™ Icons featured on each side of the reticle offer reliable, intuitive wind corrections. Simply identify the direction the wind is moving to (left or right) and count the hold on the same side as the Wind Assist Icon arrows. For example, a wind to the left, results in a hold "on" the left side of the reticle.
The Subtensions of the RH2 reticle are designed to be a simple, accessible, uncomplicated long range reticle. For the MOA reticle, all hash spacing is set at 1 MOA. The 4 MOA bars increase in size the further from the center to guide your eye to the center, and provide for quick height estimation. A full ranging scale is provided in the lower left of the scope view . The prominent vertical post is located 4 MOA below the center crosshairs for quick holdover correction or aiming at low magnification.
Reticle Illumination
Short press the Reticle Illumination Button on the parallax turret to turn the illumination on or change the brightness level. The brightness level increases with each short press beginning at level 1 and increasing to level 10. Once the brightness level is set at level 10 the brightness levels will decrease with each short press, from level 10 to level 1.
Press and hold the Reticle Illumination Button to turn off the illumination.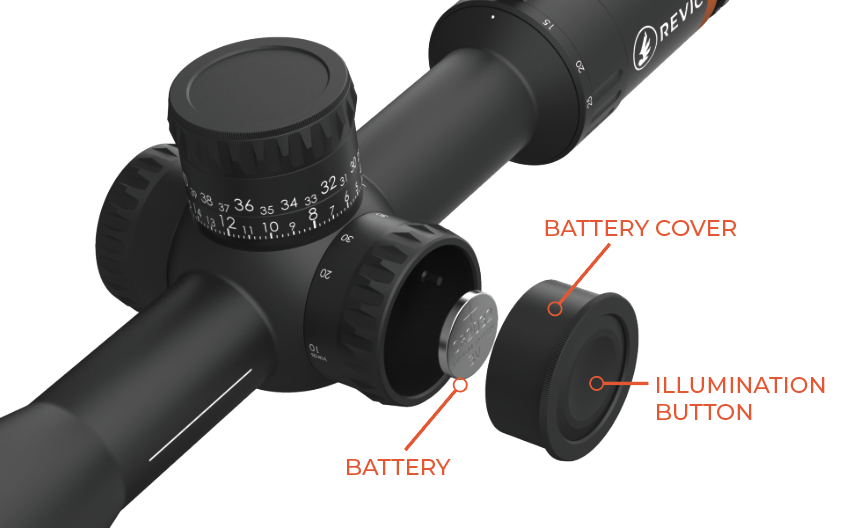
To install or replace the battery, unscrew the Battery Cover from the Parallax turret.
Remove the CR2032 battery by pressing down on one side of the battery. Lift the battery out of the battery cage from the opposite side that was pressed down.
Install the CR2032 battery with the positive terminal facing out by pressing the coin battery into the battery cage. Reinstall the Battery Cover ensuring the cover is secure to provide a watertight seal.
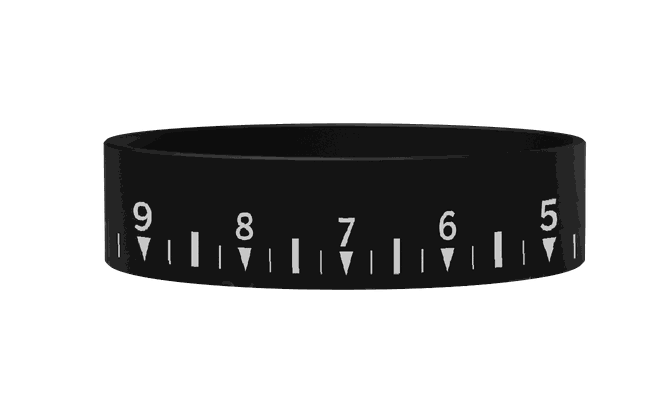
Adjusting the Parallax
Prior to adjusting the parallax ensure the diopter adjustment is set to provide a clear reticle image.
With the scope and rifle in a stable position and safely aimed at a distant object, adjust the parallax turret until the object is in focus.
Without moving the scope and rifle, slightly move your eye and head side to side and up-down. If the reticle appears to move with head movement, continue to adjust the parallax until the reticle does not move.
Ensuring parallax is eliminated will provide the most accurate configuration for long range shooting. The presence of parallax can introduce variation in the reticle alignment to the intended target.
The markings on the parallax turret provide an approximate parallax adjustment at given distances. The diopter and parallax settings in combination with each individual user’s eyesight can vary the parallax adjustment required for parallax free magnified optics.
Magnification Ambi-Throw Lever™
The Magnification Ambi-Throw Lever ™ can be adjusted in 25 positions to allow full magnification range adjustments without interfering with 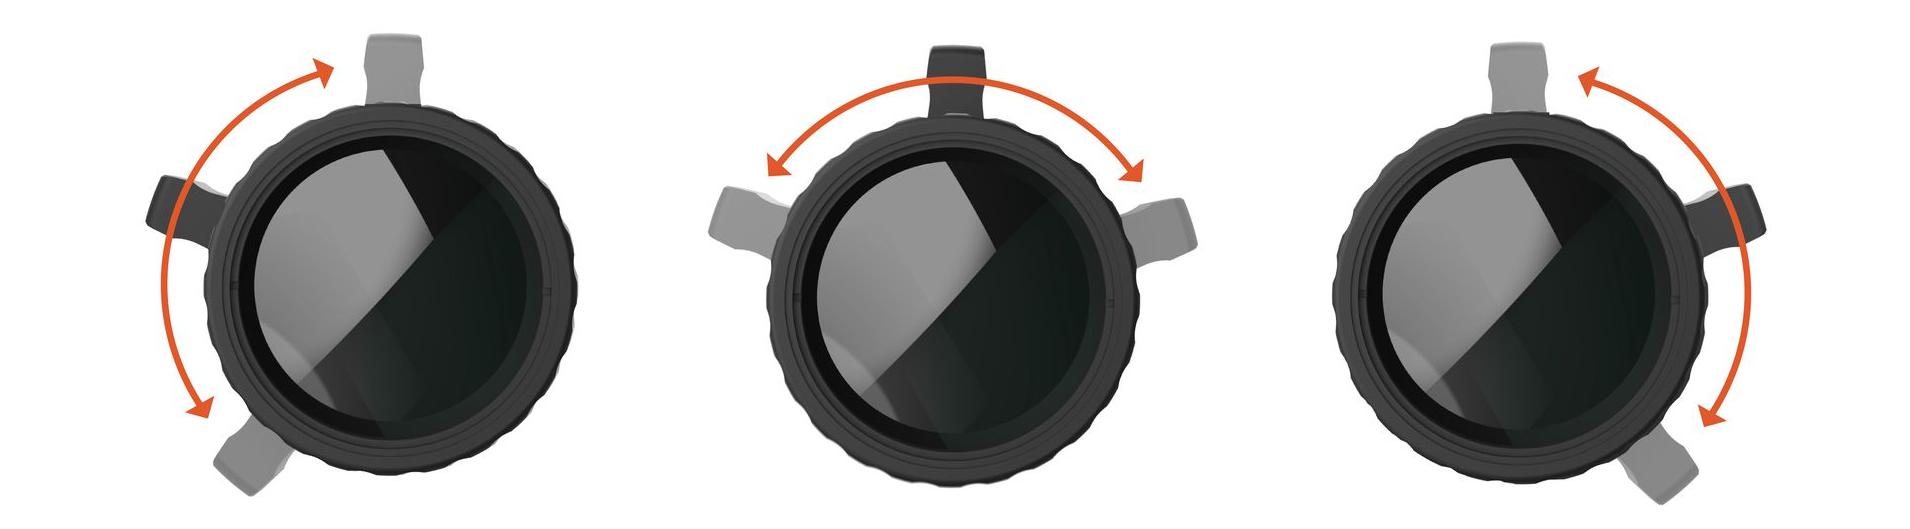 other components of your rifle systems, such as the bolt travel.
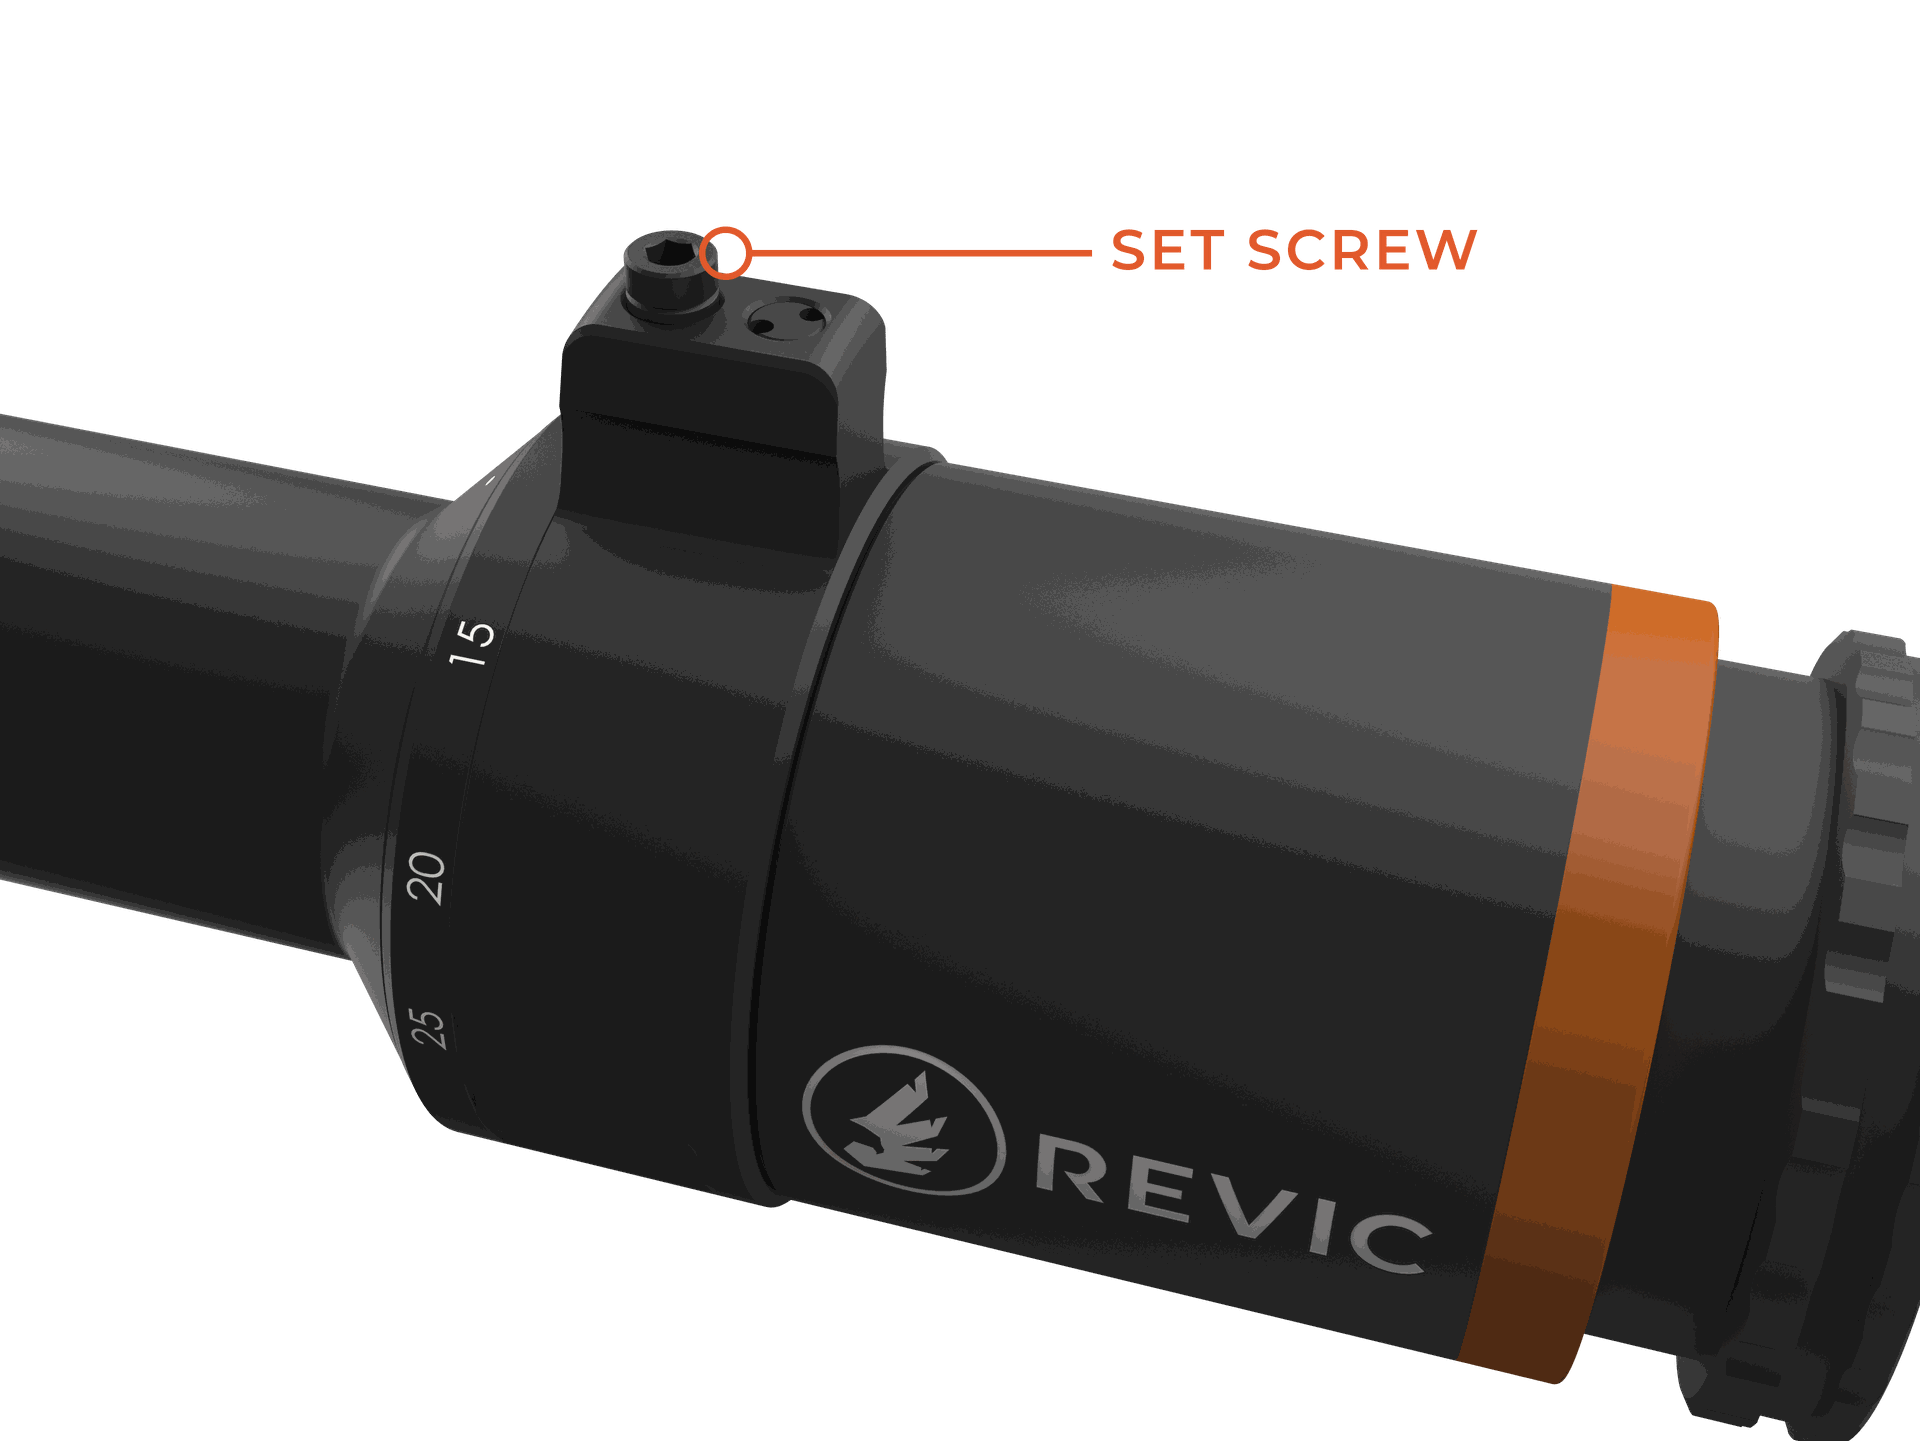
A 3/32” (2.5mm) allen wrench is provided to adjust the Ambi-Throw Lever ™.
Loosen the lever set screw (until the head of the screw is shown).
Reposition the lever in the desired detent location, and tighten the set screw. Do Not exceed 2.65 in-lb (0.3Nm).
Windage Turret
The windage turret of the RS25i is capped to prevent inadvertent adjustments. Once the cap is removed the turret features 50 MOA (14.5 mil) of travel. The turret is marked for left and right windage adjustments up to 12.5 MOA in each direction per revolution (25MOA/rev, 10 MIL/rev). Each revolution is marked by the vertical line of the raising turret. The click value of the elevation turret is 0.25MOA/click (0.1MIL/click).
A 1/16” (1.5mm) allen wrench is provided to adjust the windage turret. Once the desired zero position of the turret is set:
Use the allen wrench to loosen the three (3) set screws on the windage turret.
Rotate the turret back to the zero mark.
Tighten the set screws and replace the zero cap. Do Not exceed 2.65 in-lb (0.3Nm).
Elevation Turret
The elevation turret is a precise, robust, and accurate raising turret to provide straightforward adjustments and sharp haptic click response.
The 1st revolution of adjustments are presented in MOA or MIL, while the 2nd revolution is configurable with MOA, MIL or a custom Ballistic Data RingTM which integrates into the Revic Ecosystem for perfect accuracy at Long Range.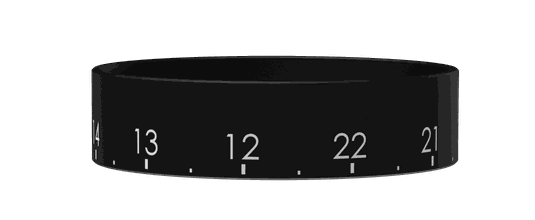
The elevation turret provides 80 MOA (23 mil) of travel with 25 MOA (10 mil) per revolution. Each revolution is marked by the horizontal line of the raising turret. The click value of the elevation turret is 0.25 MOA/click (0.1 MIL/click).
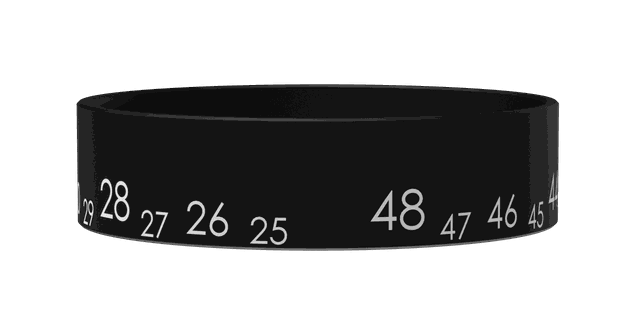
The interchanging Ballistic Data Ring ™ (BDR) allows for the RS25i to quickly be configured for multiple ammunition loads. The BDR provides the ballistic profile information as well as the ballistic drop compensation (BDC) on each ring.
To swap the BDR 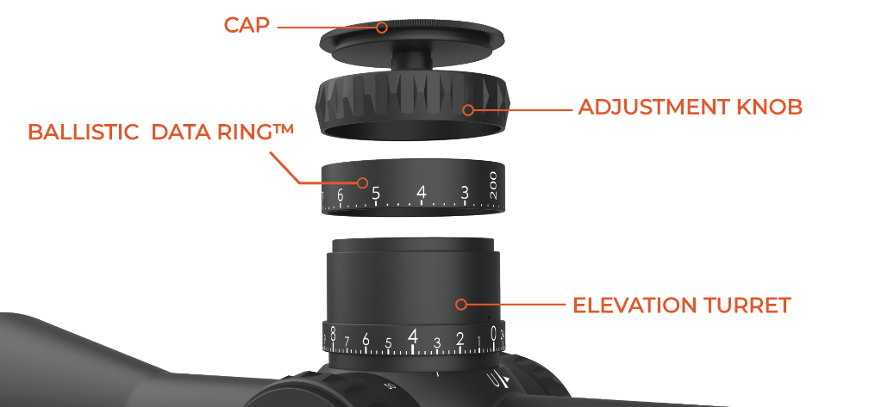
Unthread the cap of the elevation turret, and remove the adjustment knob and BDR.
Install the BDR or MOA/MIL turret ring and align the index with the detent on the turret.
Re-install the adjustment knob and cap.
A 1/16” (1.5mm) allen wrench is provided to adjust the elevation turret.
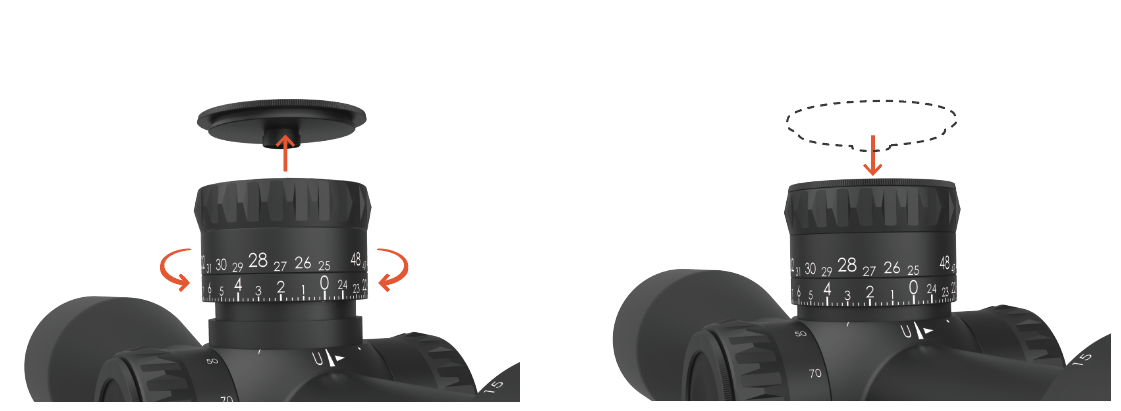
Zeroing the Scope
The RS25i elevation turret provides a tool-less zero setting and adjustable zero stop.
To set the zero:
Unthread the cap of the elevation turret keeping the adjustment knob and 2nd revolution ring in place.
Raise the entire assembly.
Reposition the assembly to the desired zero position.
Re-install the turret cap and securely tighten the cap.
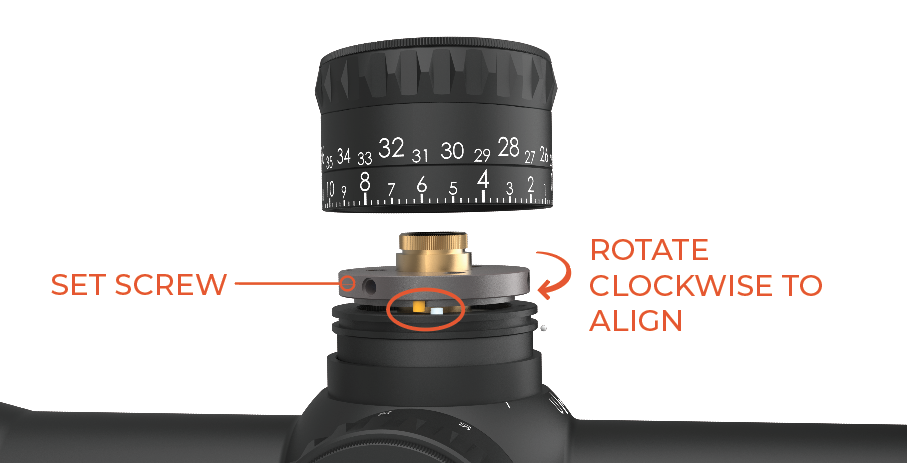
To adjust the Zero Stop:
Note the position of the elevation turret
Unthread the cap of the elevation turret
Remove the entire elevation turret exposing the zero stop mechanism.
Use the 1/16” (1.5mm) allen wrench to loosen the three (3) set screws on the zero stop.
Push the zero stop down and rotate clockwise until it stops.
Tighten the set screws. Do Not exceed 2.65 in-lb (0.3Nm).
Re-install the entire turret to the noted position.
Re-install the turret cap and securely tighten the cap.
Appendix
Accessory Installation
The Objective Accessory Adapter allows for accessories to be mounted to the objective bell housing. To install the Objective Accessory Adapter, thread the adapter onto the objective housing, or sunshade. Take care not to cross thread the adapter, scope or sunshade during installation. Do Not exceed 10 in-lb (1.13Nm).
The RS25i Sunshade minimizes intense direct light while allowing for full optical light collection of the RS25i. To install the sunshade thread the sunshade onto the objective housing directly or onto the Objective Accessory Adapter. Take care not to cross thread the sunshade, scope or adapter during installation. Do Not exceed 10 in-lb (1.13Nm).
The RS35i Lens Covers offer protection of the optical lens when not in use. The flip up style lens covers are not required to be removed when the RS25i is in use. To install the lens covers:
Grasp the cover and scope firmly.
Press the front of the hinge of the cover towards the scope until the cover partially latches to the adapter.
Press the front edge (180 degrees) of the cover from the hinge until the cover fully latches to the adapter.
Check the functionality of the cover by opening and closing the cover repeatedly to ensure a snug fit.
Care and Maintenance
Cleaning
Clean the Acura RS25i after each use, before returning it to a carrying case. Check all of the following items:
• Moisture: If the unit is exposed to excess moisture, towel off excess moisture and air dry the scope at room temperature.
• Exterior dirt. Wipe exterior surfaces clean to prevent grit buildup in the carrying case. Isopropanol may be used to remove dirt and fingerprints from the exterior.
• Ocular and Objective lenses: Cleaning the lenses after each use is suggested. Use an optical air blower to remove particles like dust or dirt. Use a non-abrasive cleaning cloth (such as the cloth provided) to remove fingerprints, smudges or oil from the lenses. Failure to keep the lenses clean may cause damage.
Dust and Water Protection
The RS25i is IPX7 rated, which means it is sealed to provide protection from dust and rain, but will not withstand prolonged submersion (beyond 1-meter submersion up to 30 minutes).
Transporting
Specifications
Warranty and Legal
Revic Optics, a subsidiary of Gunwerks LLC, warranties the mechanical and optical parts of their products to be free from defects in material or workmanship for a period of five (5) years, and the electronic parts for a period of two(2) years from the date of purchase.
After the manufacturer's warranty period, Revic Optics at its sole discretion will cover the costs of labor and/or materials of repairs for mechanical and optical parts for an additional period of five (5) years, and for electronic parts for a period of three (3) years on a goodwill repair basis There is no legal entitlement to goodwill repairs.
During the warranty period, if the product is found to have a defect in material or workmanship, Revic Optics will, at its option and without charge for labor and materials, repair or replace the defective parts or the product. If the product is no longer available, Revic Optics reserves the right to replace the product with an equivalent product offered for sale at the time of the repair.
This limited warranty does not cover failures resulting from abuse, negligence, or unauthorized alterations, modifications or repairs. Wear parts such as rubber armoring, eyecups, carrying straps or cases and direct or indirect damages caused by defects in the product are not covered by the warranty.
This warranty is only valid with proof of purchase or warranty repair documentation from Revic Optics (RMA). Return shipping will be provided for warranty repairs. If the product is shipped abroad any duties or taxes incurred must be paid by the customer. Products without a proof of purchase will be repaired at the customer’s expense.
If other warranties or guarantees (either statutory or voluntary) are agreed to in other countries they must be fulfilled by the agreeing parties. This warranty is granted by Revic Optics a subsidiary of Gunwerks LLC. The place of jurisdiction is Park County, Wyoming USA.
To complete the warranty registration process for your product, please visit www.revicoptics.com/product-registration
Should you require assistance or service, please submit a support request to https://www.revicoptics.com/helpdesk or call (307) 296-7300
Copyright (c) [202]3 Gunwerks, LLC. All Rights Reserved
Information in this document is subject to change without notice. No part of this manual may be reproduced in any form or by any means, electronic or mechanical, including photocopying, recording, or information storage and retrieval systems, for any purpose other than the purchaser’s personal use, without express written consent.
This product is covered by patents pending and the following US Patents: Find our patents at patent-list.info
Gore-Tex is a registered trademark of W. L. Gore and Associates. Google Play Store is a registered trademark of Google, LLC. App Store® is a registered trademark of Apple Inc. All other trademarks are the property of their respective owners.