PMR INSTALLATION AND SETUP CHECKLIST
The outline of steps for a successful installation are listed below:
If MOA Profile Only:
- Install the rifle scope in a set of premium 34mm rings using industry best practice
- Level the scope using the top of elevation turret, reticle, or bottom of the turret saddle
- Zero the rifle and set the turret zero (we recommend 200 yards)
- Install one of the included lithium AAA batteries
- Power the scope up
- Set the Heads Up Display (HUD) to zero
The MOA function of the Revic PMR scope is ready for use.
If Loading a Ballistic Profile for vBDC function:
- Complete all the above steps
- Install the Revic Ops App and select Profile to create a profile for your ballistics
- With the scope on, enter the Quick Menu and navigate to and turn on the Bluetooth function
- In the App, Select Revic Connect then your scope to establish a connection
- If this is the first time you have connected the scope, you will be asked to calibrate North
- Highlight the Sync icon to the right of the profile name to allow a sync to scope (up to 3 allowed)
- Initiate a sync to push the selected profiles into the Revic PMR scope
The vBDC function of the Revic PMR scope is ready for use.
PMR INSTALLATION AND SETUP INSTRUCTIONS
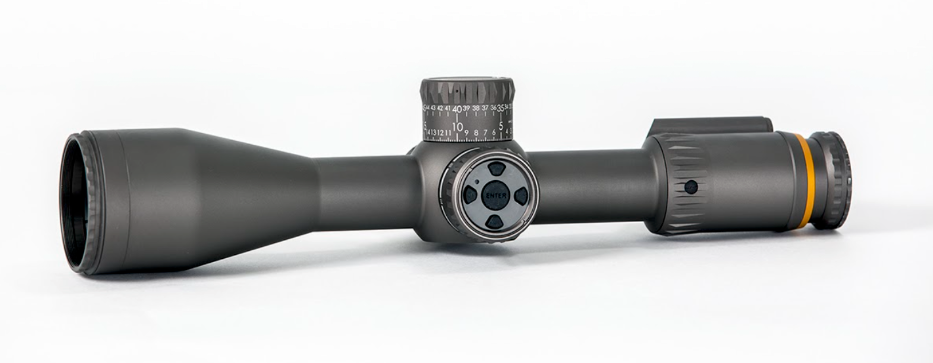
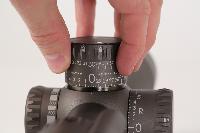
Adjusting the PMR Elevation Turret
For setups requiring up adjustment of the zero stop:
-
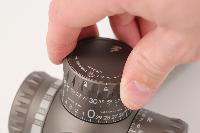
With the turret in Unlocked/raised position, adjust turret until rifle point of impact is at desired zero
- If you reach the zero stop while adjusting bullet impact down, skip to instructions below:
- Press turret down to Locked position
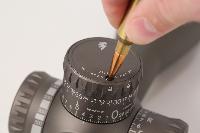
- Secure the turret from turning with one hand, and using a bullet tip with the other, depress button on top of turret and rotate top of turret clockwise to Disengage position
- Rotate turret clockwise until internal zero stop aligns to zero on turret
- Using the bullet tip, depress button and rotate counter-clockwise to Engage position
- You have now set your turret zero and zero stop
- Lift turret to Unlocked position to operate
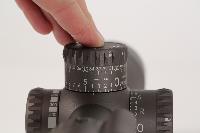
For setups requiring down adjustment of the zero stop:
- With the turret in Unlocked/raised position, adjust turret clockwise down until you hit the zero stop
- Press turret down to Locked position
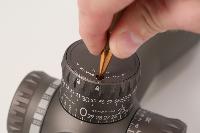
- Grasp turret with one hand and using a bullet tip with the other, depress button on top of turret and rotate clockwise to Disengage position
- Rotate turret counter-clockwise the amount of adjustment required for zeroing
- Using the bullet tip, depress button and rotate counter-clockwise to Engage position
- Lift turret to Unlocked position and dial clockwise down to the zero stop
- You have now set your turret zero and zerostop
Adjusting the PMR Windage Turret
-
With the turret in Unlocked/raised position, adjust turret until rifle point of impact is at desired zero
- If you reach the travel limit stop while adjusting bullet impact, skip to instructions below:
- Press turret down to Locked position
- Grasp turret with one hand and using a bullet tip with the other, depress button on top of turret and rotate clockwise to Disengage position
- Rotate turret until zero position aligns to the index mark
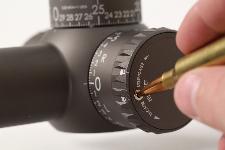
- Using the bullet tip, depress button and rotate counter-clockwise to Engage position
- You have now set your turret zero and travel limit stop, lift turret to Unlocked position to operate
For setups requiring adjustment beyond the travel limit stop:
- With the turret in Unlocked/raised position, adjust turret until you hit the travel limit stop
- Press turret down to Locked position
- Grasp turret with one hand and using a bullet tip with the other, depress button on top of turret and rotate clockwise to Disengage position
- Rotate turret back to zero position, plus the additional amount required for zero adjustment
- Using the bullet tip, depress button and rotate counter-clockwise to Engage position
- Lift turret to Unlocked position to and dial to the zero position
- You have now set your turret zero travel limit stop
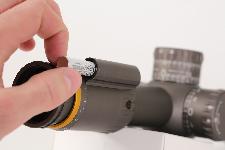
Battery Installation
**Important** the battery cap is designed to be tightened by hand only, do not use pliers or other tools.
- Remove battery cap.
- Install the supplied lithium AAA battery, positive terminal forward toward objective.
- Tighten battery cover securely.
Power ON
- Press and hold enter button for three (3) seconds or until Revic Logo is displayed
-
While Revic logo is displayed:
- Up arrow for company contact information
- Down arrow for Firmware and Hardware version
- Left or arrow to view FCC certification
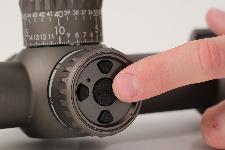
Power OFF
Press and hold enter button for 3 seconds
Install Revic Ops and Create Profiles
- Use the provided link to download and install the Revic Ops app on your Android device
- You will likely have to adjust your security settings to allow installation from unknown sources
- After opening the app on your device, select Profiles to enter and store a ballistic profile for your firearm
- Select the + sign to create a new profile, then select Firearm for data entry
- Once the Firearm section is complete, select Ammo to enter ammunition data
- The profile name is automatically updated with characteristic information; therefore, select and hold the profile name to allow editing
- Swipe the Profile name left for an option to delete
Turn PMR Bluetooth On
- Open the Revic Ops App
- Turn on the PMR
- Press the ENTER button to access Quick Menu
- Press LEFT or RIGHT arrows to navigate to the Bluetooth menu tab
- Press ENTER to edit menu item, then UP or DOWN arrow to change value to ON
- Press ENTER again to store value and exit edit mode
- Press LEFT or RIGHT arrows to navigate to the Exit menu tab, then press ENTER to return to Main Display
Connect the Ops App to the Scope and Sync Ballistic Profiles
- With the Revic Ops app open, select Revic Connect, and choose your PMR scope from the list
- Expand the Profiles to Load section by selecting the orange up arrow
- Select up to three (3) profiles you want to load into the PMR memory by selecting the grey sync icon (ICON)
- When selected the icon will turn orange
- To sync, select the large orange sync icon (ICON) in the lower right of the app
- Your profiles are now loaded
- Select current profile on the PMR to begin zeroing process
Calibrate the Scope to North
If you have not calibrated the scope to North for this scope/rifle installation, follow these steps:
- From the Main Display, press and immediately release ENTER button to access Quick Menu
- Press LEFT or RIGHT arrows to navigate the Calibration (ICON) menu tab
- Press UP or DOWN arrows to scroll up/down to highlight TRUE NORTH menu item
- Aim your scope North using a compass
- Press ENTER to edit menu item
- Then press and hold ENTER until — is displayed
- Press ENTER again to exit edit mode
- Navigate to Exit menu item and press ENTER to select, or dial the elevation turret to return to Main Screen
Alternate Instructions:
- Connect your scope to the app
- In the Revic Connect menu, select the settings (ICON) for your scope and follow the instructions to calibrate TRUE NORTH
Manually Set Heads Up Display (HUD) to Zero
This step needs to be performed for every profile loaded into the PMR. It captures the environment, sighting, and turret data for the zeroing state of the rifle, and resets the heads up display to show zero range. All ballistic calculations are based on these initial conditions.
- This step should be performed after sighting in the rifle and zeroing the elevation turret
- From the Main Display, press and immediately release ENTER button to access Quick Menu
- Press LEFT or RIGHT arrows to navigate the Calibration (ICON) menu tab
- Confirm that the loaded data for Zero Range and Zero Offset are correct
- Press UP or DOWN arrows to scroll up/down to highlight HUD Zero menu item
- Aim at your target impact point to get the exact angle and compass heading
- Press ENTER to edit menu item
- Then press and hold ENTER until — is displayed
- Press ENTER again to exit edit mode
- Navigate to Exit menu item and press ENTER to select, or dial the elevation turret to return to Main Screen
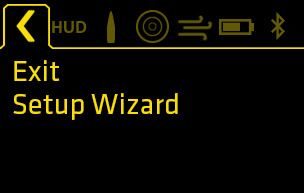
Alternate: Use the Startup Wizard to Set Heads Up Display (HUD) to Zero
This wizard can be used to quickly set the zero range and HUD zero for any loaded profile.
- Turn on the PMR
- Press the ENTER button to access Quick Menu
- Press LEFT or RIGHT arrows to navigate to the Exit (ICON) menu tab
- Press DOWN arrow to scroll down to highlight Setup Wizard menu item
- Press ENTER to select menu item, then follow the instructions to zero the HUD
USING THE PMR RIFLESCOPE
Power ON
Press and hold enter button for three seconds or until Revic Logo appears for one second
- While Revic logo is displayed:
- Up arrow for company contact information
- Down arrow for Firmware and Hardware version
- Left or arrow to view FCC certification
Power OFF
- Press and hold enter button for three seconds
Accessing the Quick Menu
- Press and immediately release enter button to access Quick Menu
- Press Left or Right arrows to navigate menu tabs
- Press Up or Down arrows to scroll up/down to highlight desired menu item
- Press enter to edit menu item, then Up or Down arrow to change value
- Press enter again to store value and exit edit mode
- Navigate to other menu items with arrow buttons or press Enter to return to Main Screen
Adjusting Brightness
- From the Main Screen, press and release Up/Down arrows to adjust display brightness
- Press and hold Up arrow to switch display Off – reticle illumination will remain On
- Press and release Enter to switch display On again
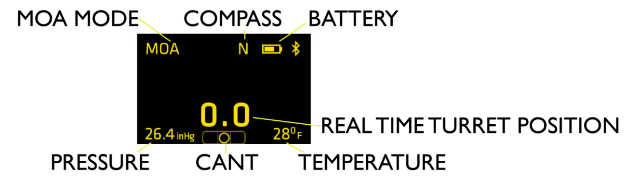
MOA MODE
This is the default mode upon delivery
With HUD set to Factory Zero
- Adjusting the elevation turret will indicate turret position relative to the scope’s entire range of elevation adjustment
With HUD Zeroed to Match Sight-In Distance
-
Adjust the elevation turret to desired setting relative to zero, while looking through the scope by watching the HUD
- If zeroed properly, the displayed numbers will match turret markings
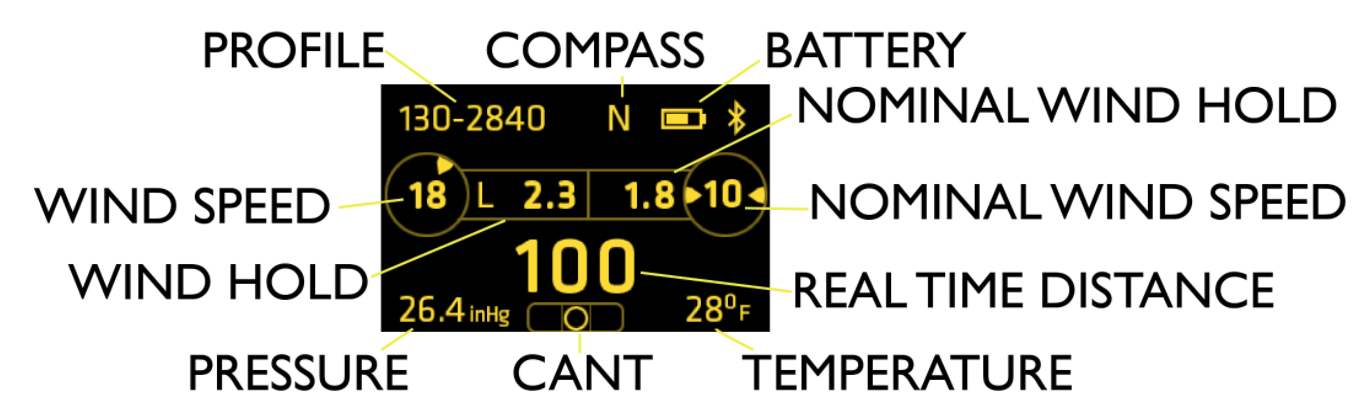
VBDC MODE
Enter vBDC Mode by loading and selecting a ballistic profile
Adjusting Range
- While aiming at your target, dial the turret until the Line of Sight range is displayed
- Hold the center reticle on the target, a complete ballistic solution has been made
Use the Nominal Wind Calculation
- For the dialed target distance, scale the nominal wind hold for actual conditions and dial or hold the value using the scope windage turret or reticle
Or Enter Wind Vector
- Press Right or Left button to enter Wind Vector screen
- Press Right or Left arrow to adjust wind direction
- Press Up or Down arrow to adjust wind speed in one (1) mile per hour increments
- Press and release Enter to return to Main Screen
MAIN SCREEN OVERVIEW
MOA Mode
- Top left – MOA mode indicator
- Top Right – battery level indicator
- Top Center – Compass Direction in 90 degree increments
- Bottom Left – barometric pressure
- Bottom Right – Ambient Temperature (or override value entered in Environment Settings Menu)
- Bottom Center – Cant indicator
- Large Number – Real time elevation turret position, relative to zero setting
vBDC Mode
- Top left – profile in use
- Top Right – battery level indicator
- Top Center – Compass Direction in 90 degree increments
- Bottom Left – barometric pressure
- Bottom Right – Ambient Temperature (or override value entered in Environment Settings Menu)
- Bottom Center – Cant indicator
- Left circle – Entered wind speed and direction
- Left box – Wind hold value and direction based on entered speed and direction (if zero wind value, spindrift hold is displayed)
- Right Circle – Nominal wind speed
- Right box – Nominal wind hold regardless of direction of wind
- Large Number – Real time distance calculated according to turret setting
-
When rotating turret, bottom number is calculated turret distance, middle numbers are nearest distances and top number is linear about of each click at the respective distance. (i.e. 0.25 moa click = 5.83” at 527yds)
QUICK MENU OVERVIEW
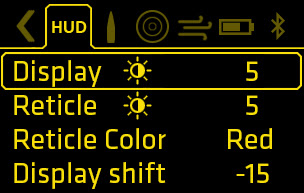
(ICON) Heads Up Display (HUD) Menu tab
- Display Brightness levels 1-9
- Reticle Brightness levels 0-9
- Reticle Colors White, Red, Cyan, Magenta, Yellow, Blue, Green
- Display Shift +/- 31 pixels
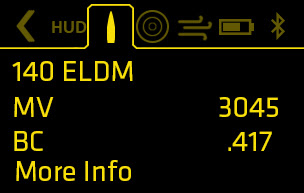
(ICON) Profile Menu Tab
- Default Profile MOA – no values can be changed
- User programmed Ballistic Profiles (must be loaded with Revic Ops app) – Muzzle Velocity and B.C. values can be changed onboard scope
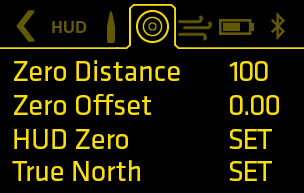
(ICON) Calibration Menu Tab
- Zero Range Distance
- Zero Offset (i.e. 2” high at 100yds)
- HUD Zero Set – reset HUD after sight-in (Select Set -> Press and Hold Enter until — is displayed)
- True North Set – must be done after each and every mounting to a rifle (Select Set -> Press and Hold Enter until — is displayed to confirm the setting)
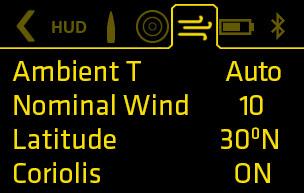
(ICON) Environment Settings Menu Tab
- Ambient Temperature – Auto or Manual override scope temperature sensor
- Nominal Wind – nominal wind increment to be displayed on Main Screen (5 mph increments up to 40mph)
- Latitude – degree location in North or Southern hemisphere
- Coriolis calculation On or Off
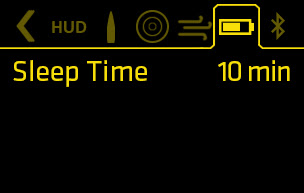
(ICON) Power Management Menu Tab
- Set scope sleep time in 5min increments up to 60min
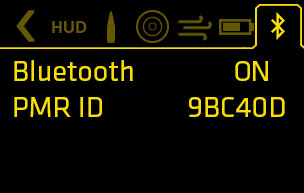
(ICON) Bluetooth Menu Tab
- Bluetooth radio On or Off
- Scope MAC address
(ICON) Exit Menu Tab
- Select Exit to return to Main Screen
-
Setup Wizard for zeroing process after loading ballistic profiles