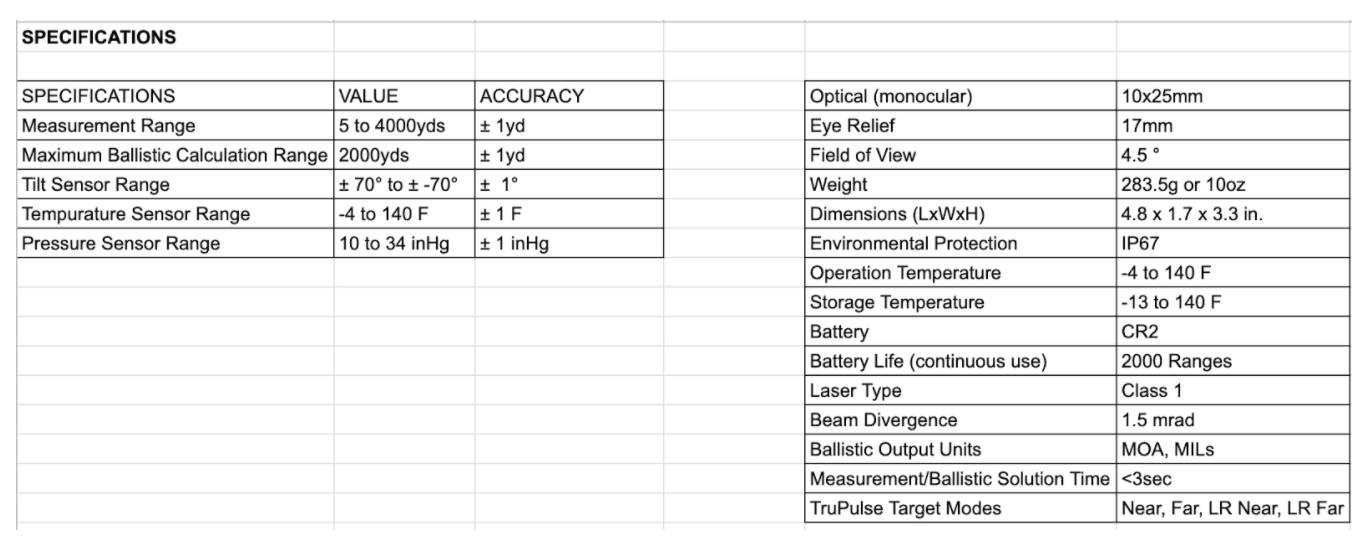
BR4 BALLISTIC RANGEFINDER
HOW TO VIDEOS
Unboxing & Quick Start
Settings & Menu Navigation
Creating & Loading Ballistic Profiles
Wind Inputs & Calculations
Field Application & Ranging
INSTRUCTION MANUAL
Introducing the BR4
Congratulations on the purchase of your BR4 Ballistic Rangefinder! The Revic BR4 features our new Revic solver with advanced wind and earth based effects to provide accurate, ultra-fast corrections in MOA, MILS, or our exclusive Shoot-To-Range Mode for use with BDC turrets. The data rich display simplifies the shooting process and the improved ranging tools feature target discrimination and a new long range mode. You can program your BR4 via a connected Bluetooth device, and with our Over The Air Update protocols you will always have access to the latest software improvements.
Section 1 - Quick Start/Battery Installment
To install/reinstall:
a. Remove the battery compartment cover by lifting up the hinged tab and turning counter-clockwise,
b. Insert the battery, negative end (-) first.
c. Re-insert the battery compartment cover and use the hinged tab to turn clockwise.
d. Press down on the hinged tab to secure.
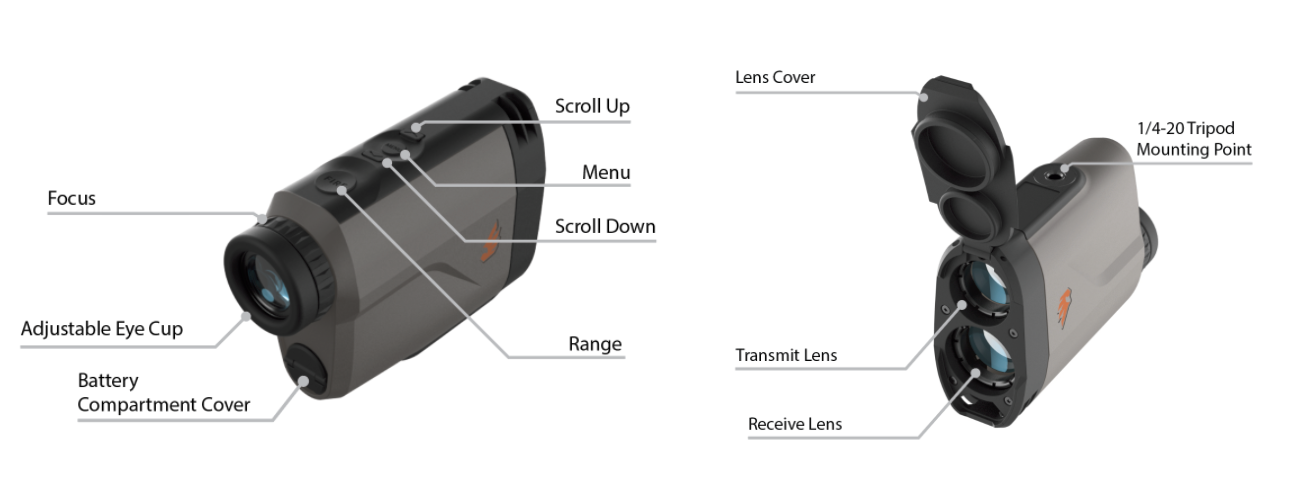
2. Pull the tab on the lens cover to expose the transmit and receive lenses and begin use.
3. Press and release the FIRE button to power ON the unit. Each time the unit is powered on, the unit is ready to take a measurement.
4. Select a target, look through the eyepiece, and use the crosshair to aim at the target.
5. To acquire a range, press and hold the FIRE button until a range is acquired and displayed. The horizontal and vertical reticle lines are displayed while the laser is active. Release the FIRE button once the distance is displayed. If the distance is not displayed, release the FIRE button and repeat.
6. The Angle Modified Range (AMR or Horizontal Range) will display momentarily in the upper left quadrant of the display, then flash to the Line-of-Sight (LOS) range.
Powering OFF the BR4
If no buttons are pressed for 20 seconds, the BR4 will enter sleep mode to conserve battery power. After entering sleep mode, the BR4 will automatically power OFF in 60 seconds of no buttons being pressed. If a Bluetooth connection was established, the BR4 will automatically power off 5 minutes after the last button press. If the BR4 goes into sleep mode after a Bluetooth connection was established, you must reconnect the BR4 to the device.
Section 2 - Basic Operations
Display Backlight Adjustment
The display’s backlight intensity can be adjusted in the Quick Menu by short-pressing (short-press is simply pressing the button and releasing as opposed to press and hold which is holding the button down for 3 seconds and releasing) the Menu button. After waking from Sleep Mode or being powered on, the most recent brightness setting is recalled. Detailed instructions to change the brightness settings can be found in section 5: Brightness.
Aiming Box
The Aiming Box shown below is used to aim the range finder. The size of the display Aiming Box is the actual size and shape of the laser beam.

Eyecup
The adjustable eyecup is designed for comfort while blocking extraneous light. To adjust the eyepiece, turn it counter-clockwise while pulling up. To return the eyepiece to its original position, turn it clockwise and push down.
Focus Adjustment
The focus adjustment ring allows you to alter the BR4s focus to provide optimum clarity of the display and intended target. During assembly, the focus is set to infinity. To adjust the focus, press the Fire button to power the unit on and aim at a blank surface such as a wall, then turn the adjustment ring clockwise or counter-clockwise to maximize visual clarity. Once you are satisfied with the display clarity, check the focus on a target at distance.
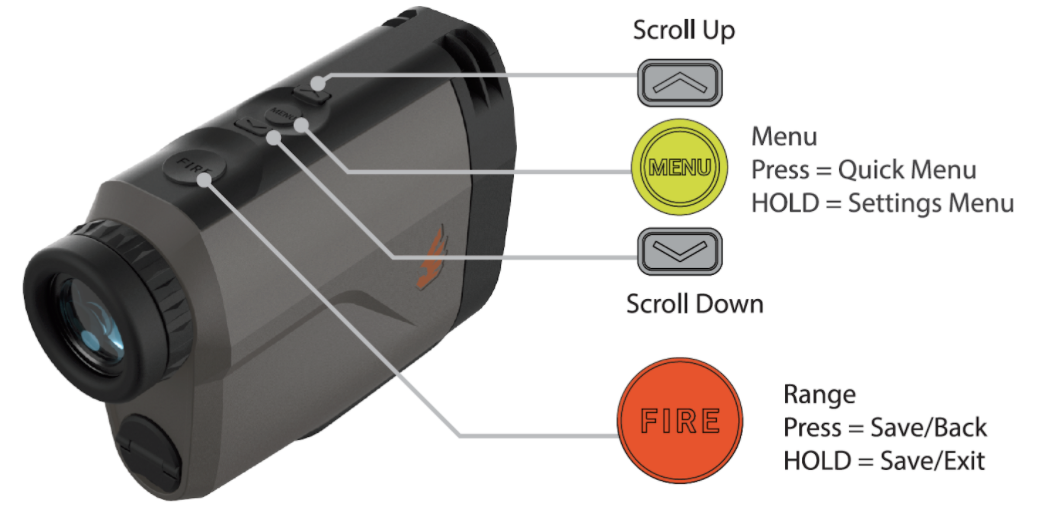
Buttons
The BR4 has a 4-button keypad located on the top panel of the instrument. See Figure 3: BR4 Buttons. The buttons provide easy access to the instrument functions, programming, and operating commands.
Section 3- How the BR4 Works
LCD Display
A Back Mask Liquid Crystal Display (BMLCD) is mounted within the optical system and projects information into the field of view using a beamsplitter.
Figure 4: LCD Display
Laser Range Sensor
The laser range sensor emits a 905 nm eyesafe invisible laser beam. The BR4 determines distance by measuring the time it takes for each pulse to travel from the rangefinder to the target and back. The horizontal and vertical reticle lines are displayed while the laser is being transmitted. The laser may be active for a maximum of 10 seconds while it acquires distance data.
Target Responsiveness
The BR4 automatically provides the best accuracy of distance to a given target. The maximum measurement distance varies with target reflective properties and environmental conditions. The maximum measurement distance in ideal conditions is approximately 4,000 yards on a reflective target.
When selecting a target, you should consider the following for the best ranging results:
• Reflectivity: Lighter colors and shiny surfaces provide better reflection.
• Angle: Ranging perpendicular to a target versus ranging to a target that is at an angle can affect ranging accuracy, which in-turn can affect MOA/MILs calculations.
• Lighting Conditions: Overcast skies will increase the unit’s maximum range while sunny skies will decrease the unit’s maximum range.
Altimeter
Your ballistic rangefinder is equipped with a barometric pressure sensor that is mounted inside the unit. A Gore-Tex® membrane allows an accurate sampling of barometric pressure while maintaining a weatherproof seal. This device measures relative pressure uncorrected to sea level - this is station pressure. A simple calculation converts the station pressure reading to an equivalent altitude. Both the station pressure reading and equivalent altitude are accessible under Quick Menu. Section 5: Pressure further explains the available display options of barometric pressure, elevation or density altitude.
Temperature Sensor
The temperature sensor is located at the front of the unit where it is exposed to ambient conditions. There may be a slight response time delay while the unit reaches outside temperature as the housing temperature of your BR4, until it is stabilized to the ambient temperature, which can affect the accuracy of the ballistic calculation. The temperature override function is explained in Section 5: Temperature.
Inclination Sensor
The inclination sensor is located inside the housing of the BR4 rangefinder. When the rangefinder is aimed at an object and the range is obtained by pressing the Fire button, the inclination angle to the target is calculated.
Section 4 – Ballistic Profiles
Connect to a Device
To access and connect to your ballistic files, complete the following steps:
1. Download the Revic app from the Google Play Store or the App Store, and create your ballistic profile in the app.
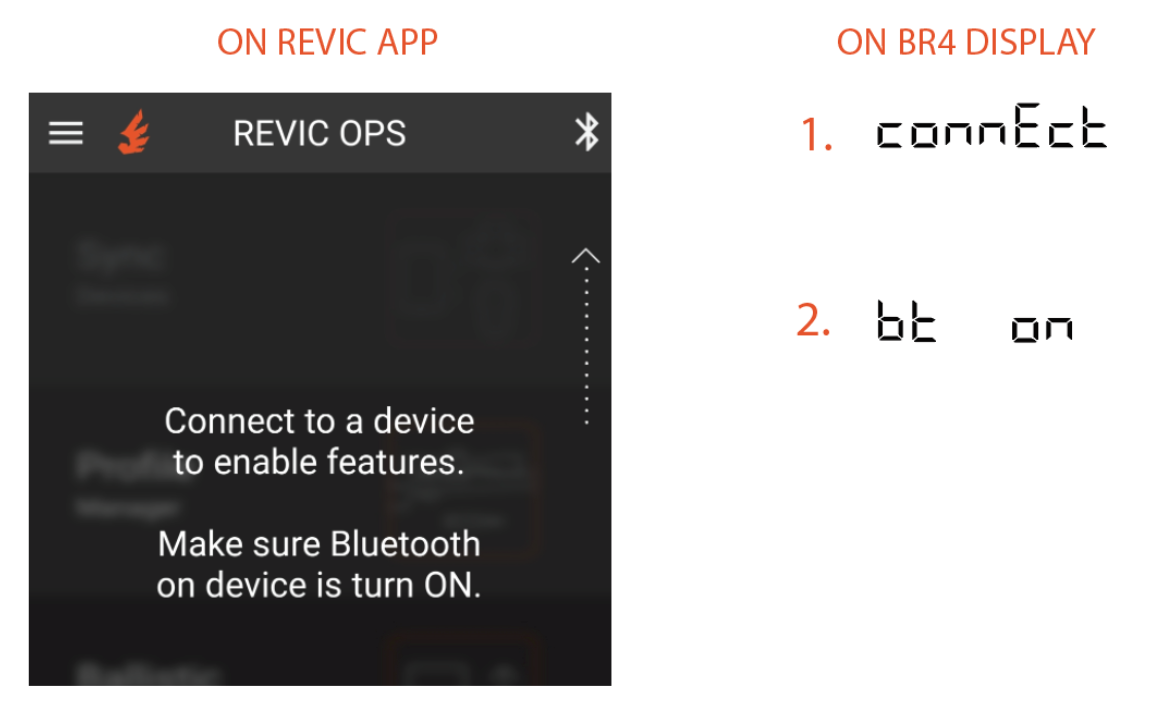
2. To turn on the Bluetooth in your BR4, follow the steps below:
a. Press and release the “Fire” button to turn on your Rangefinder.
b. Now, press and hold the “Menu” button until “CONNECT” is displayed in the settings menu.
c. Next, press the menu button once until “bt on” is being displayed.
d. Use the “up” or “down” arrows to toggle between “bt on” or “bt off.
e. Press the “Fire” button twice to save and return to the main display.
3. In the Revic app, select the Bluetooth icon to show the available devices and select your BR4 Device ID number from the list.
Figure 5: Revic Ops mobile app
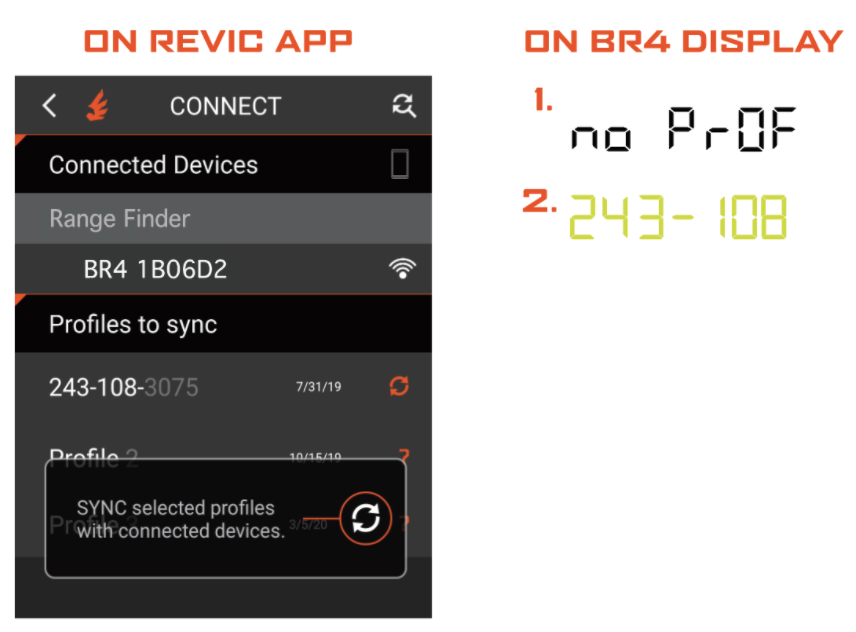
Select your profile to add to your BR4 by completing the following steps:
1. In the app, on the main screen, open the Sync Module
2. Select the icon () next to the ballistic profile you would like to add to your BR4 Rangefinder.
3. Next, press the Sync button to push the selected profiles to the connected BR4 device. You can choose up to 10 profiles to sync to the device.
Figure 6: Revic Ops mobile app
**In Figure 6: “ no PrOF” indicates no profile.
Section 5 - Menus
Figure 7: Quick Menu and Settings Menu
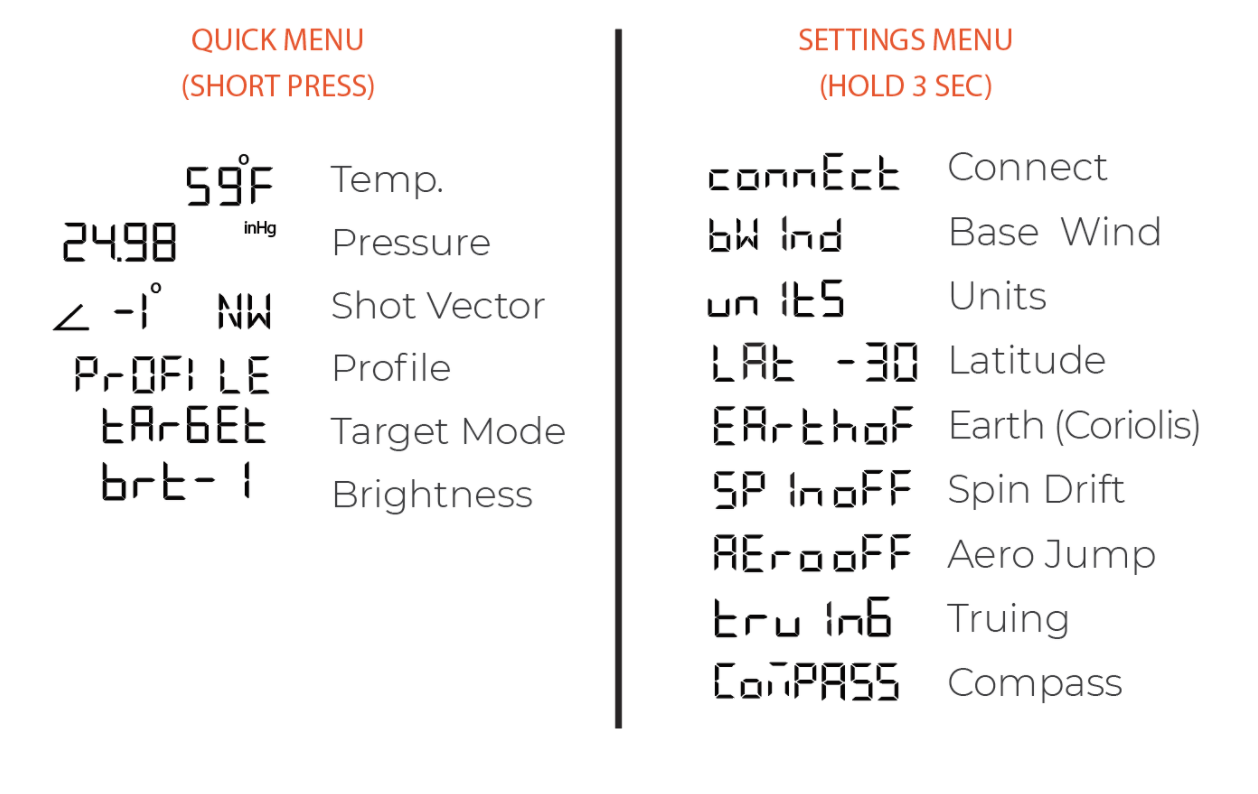
Quick Menu
The Quick Menu can be accessed with a short-press of the Menu button. To scroll through the menu, use the Up and Down Arrow keys. To select, press the menu button again. To go back, press the fire button.
Temperature (
):
The BR4 is set up to have the temperature automatically calculated. This feature can be overridden by accessing “Temperature” in the Quick Menu. Once the temperature is manually changed, the automatic temperature reading function is disabled. In order to revert back to automatic temperature reading, allow the BR4 to “power off” (5 minutes if connected via Bluetooth to another device) or remove and reinstall the battery for immediate reset of the automatic temperature function.
To access the “Temperature” function in the Quick Menu, short-press the Menu button. The first menu option displayed is “Temperature”. The temperature and unit of measure will be flashing. To enter the Temperature sub-menu, short-press the Menu button. The numerical value of the temperature will flash but the unit of measure will remain constant. Use the Up and Down Arrow keys to adjust the temperature. Short-press the Fire button to save the new temperature and exit back to the temperature main menu or press and hold the Fire button to save and exit the Quick Menu.
Pressure (
):
The “Pressure” function in the Quick Menu allows you to choose which unit of measurement you would like your information displayed. This can be displayed in inHG, elevation, or density altitude.
To change the “Pressure” value, short-press the Menu button to access the Quick Menu. Press the Up or Down Arrows to arrive at the “Pressure” option. Press the Menu button to enter the “Pressure” sub-menu. Use the Up or Down Arrows to scroll the available pressure display options. Short-press the Fire button to save and go back to the “Pressure” menu or Press and Hold the Fire button to save and exit the Quick Menu.
Shot Vector (
):
The Shot Vector displays the Degrees of Inclination and Compass heading for your reference. It is important to calibrate your compass when changing geographic locations.
Profile (
):
Your BR4 can store up to 10 profiles. To load the profiles on the device, you will need to use the Revic Ops mobile app. You can view the profile settings by selecting the profile menu in the BR4. This shows what profiles are loaded into your BR4. It also displays which ballistic profile is being used to compute your ballistic solution.
To review or select your loaded profiles, short-press the Menu button. Use the Up or Down Arrows to scroll until “Profile” is displayed. Short-press Menu again to enter the “Profile” sub-menu. The Up and Down Arrows will allow you to scroll through the profiles you have loaded into your BR4. The names of each profile correspond to each profile created and loaded from the Revic Ops app. Short press the Fire button to select the desired profile and go back to the profile top menu or press and hold the Fire button to save and exit the Quick Menu.
AMR Mode (
):
“AMR” is the Angle Modified Range mode. This range output will display the Modified Range due to shot inclination. The display will also show the Degrees of Inclination in the lower-left corner of your display.
Select the appropriate profile loaded from the Revic Ops mobile app. Short-press the Menu button to enter the loaded ballistic data. Use the Up and Down Arrow keys to scroll through the data. “dEL” is the option to delete a loaded profile from your BR4. If you want to delete the selected profile from your BR4, short-press the Menu Button. “dEL” will flash. Short-press the Menu button to enter delete mode. “NO” will flash to indicate you have entered profile delete mode. Press the Up or Down Arrow keys to scroll through “NO” and “YES”. Short press the Menu button to delete the current selected profile. The display will automatically flash the next loaded profile.
**NOTE: You cannot modify any loaded data through the BR4. You can only delete a profile if not needed.
Target Mode (
):
Choose between Near, Far, LR Near, or LR Far to range your target. These Target Modes are further defined in the “Measurement Modes” section.
To change with Target Mode; short-press the Menu button to enter the Quick Menu. Use the Up and Down Arrow keys to scroll until you see “Target”. Short-press the Menu button to enter “Target Mode”. Use the Up and Down Arrow keys to select your preferred target mode. Short-press the Fire button to save and go back to the Target Mode Menu or press and hold the Fire button to save and exit the Quick Menu.
***NOTE: The factory setting for the Target Mode is NEAR.
Brightness (
):
There are four options for brightness to choose from: 1 being the dimmest, 4 being the brightest. Use the Up and Down Arrows to choose your setting.
To change with Brightness you want to use; short-press the Menu button to enter the Quick Menu. Use the Up and Down Arrow keys to scroll until you see “brt-1”. Short-press the Menu button to enter the “Brightness” Menu. Use the Up and Down Arrow keys to select your preferred brightness setting. Short-press the Fire button to save and back to the Brightness Menu or press and hold the Fire button to save and exit the Quick Menu.
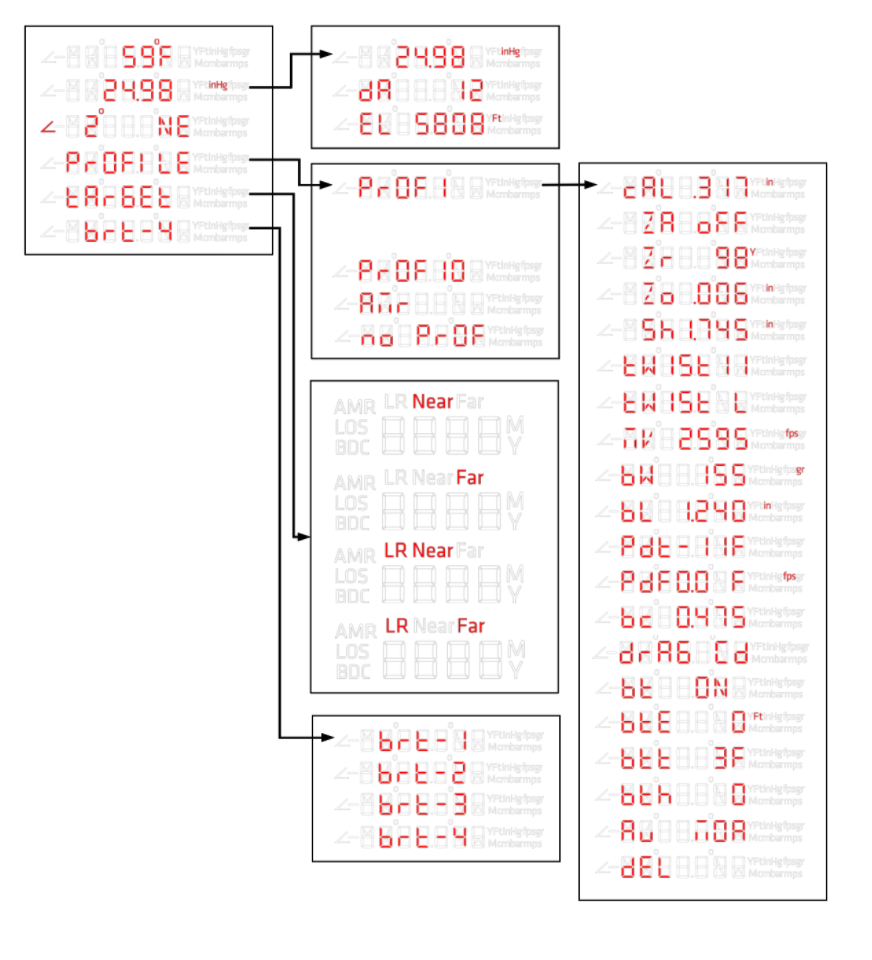
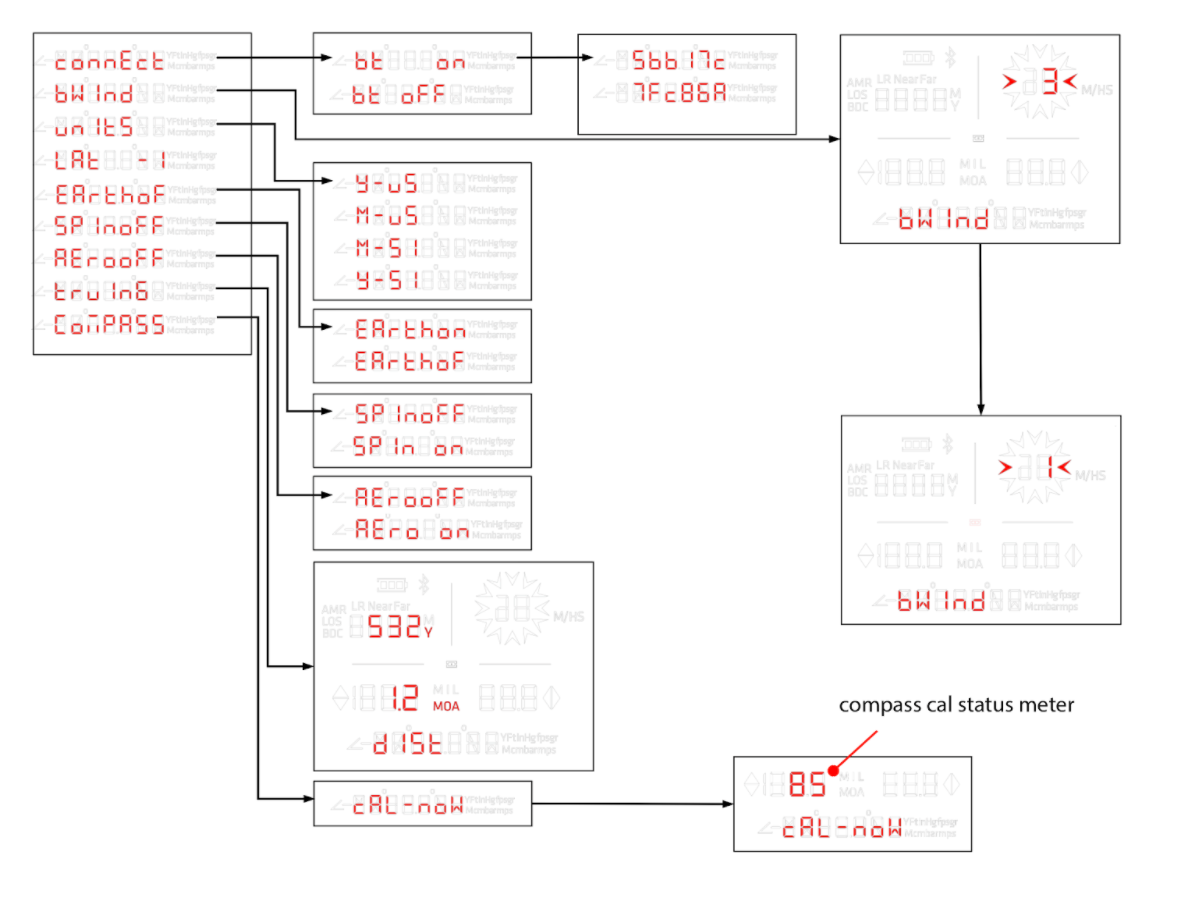
Diagram of Quick Menu User Interface:
SETTINGS MENU
The Settings Menu can be accessed with a press and hold (hold the button down 3 seconds and release) of the Menu button. To scroll through the menu, use the Up and Down Arrow keys. To select, press the Menu button again. To go back, press the Fire button.
Connect (
):
Turn on Bluetooth through this menu. How to connect your device is explained in the “Connect a Device” section.
To activate or deactivate Bluetooth; press and hold the Menu button to enter the Settings Menu. “Connect” is the first available option. This is used to activate or deactivate Bluetooth. “Connect” will be flashing. Short-press the Menu button to enter Bluetooth. The screen will display “bt-on” Use the Up and Down Arrow keys to toggle between “bt-on” (Bluetooth On) and bt-oFF”. When “bt-oFF” is selected, the Bluetooth Icon will disappear from the upper left quadrant of the display. To save the change, short-press the Fire button to exit to the previous screen. Press and hold the Fire button to save and exit the Setting Menu.
***NOTE: The factory setting for the Bluetooth is “bt-on”. This is indicated by the flashing Bluetooth Icon in the upper left quadrant of the display.
Base Wind (
):
Set your Base Wind magnitude that you would like to apply to your ballistic solutions. This turns off Spin Drift, Aerodynamic Jump, and Coriolis. This will apply to all profiles unless it is changed within the other wind functions which is explained in the “Setting Wind” section.
To set your Base Wind magnitude, press and hold the Menu button to enter the Settings Menu. Use the Up and Down Arrow keys to scroll to “bWind”. Short-press the Menu button to enter the Base Wind magnitude adjustment. The wind icon in the upper right quadrant of the screen will illuminate and the wind numerical value will flash. Use the Up and Down Arrow keys to adjust the magnitude of the Base Wind. To save the changes, short-press the Fire button to exit to the previous screen. Press and hold the Fire button to save and exit the Settings Menu.
Figure 9: Base Wind Magnitude adjustment display

Units(
):
Choose between your preference of measurement.
a. Y/US outputs yards for distance and US units for everything else within the BR4.
b. Y/SI outputs yards for distance and SI (System International) units for everything else within the BR4.
c. M/US outputs meters for distance and US units for everything else within the BR4.
d. M/SI outputs meters for distance and SI (System International) units for everything else within the BR4.
Figure 10: LCD with different units selected
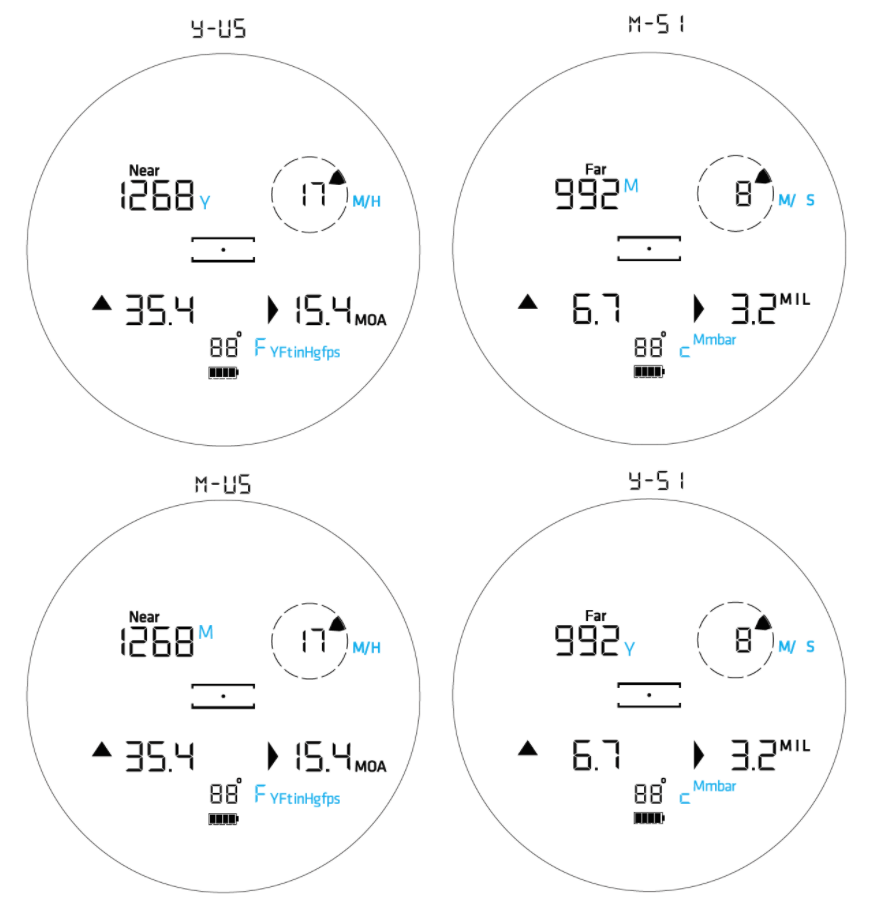
To set your desired units, press and hold the Menu button to enter the Settings Menu. Use the Up and Down Arrow keys to scroll to “unItS”. Short-press the Menu button to enter the Units menu. Use the Up and Down Arrow keys to change the units of measure. To save the changes, short-press the Fire button to exit to the previous screen. Press and hold the Fire button to save and exit the Settings Menu.
Latitude (
): Latitude can only be adjusted manually through the BR4.
To set your current Latitude, press and hold the Menu button to enter the Settings Menu. Use the Up and Down Arrow keys to scroll to “Lat XX”. Short-press the Menu button to enter the Latitude menu. “XX” will be flashing on the display. Use the Up and Down Arrow keys to change the Latitude. To save the changes, short-press the Fire button to exit to the previous screen. Press and hold the Fire button to save and exit the Settings Menu.
***NOTE: “XX” represents the latitude of your current location. For example, the display could show “LAt 45”. In this case, “XX” is the numerical value 45.
Coriolis Effect(
):
You can turn this function on or off through the BR4 and it will apply for all profiles chosen.
To turn Earth on or off; press and hold the Menu button to enter the Settings Menu. Use the Up and Down Arrow keys to scroll to “Erth on”. Short-press the Menu button to enter this menu. The screen will display “Erth on” and the “on” will be flashing. Use the Up and Down Arrow keys to toggle between “Erth on” and “ErthoFF”. To save the change, short-press the Fire button to exit to the previous screen. Press and hold the Fire button to save and exit the Settings Menu.
Spin Drift(
):
The Spin Drift function can be turned on or off through your BR4 and apply to all profiles.
To turn Spin Drift on or off; press and hold the Menu button to enter the Settings Menu. Use the Up and Down Arrow keys to scroll to “SPIn on”. Short-press the Menu button to enter this menu. The screen will display “SPIn on” and the “on” will be flashing. Use the Up and Down Arrow keys to toggle between “SPIn on” and “SPInoFF”. To save the change, short-press the Fire button to exit to the previous screen. Press and hold the Fire button to save and exit the Settings Menu.
Aerodynamic Jump(
):
You can turn this function on or off through the BR4. This will apply for all the loaded profiles in your BR4.
To turn Aerodynamic Jump on or off, press and hold the Menu button to enter the Settings Menu. Use the Up and Down Arrow keys to scroll to “AEro on”. Short press the Menu button to enter this menu. The screen will display “AEro on” and the “on” will be flashing. Use the Up and Down Arrow keys to toggle between “AEro on” and “AERooff”. To save the change, short-press the Fire button to exit to the previous screen. Press and hold the Fire button to save and exit the Settings Menu.
Truing(
):
Truing can be adjusted through your Revic App or through the BR4.
To adjust Truing, range your target first and then press and hold the Menu button to enter the Settings Menu. Use the Up and Down Arrow keys to scroll to “truInG”. Short-press the Menu button to enter this menu. The screen will display “XX Y” in the upper display and the “.0 MOA” will be flashing. The bottom of the display will show “adjust” Use the Up and Down Arrow keys to increase or decrease the MOA value from the base MOA reading. Short-press the Menu Button to advance to the next screen. “bc 0.XXX” will display with “bc” flashing. Use the Up and Down Arrow keys to toggle between “bc 0.XXX” and MV XXXX. If you want to change the ballistic coefficient, select “bc”. If you want to change the muzzle velocity, select “MV”. Short-press the Menu button to make your selection. “dnE” will display on the display. Your truing corrections have now been saved. Short-press the Fire button to exit to the previous screen. Press and hold the Fire button to save and exit the Settings Menu.
Compass(
):
Use this option to calibrate your device and establish a baseline for North.
To calibrate the Compass in the BR4, press and hold the Menu button to enter the Settings Menu. Use the Up and Down Arrow keys to scroll to “Cal Now”. This will flash with a numerical value starting at “0”. Rotate the BR4 along all axes on the BR4. Rotate in a gyroscopic motion. The numerical value indicates the percentage complete for calibration. Once complete, “cal-dNe” will display on the screen. Press and hold the Fire button to save and exit the Settings Menu.
Figure 11: Diagram of Compass Calibration Rotation
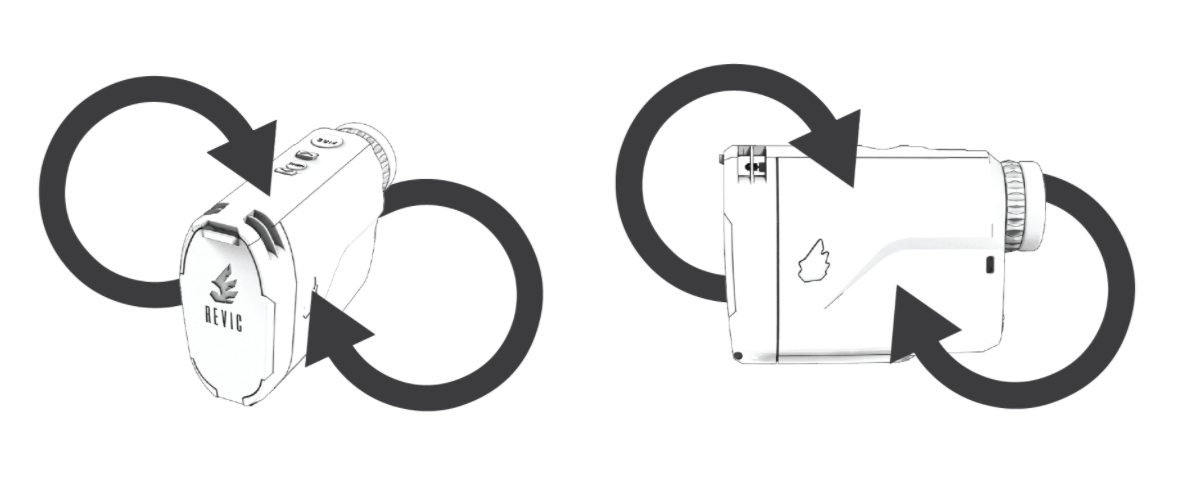
Diagram of Settings Menu User Interface:
Figure 12: Settings Menu Interface
Section 6 – Modes
Range Only Mode
While it is possible to get range measurements up to 4,000 yards, measurement results vary depending upon the reflectivity of the target being ranged and the environmental conditions.
1. Look through the eyepiece and use the center of the reticle to aim at the target.
2. Press and hold the FIRE button. The crosshairs are displayed while the laser is active. A Scan mode will start after 0.5 seconds of the laser firing. The SCAN will continue for up to 10 seconds.
3. If the target is not acquired in the 10-second period, release the FIRE button, and repeat step 2. After 10 seconds, the laser will no longer be active.
4. Once the measurement is displayed, release the FIRE button. The line-of-sight distance will briefly be displayed and then the display will be updated with the ballistic solution.
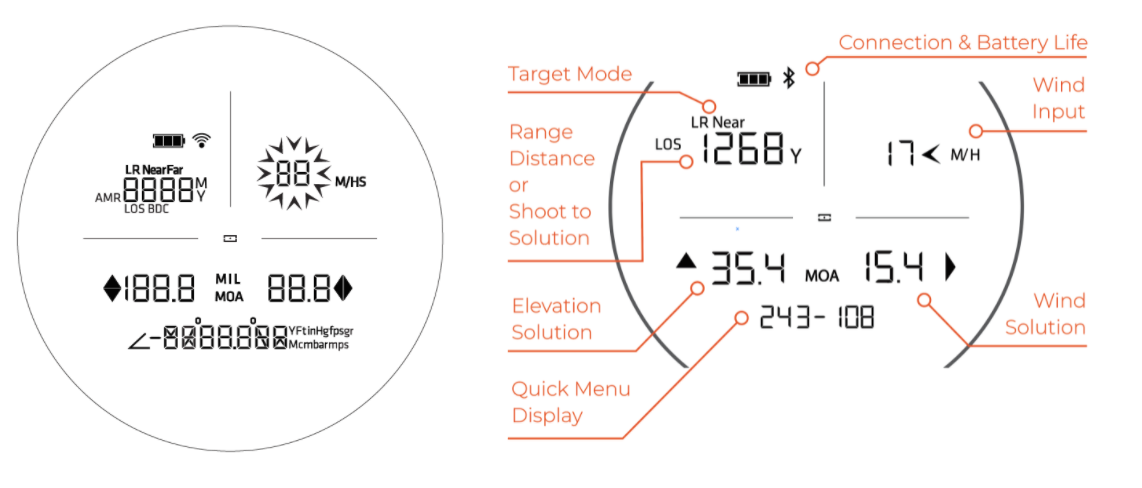
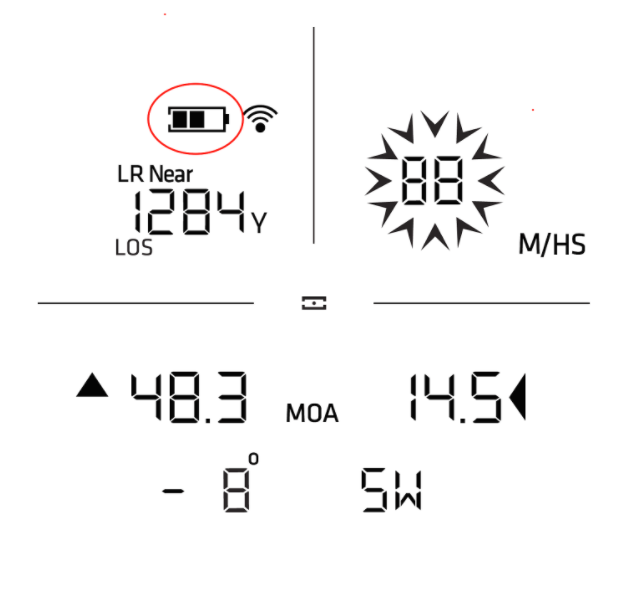
BDC mode (Labeled Ballistic Turret in the Revic Ops mobile app): ‘BDC’ will appear in the Upper left-hand display and alternates to Line of Sight (LOS), to indicate the Shoot-To-Range (BDC or corrected distance) and LOS distance.
**NOTE: BDC selection is driven from the Revic Ops mobile app. This setting cannot be changed in the BR4.
Figure 13: Sample of Display with BDC turned on
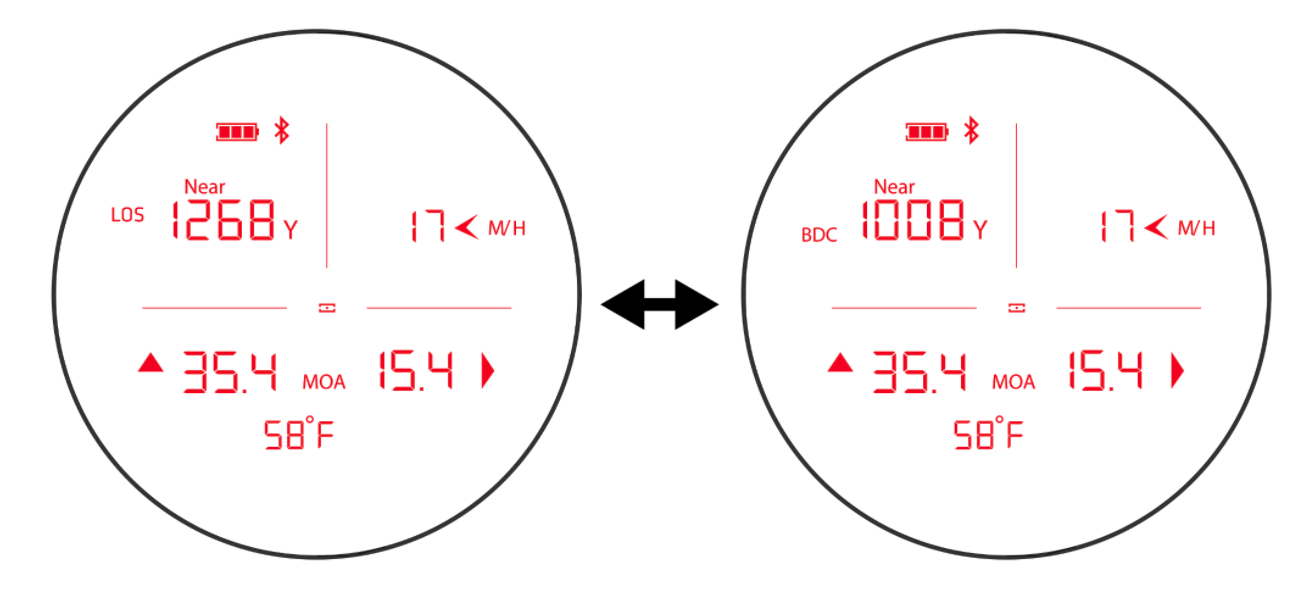
In MOA, MILs: the correction will be displayed in the lower-left corner indicated by MIL / MOA. LOS distance is displayed in the upper left corner with LOS
**NOTE: MOA / MIL selection is driven from the Revic Ops mobile app. This setting cannot be changed in the BR4.
Range Mode
No Ballistic Calculation
a. Line of Sight Only
b. Angle Modified Range and LOS range alternate back and forth
Ballistic Calculation
a. Ballistic calculations are always shown along with Distance (MOA or MIL is a profile setting) BDC off will only display LOS (profile setting)
b. If BDC is turned on, the range output will alternates between the LOS range and BDC range (profile setting)
Scan Mode
A Scan mode will start after 0.5 seconds of the laser firing. The SCAN will continue for up to 10 seconds, giving you different ranges as different targets are acquired. If you have difficulty getting a range due to poor reflective properties of the desired target. If this occurs, press and hold the Fire button while aiming the device at your intended target. The BR4 will continuously emit laser pulses to acquire target distance data.
Targeting Modes
The BR4 allows you to select or eliminate targets to obtain the most accurate measurements possible in various field conditions. You can choose between the four targeting modes through your quick menu:
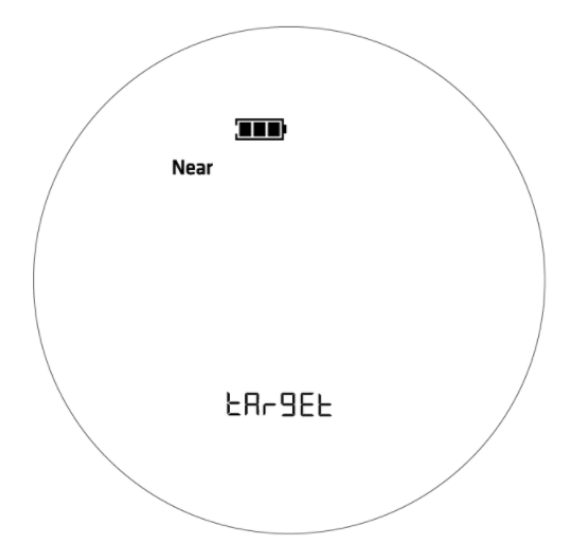
Near: Allows for easy acquisition of small targets without inadvertently getting background targets that have stronger signal strength. The “Near” display indicator appears above the range in the upper left display. This mode will typically ignore far out objects and only pick up the closest/strongest objects.
Figure 14: Near Targeting Mode sample display
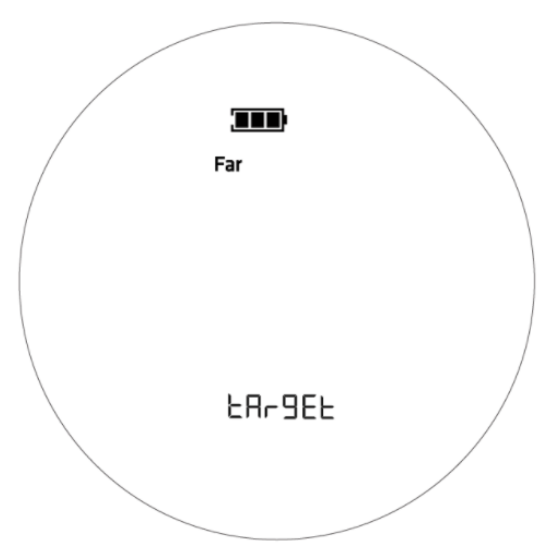
Far: Allows obstructions such as brush or fog to be ignored so that only background targets are acquired. The “Far” display indicator appears above the range in the upper left display. This mode will typically ignore close objects and will only look at the farthest objects.
Figure 15: Far Targeting Mode sample display
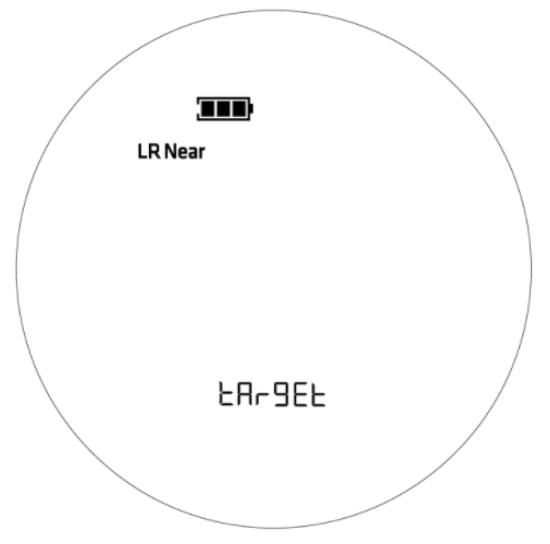
Long Range Near: Allows for more accurate target differentiation by acquiring more data of the intended target area. The “LR Near” display indicator appears above the range in the upper left display. This mode takes in more data than the non-Long Range modes so we suggest using a stabilizer (such as a tripod) when ranging in this mode. Use this if you cannot find your solution using “Near” mode.
Figure 16: Long Range Near Targeting Mode sample display
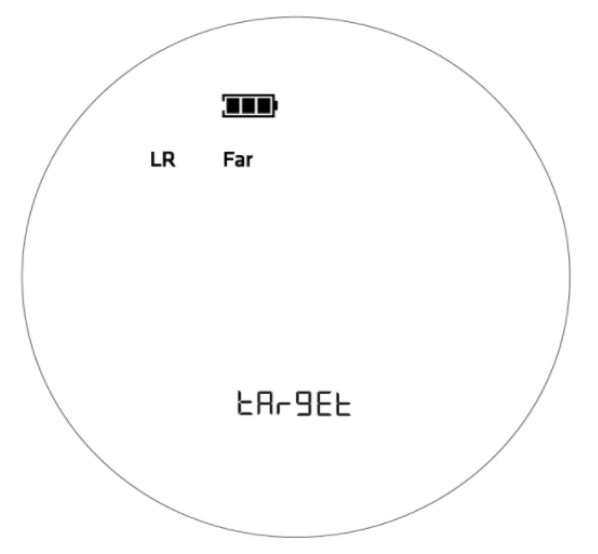
Long Range Far: Allows obstructions such as brush or fog to be ignored so that only background target data is displayed. The “LR Far” display indicator appears above the range in the upper left display. This mode takes in more data than the “Far” mode so we suggest using a stabilizer (such as a tripod) when ranging in this mode. Use this if you cannot find your solution using “Far” mode.
Figure 17: Long Range Far Targeting Mode sample display
Section 7 – Setting Wind
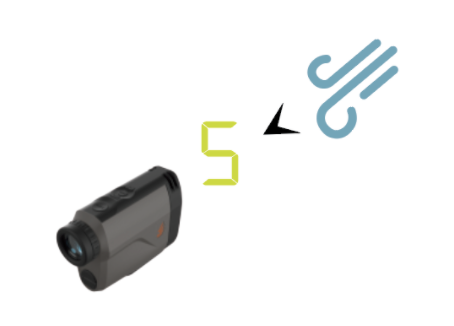
Wind Vector Input: Wind vector input provides more accurate wind solutions. It enables both wind direction and speed input and compensates for headwind and tailwind, aerodynamic jump, and spindrift.
To change Wind Vector input:
From the main display, short press either the Up or Down Arrow keys to set the wind direction. When the vector indicator flashes, use the Up or Down Arrow keys to move the vector indicator to reflect the current wind direction. Short press “Menu” to switch to speed input.
Figure 18: Base Wind Vector input sample diagram
The Wind magnitude numerical value will flash. Use the Up and Down Arrow keys to adjust the Wind magnitude value.
To set your Base Wind magnitude, press and hold the Menu button to enter the Settings Menu. Use the Up and Down Arrow keys to scroll to “bWind”. Short-press the Menu button to enter the Base Wind magnitude adjustment. The wind icon in the upper right quadrant of the screen will illuminate and the wind numerical value will flash. Use the Up and Down Arrow keys to adjust the magnitude of the Base Wind. To save the changes, short-press the Fire button to exit to the previous screen. Press and hold the Fire button to save and exit the Settings Menu.
Figure 19: Base Wind Magnitude input sample display

* NOTE: The Gunwerks wind bracketing technique works well to estimate the base wind at 5 mph.
Section 8 – Truing
In some instances, it is necessary to adjust your ballistic profile to represent real-world performance (i.e. lower the projected impact provided by the ballistic profile). You will use the Truing function to do this.
To adjust Truing, range your target first and then press and hold the Menu button to enter the Settings Menu. Use the Up and Down Arrow keys to scroll to “truInG”. Short-press the Menu button to enter this menu. The screen will display “XX Y” in the upper display and the “.0 MOA” will be flashing. The bottom of the display will show “adjust” Use the Up and Down Arrow keys to increase or decrease the MOA value from the base MOA reading. Short-press the Menu Button to advance to the next screen. “bc 0.XXX” will display with “bc” flashing. Use the Up and Down Arrow keys to toggle between “bc 0.XXX” and MV XXXX. If you want to change the ballistic coefficient, select “bc”. If you want to change the muzzle velocity, select “MV”. Short-press the Menu button to make your selection. “dnE” will display on the display. Your truing corrections have now been saved. Short-press the Fire button to exit to the previous screen. Press and hold the Fire button to save and exit the Settings Menu.
This should adjust the rest of your ballistic data and the value will be saved into your current profile.
***NOTE: the Truing function is not available if no profile is selected and/or no range has been obtained.
Section 9 - APPENDIX
Care & Maintenance
The battery is the only user-replaceable part in the BR4. Do not remove any screws or disassemble your BR4. This will void the limited warranty.
Low Battery Warning
The BR4 monitors the incoming battery voltage. It is located on the left side of the LCD, just above the yards indicator.
• The BR4 has a constant battery power indicator. When the battery indicator reaches one bar, we suggest you replace the battery as soon as possible.
• Although the unit still operates, it is recommended that you install a new battery before making changes to a profile or go on a hunt.
• When the voltage drops below one bar, the system operation is locked and then powers off.
• You must replace the battery to return to normal system operation. All profiles will be saved.
Protecting from Moisture and Dust
The BR4 is IP67 rated, which means it is sealed to provide protection from dust and rain, but will not withstand prolonged submersion (1-meter submersion up to 30 minutes).
Precautions
-
Avoid staring directly at the laser beam for prolonged periods
-
The BR4 is designed to meet FDA eye safety requirements and is classified as eye-safe to Class 1 limits, which means that virtually no hazard is associated with directly viewing the laser output under normal conditions. As with any laser device, however, reasonable precautions should be taken in its operation. It is recommended that you avoid staring into the transmit aperture while firing the laser.
-
-
Never point the unit directly at the sun
-
Exposing the lens system to direct sunlight, even for a brief period, may permanently damage the internal components and may cause permanent eye damage.
-
-
Avoid direct sun exposure on the eyepiece
-
Exposing the eyepiece to direct sunlight can damage the internal display. The eyepiece cover should be in place when the unit is not in use.
-
-
Do not expose the instrument to extreme temperatures
-
BR4 components are rated for a temperature range of -4°F to 140°F.
-
Protecting from Shock
The BR4 is a precision instrument and should be handled with care. It will withstand a reasonable drop shock.
Transport
When transporting the BR4, the unit should be secured in the provided carrying case. The eyepiece cover should be in place whenever the BR4 is not in use.
Cleaning
Clean the BR4 after each use, before returning it to its carrying case. Check all of the following items:
• Moisture: If the unit is exposed to excess moisture, towel off excess moisture and air dry the instrument at room temperature with the battery removed and the battery compartment open.
• Exterior dirt: Wipe exterior surfaces clean to prevent grit buildup in the carrying case. Isopropyl alcohol may be used to remove dirt and fingerprints from the exterior.
• Transmit and receive lenses: Cleaning the lenses after each use is suggested. Failure to keep the lenses clean may cause damage.
Storing
If you won’t be using the BR4 again soon, remove the battery before storing the instrument. The storing temperature should be between -13 to 140 degrees Fahrenheit.
Warranty and Service
Revic Optics, a subsidiary of Gunwerks LLC, warranties the mechanical and optical parts of their products to be free from defects in material and workmanship for a period of five (5) years, and the electronic parts for a period of two (2) years from the date of purchase.
After the manufacturer’s warranty period, Revic Optics at its sole discretion will cover the costs of labor and/or materials of repairs for mechanical and optical parts for an additional period of five (5) years, and for electronics parts for a period of three (3) years on a goodwill repair basis. There is no legal entitlement to goodwill repairs.
During the warranty period, if the product is found to have a defect in material or workmanship, Revic Optics will, at its option and without charge for labor and materials, repair or replace the defective parts or the product. If the product is no longer available, Revic Optics reserves the right to replace the product with an equivalent product offered for sale at the time of the repair.
This limited warranty does not cover failures resulting from abuse, negligence, or unauthorized alterations, modifications or repairs. Wear parts such as rubber armoring, eyecups, carrying straps or cases and direct or indirect damages caused by defects in the product are not covered by the warranty.
This warranty is only valid with proof of purchase or warranty repair documentation from Revic Optics (RMA). Return shipping will be provided for warranty repairs. If the product is shipped abroad any duties or taxes incurred must be paid by the customer. Products without a proof of purchase will be repaired at the customer’s expense.
If other warranties or guarantees (either statutory or voluntary) are agreed to in other countries they must be fulfilled by the agreeing parties. This warranty is granted by Revic Optics, a subsidiary of Gunwerks LLC. The place of jurisdiction is Park County, Wyoming USA.
To complete the warranty registration process for your product please visit www.gunwerks.com/productregistration
Should you require assistance or service, please submit a support request to https://www.gunwerks.com/helpdesk/customer-care-15 or call (307) 296-7308
Legal
Copyright (c) [2021] Gunwerks, LLC. All Rights Reserved
Information in this document is subject to change without notice. No part of this manual may be reproduced in any form or by any means, electronic or mechanical, including photocopying, recording, or information storage and retrieval systems, for any purpose other than the purchaser’s personal use, without express written consent.
This product is covered by patents pending and the following US Patents: Find our patents at patent-list.info
Gore-Tex is a registered trademark of W. L. Gore and Associates. Google Play Store is a registered trademark of Google, LLC. App Store® is a registered trademark of Apple Inc. All other trademarks are the property of their respective owners.