BLR10b Laser Rangefinding Binocular
HOW TO VIDEOS
Unboxing & Setup
Menus & Navigation
Sync & Select Ballistic Profiles
Ranging a Target
Ballistic Solutions
INSTRUCTION MANUAL
Introducing the BLR10b
Congratulations on your purchase of the Acura BLR10b Binocular Laser Rangefinder 10x42 with Ballistics! Your BLR10b combines an excellent binocular, with an integrated laser rangefinder, a weather station, and a powerful ballistic solver using our proprietary Revic Ballistic Engine.
If you have loaded a ballistic profile from the Revic Ops app, when you press the FIRE button, on-board sensors measure distance, incline angle, barometric pressure, temperature, and compass bearing and send the data to the on-board ballistic solver to provide a fast firing solution.
The BLR10b features Base Wind and Vector Wind modes for basic and advanced solutions configured to provide ultra-fast corrections displayed as a Shoot-To-Range in BDC, MOA or MILs at the measured distance.
The BLR10b uses Bluetooth to communicate with the Revic Ops app, Revic rifle scopes, or other peripheral devices, and uses the Revic targeting modes including Long Range Mode to measure distance in the toughest conditions.
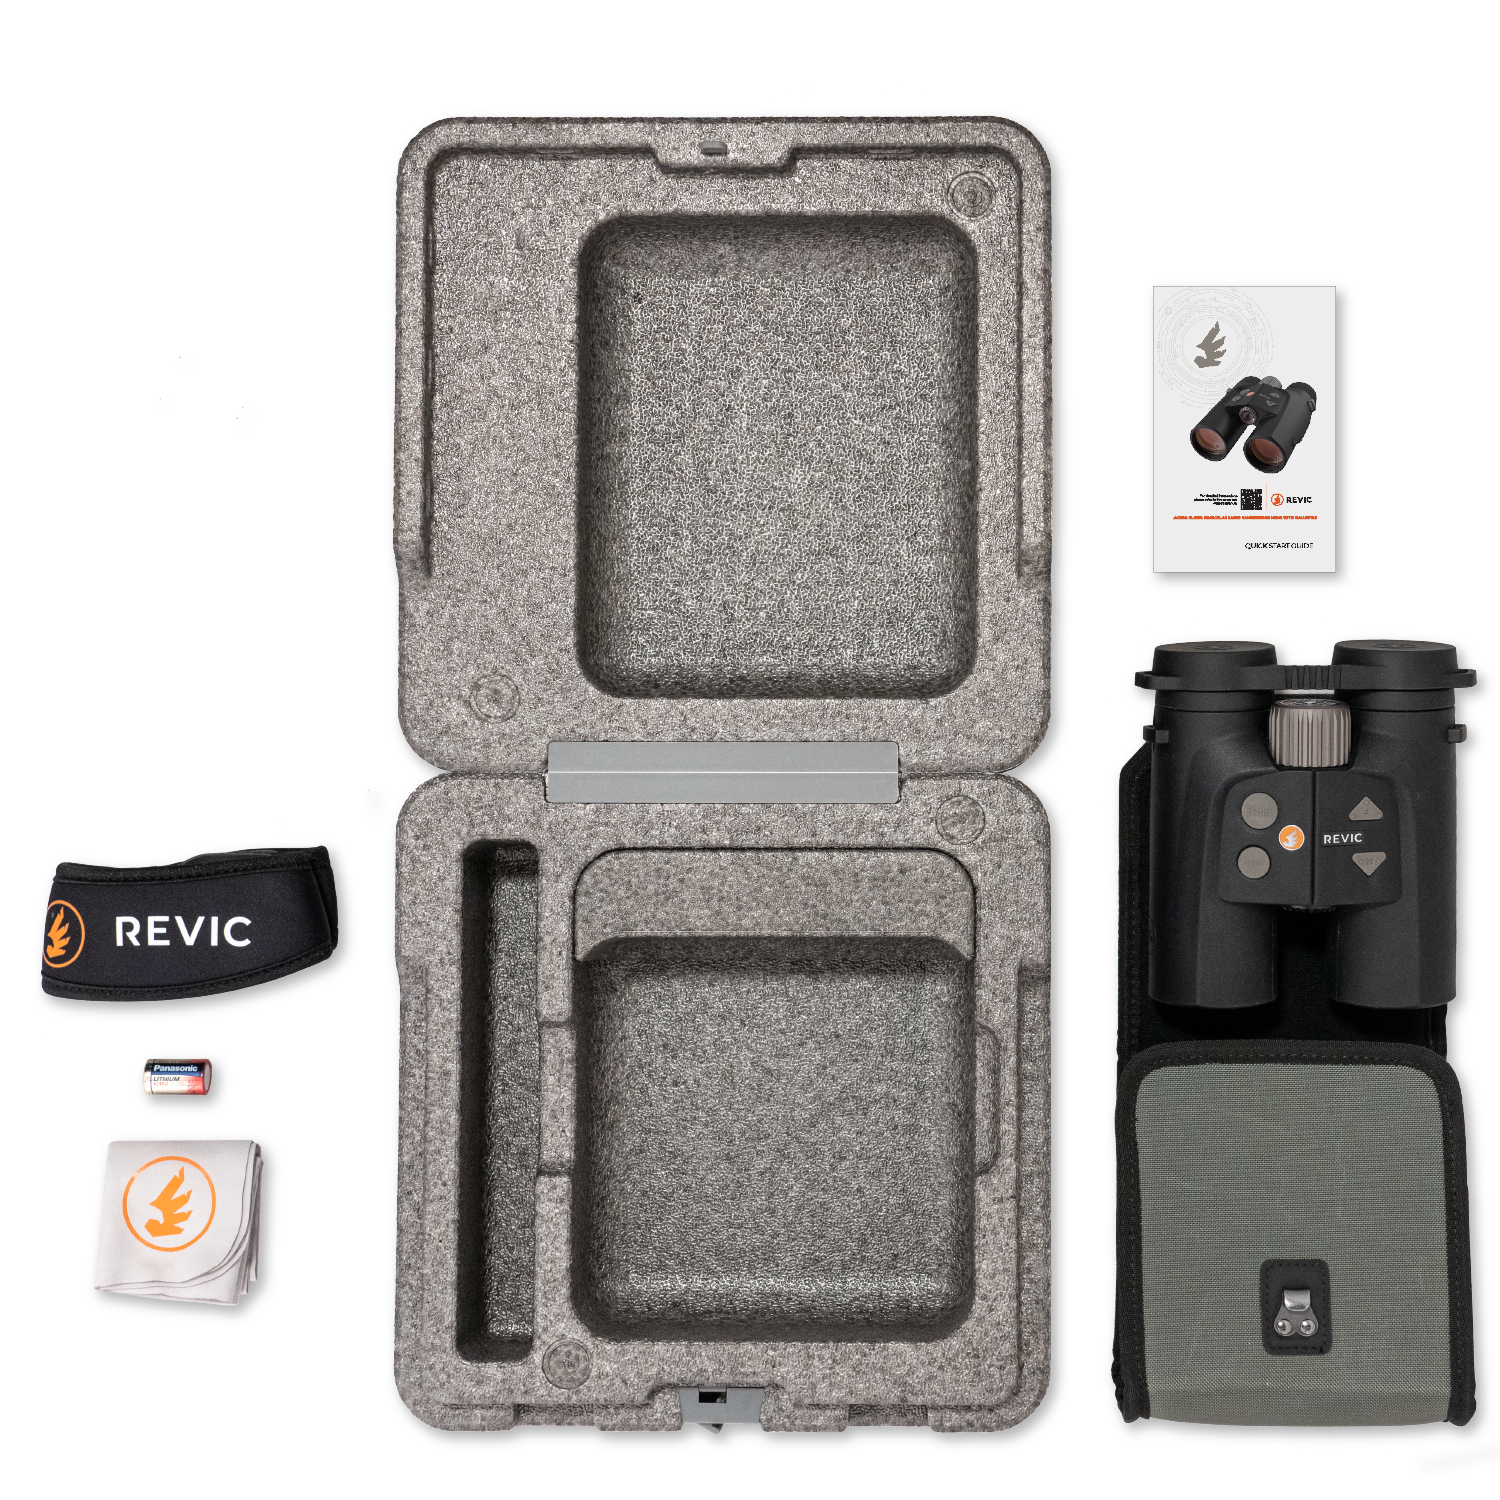
What's in the Box
-
Binocular
-
Soft carrying case
-
Carry Strap
-
Lens Cleaning Cloth
-
CR2 Battery
-
Quick Start Guide

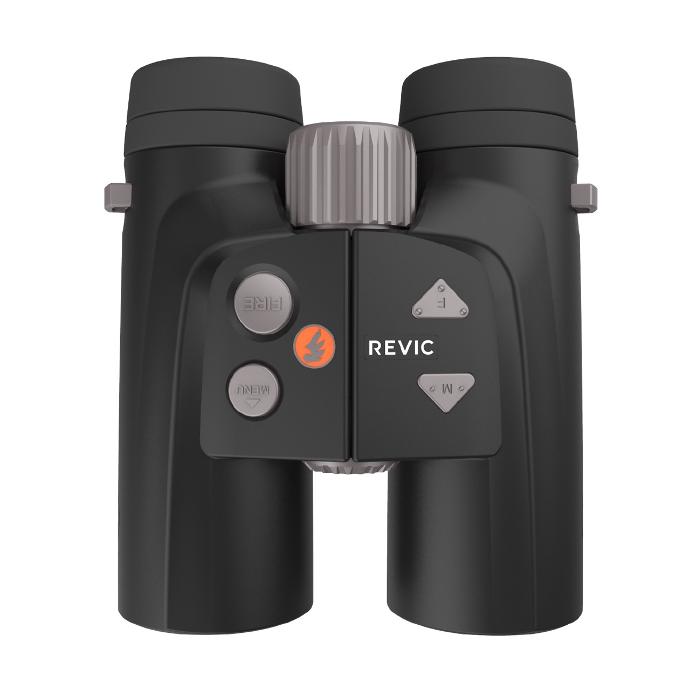
Product Identification

B. Image Focus
C. Eyecup
D. Display Focus
E. Battery Compartment
F. FIRE Button
G. MODE button
H. Tripod Attachment Point
I. Device Information Panel
J. UP Button
K. DOWN Button
Safety Warning
The Acura BLR10b is designed to meet FDA eye safety requirements and is classified as eye-safe to Class 1M limits, which means that virtually no hazard is associated with directly viewing the laser output under normal conditions. As with any laser device, however, reasonable precautions should be taken in its operation.Setting Up Your Binocular
Battery Installation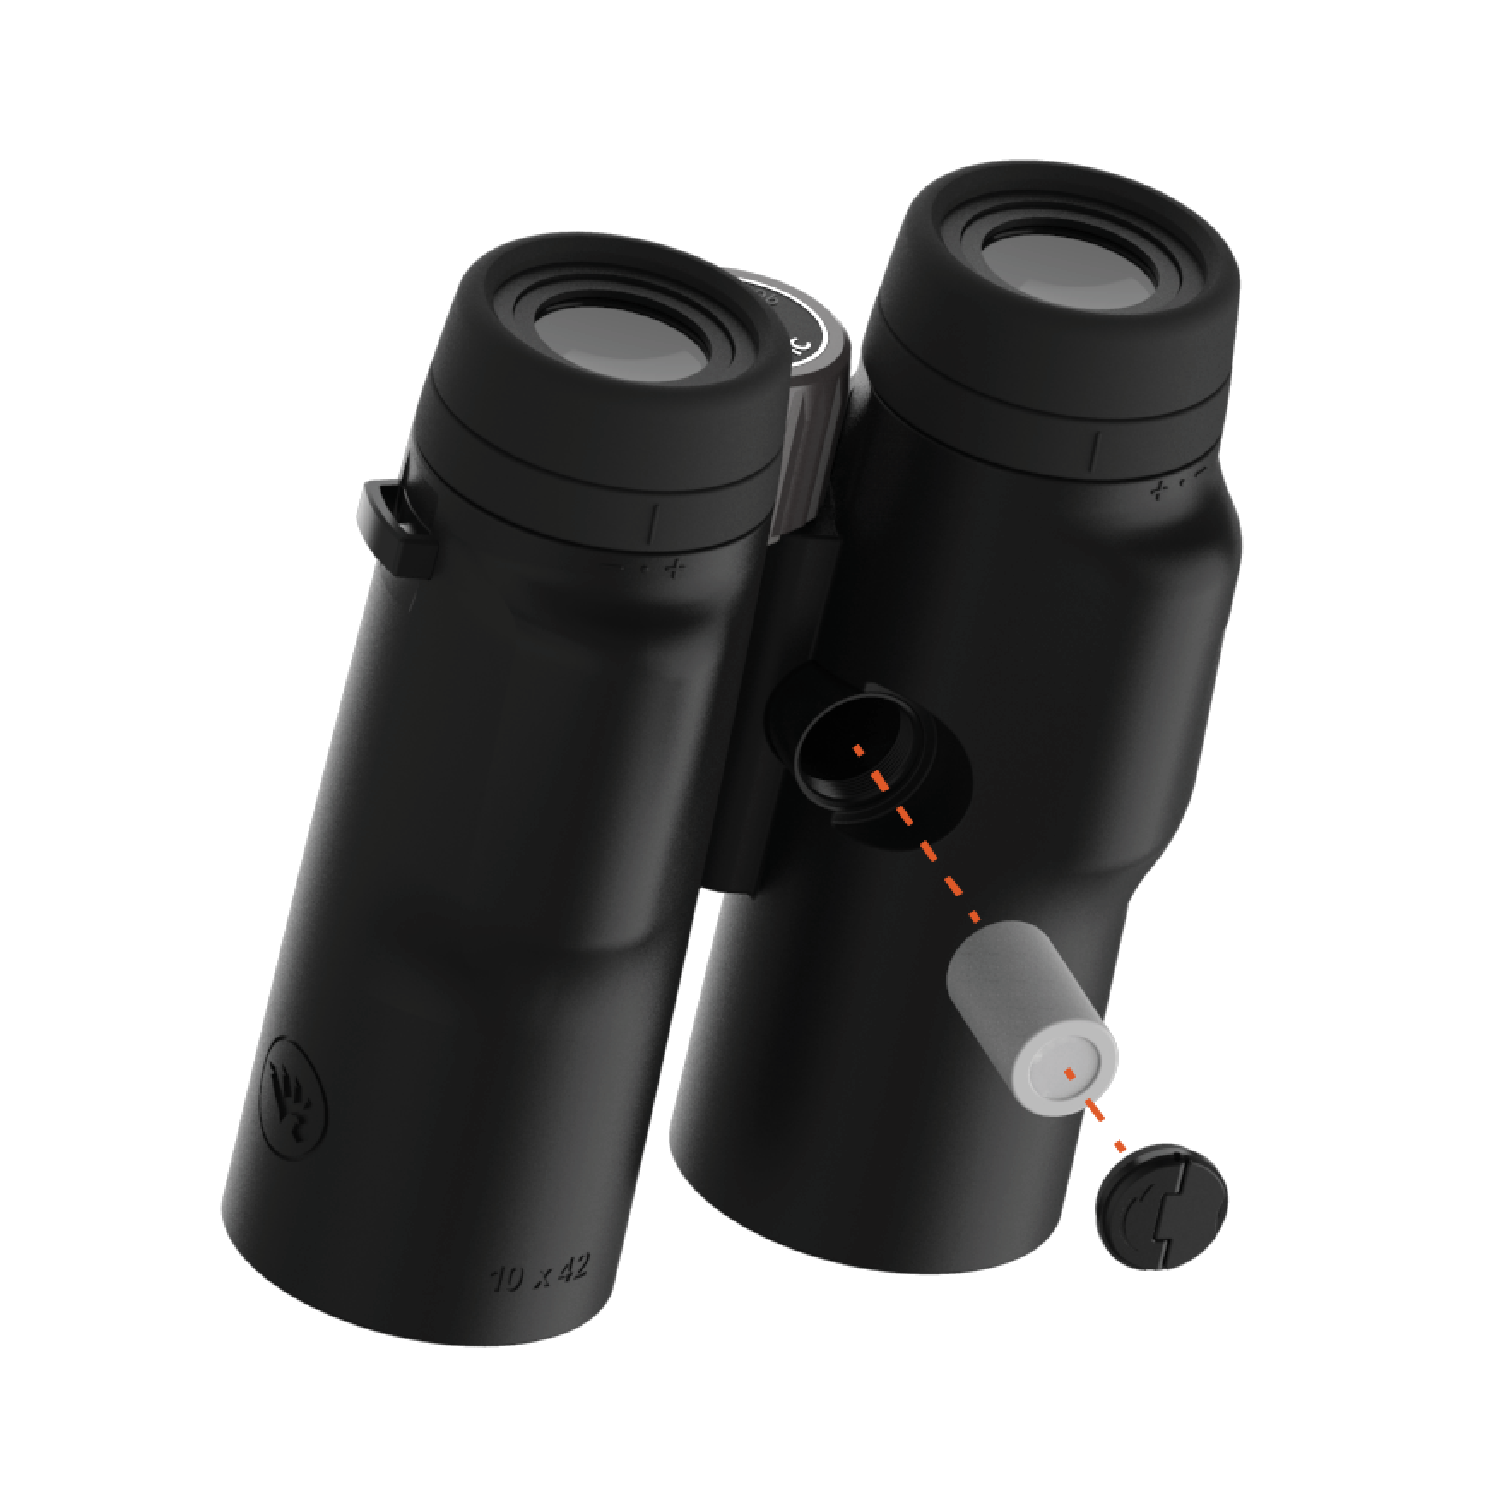
Carry Strap Installation
The Binocular Carry Strap is routed through the attachment points on each side of the Binocular. To attach the carry strap:
-
Pass the strap webbing through the attachment point from the bottom.
-
Thread the strap through the buckle (under the 1st layer of the strap).
-
Adjust the strap to the desired length (ensuring the strap does not slide out of the buckle).
-
Pull the strap tight through the buckle to secure the strap.
Adjusting Eye Relief
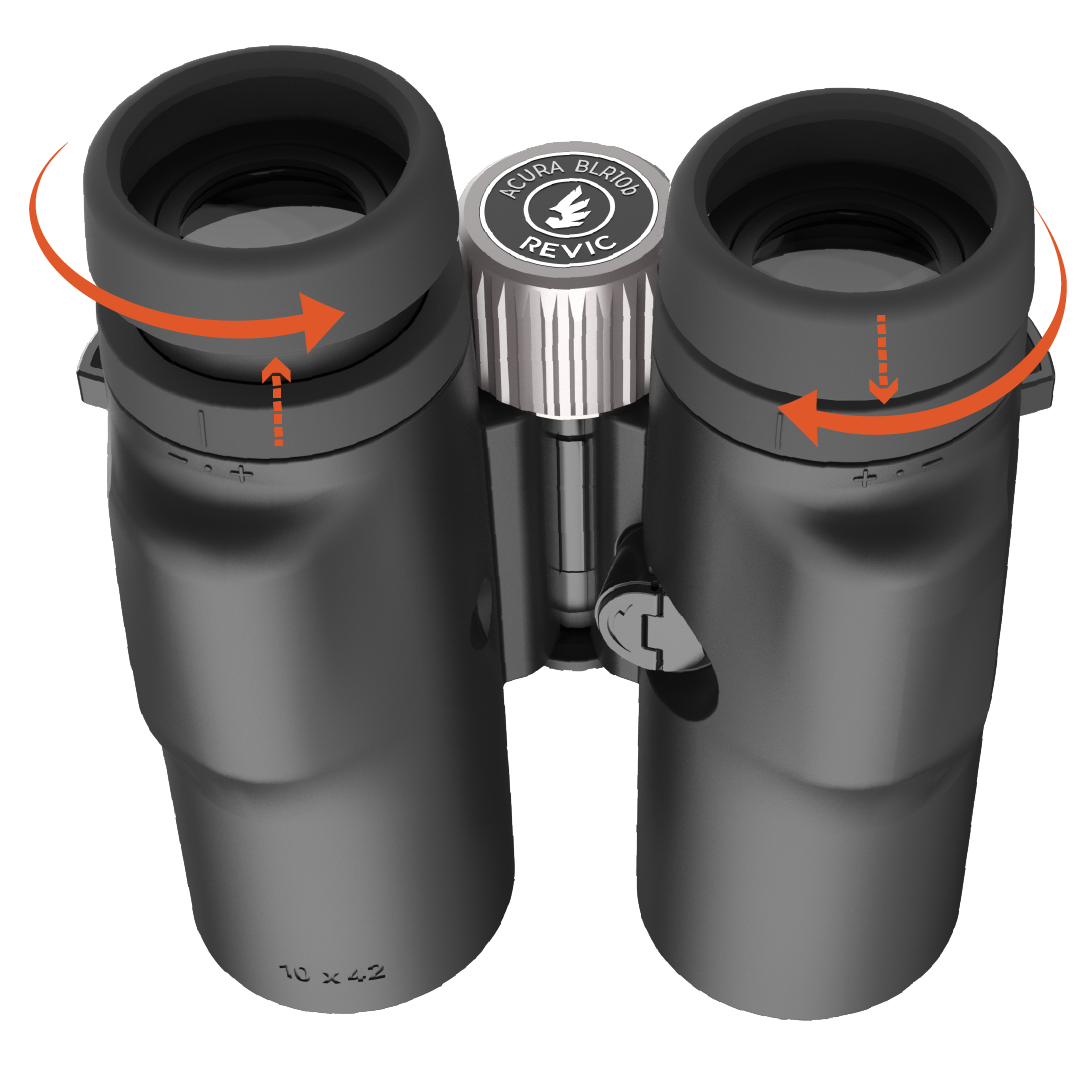
The adjustable eyecups are designed for comfort and to set the correct eye relief. To adjust the eyecup up, increasing the eye-relief, turn it counter-clockwise. To return the eyepiece down, decreasing the eye-relief, turn it clockwise.
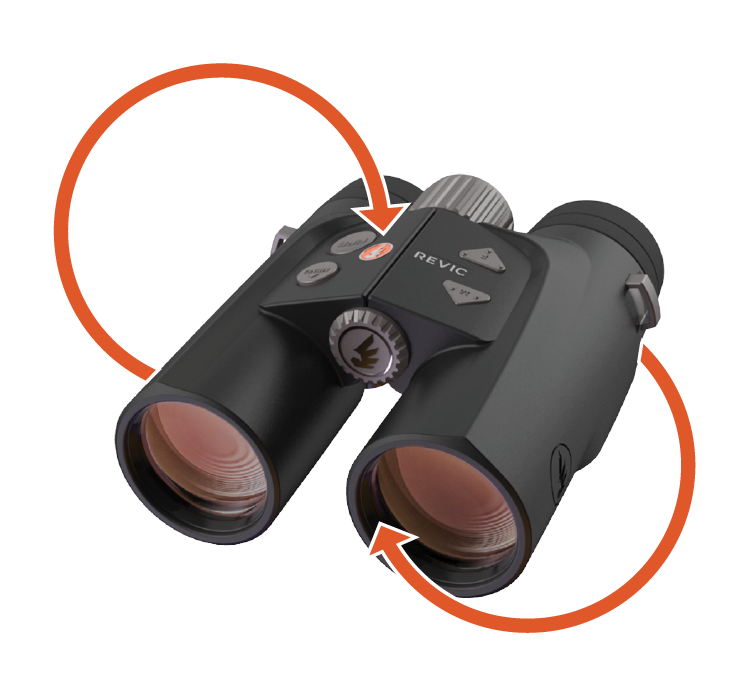
Adjusting Diopter
The two eyepiece diopter adjustment rings allow you to focus the OLED display and the viewable image for each eye independently. To adjust the focus:

-
Cover the right objective lens with your left hand, press the fire button to turn on the display. Turn the (right) Display Focus ring until the display is optimally focused to your right eye.
-
Now cover the left objective lens with your left hand, look through the right barrel at a distant object, then adjust the (center) Image Focus knob until the image is optimally focused to your right eye.
-
Now cover the right objective lens with your right hand, then turn the (left) Diopter Focus ring until the same object is optimally focused to your left eye.
-
Confirm focus and repeat as needed
Menus and Navigation
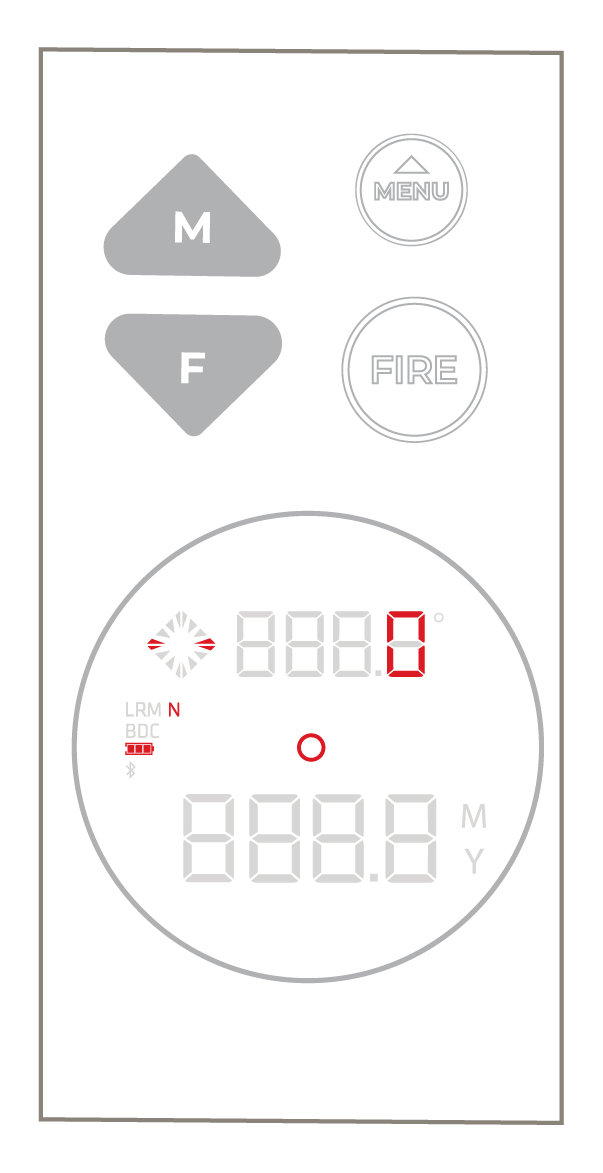
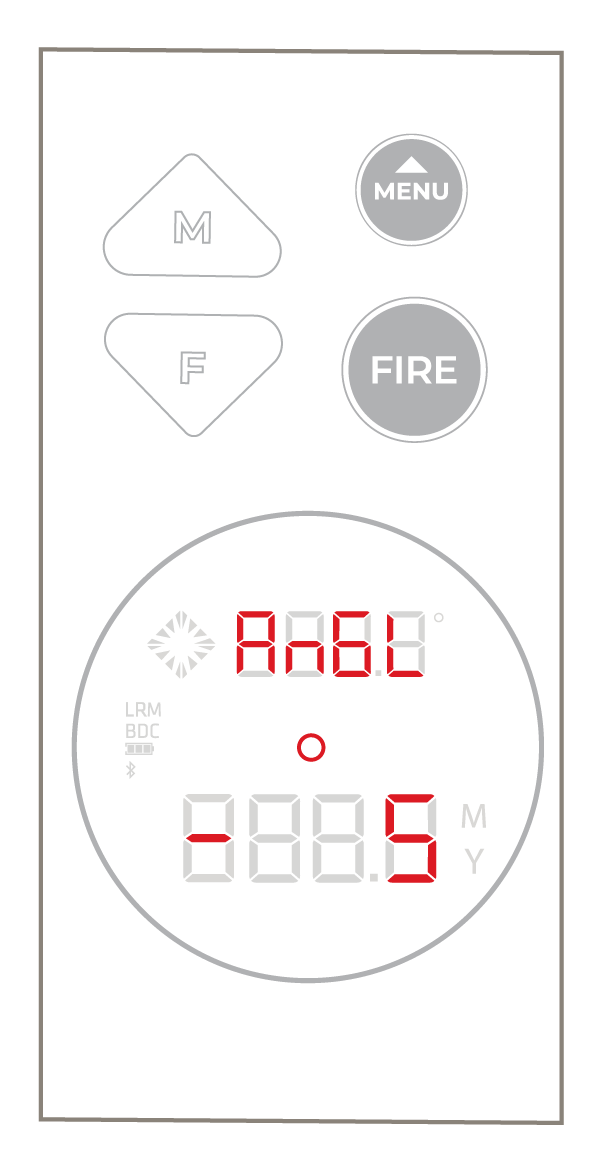
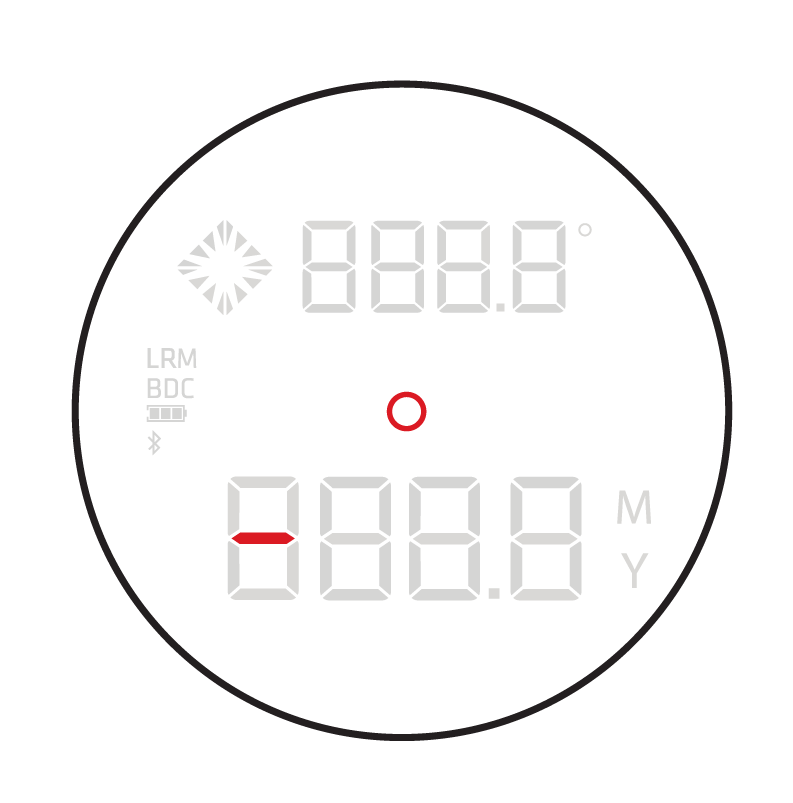
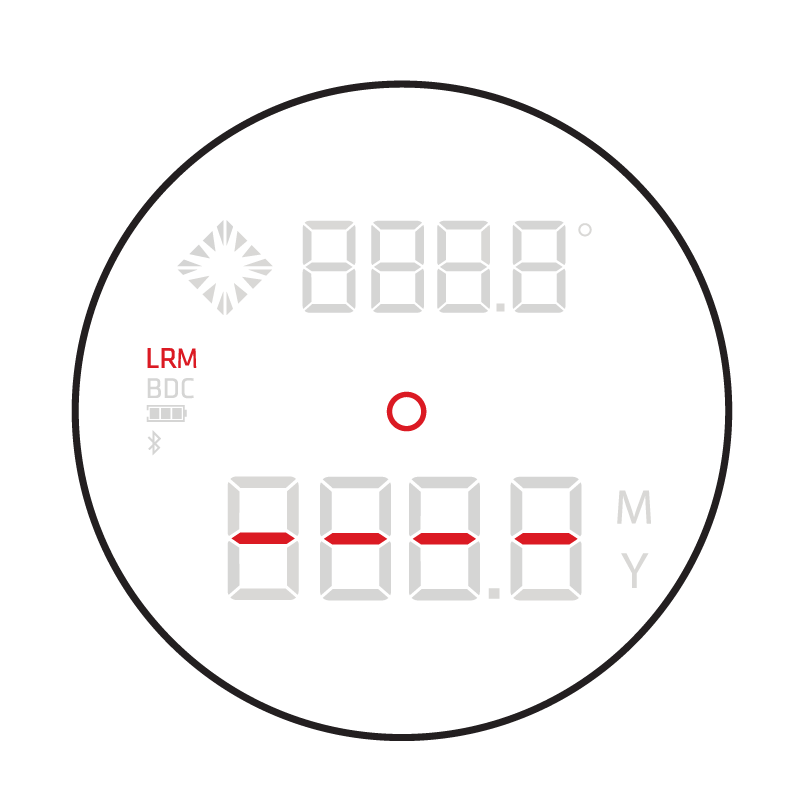
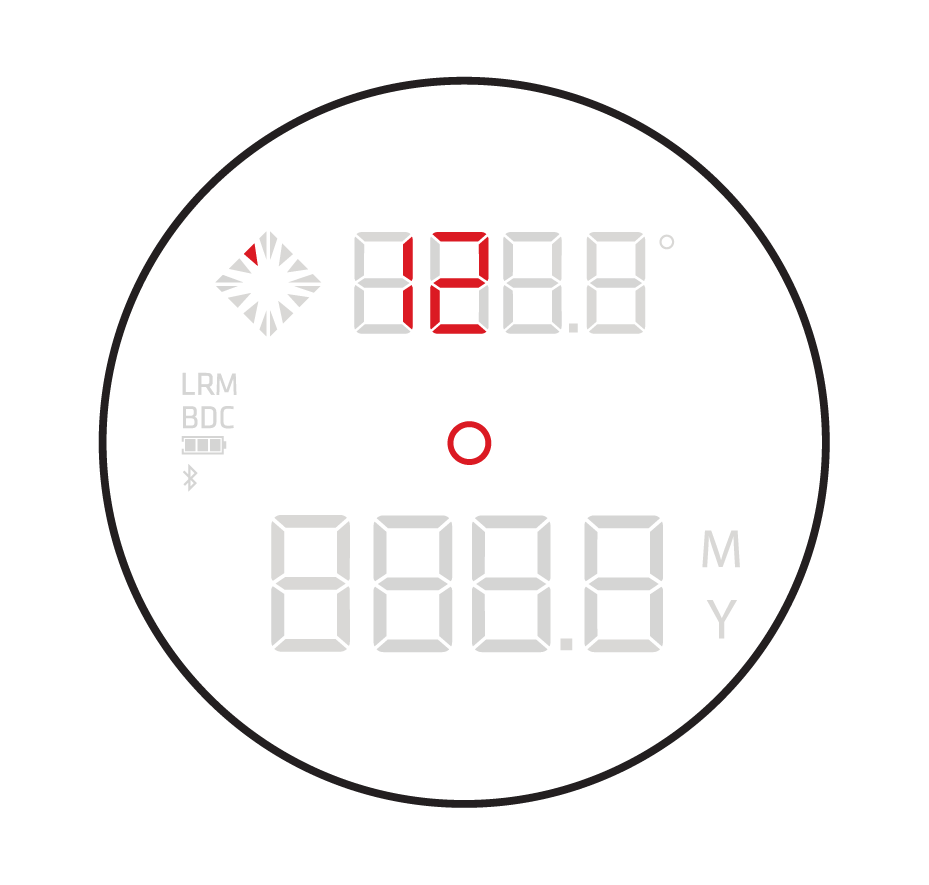
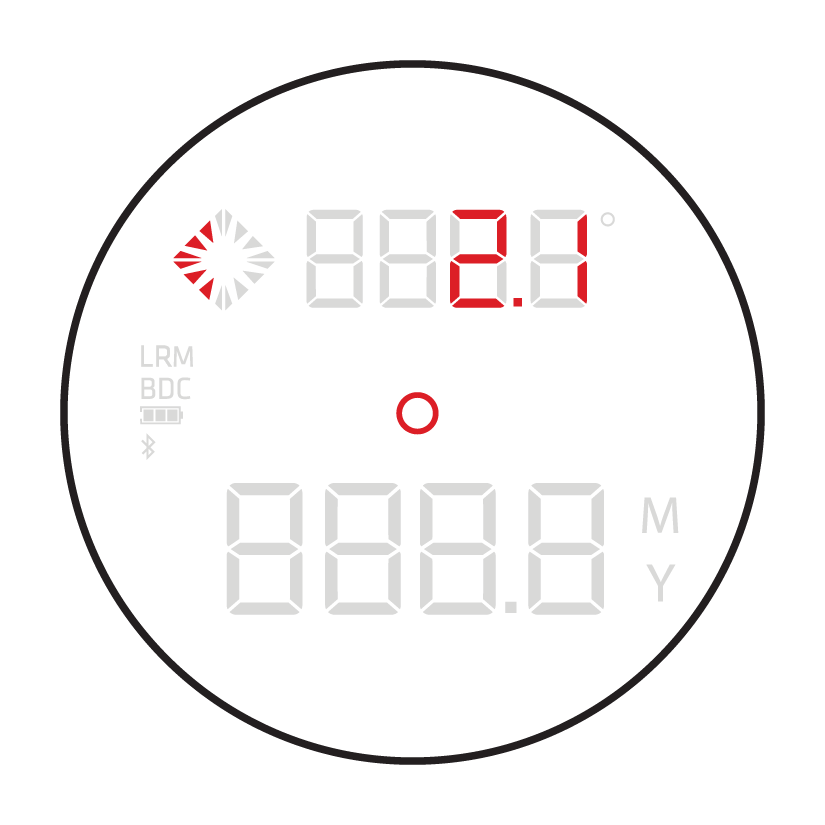
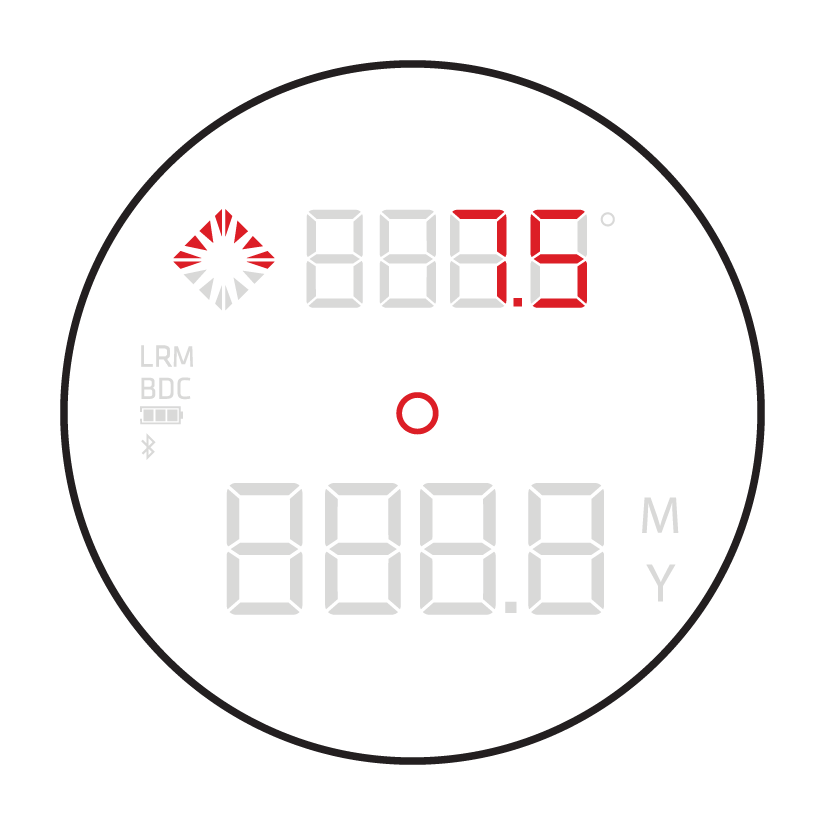
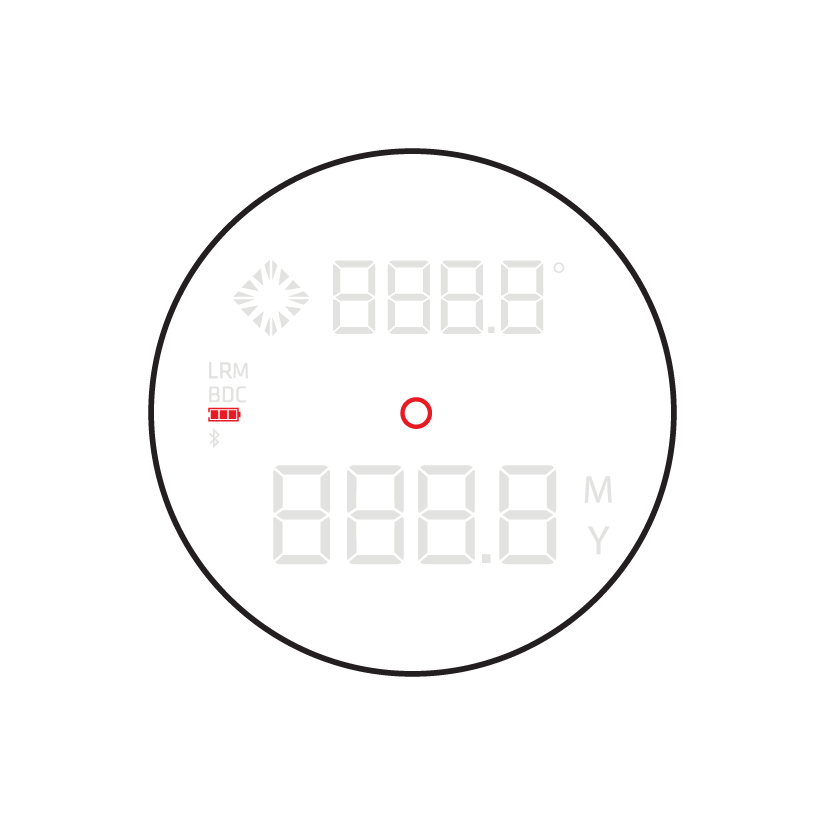
Display Layout and Overview
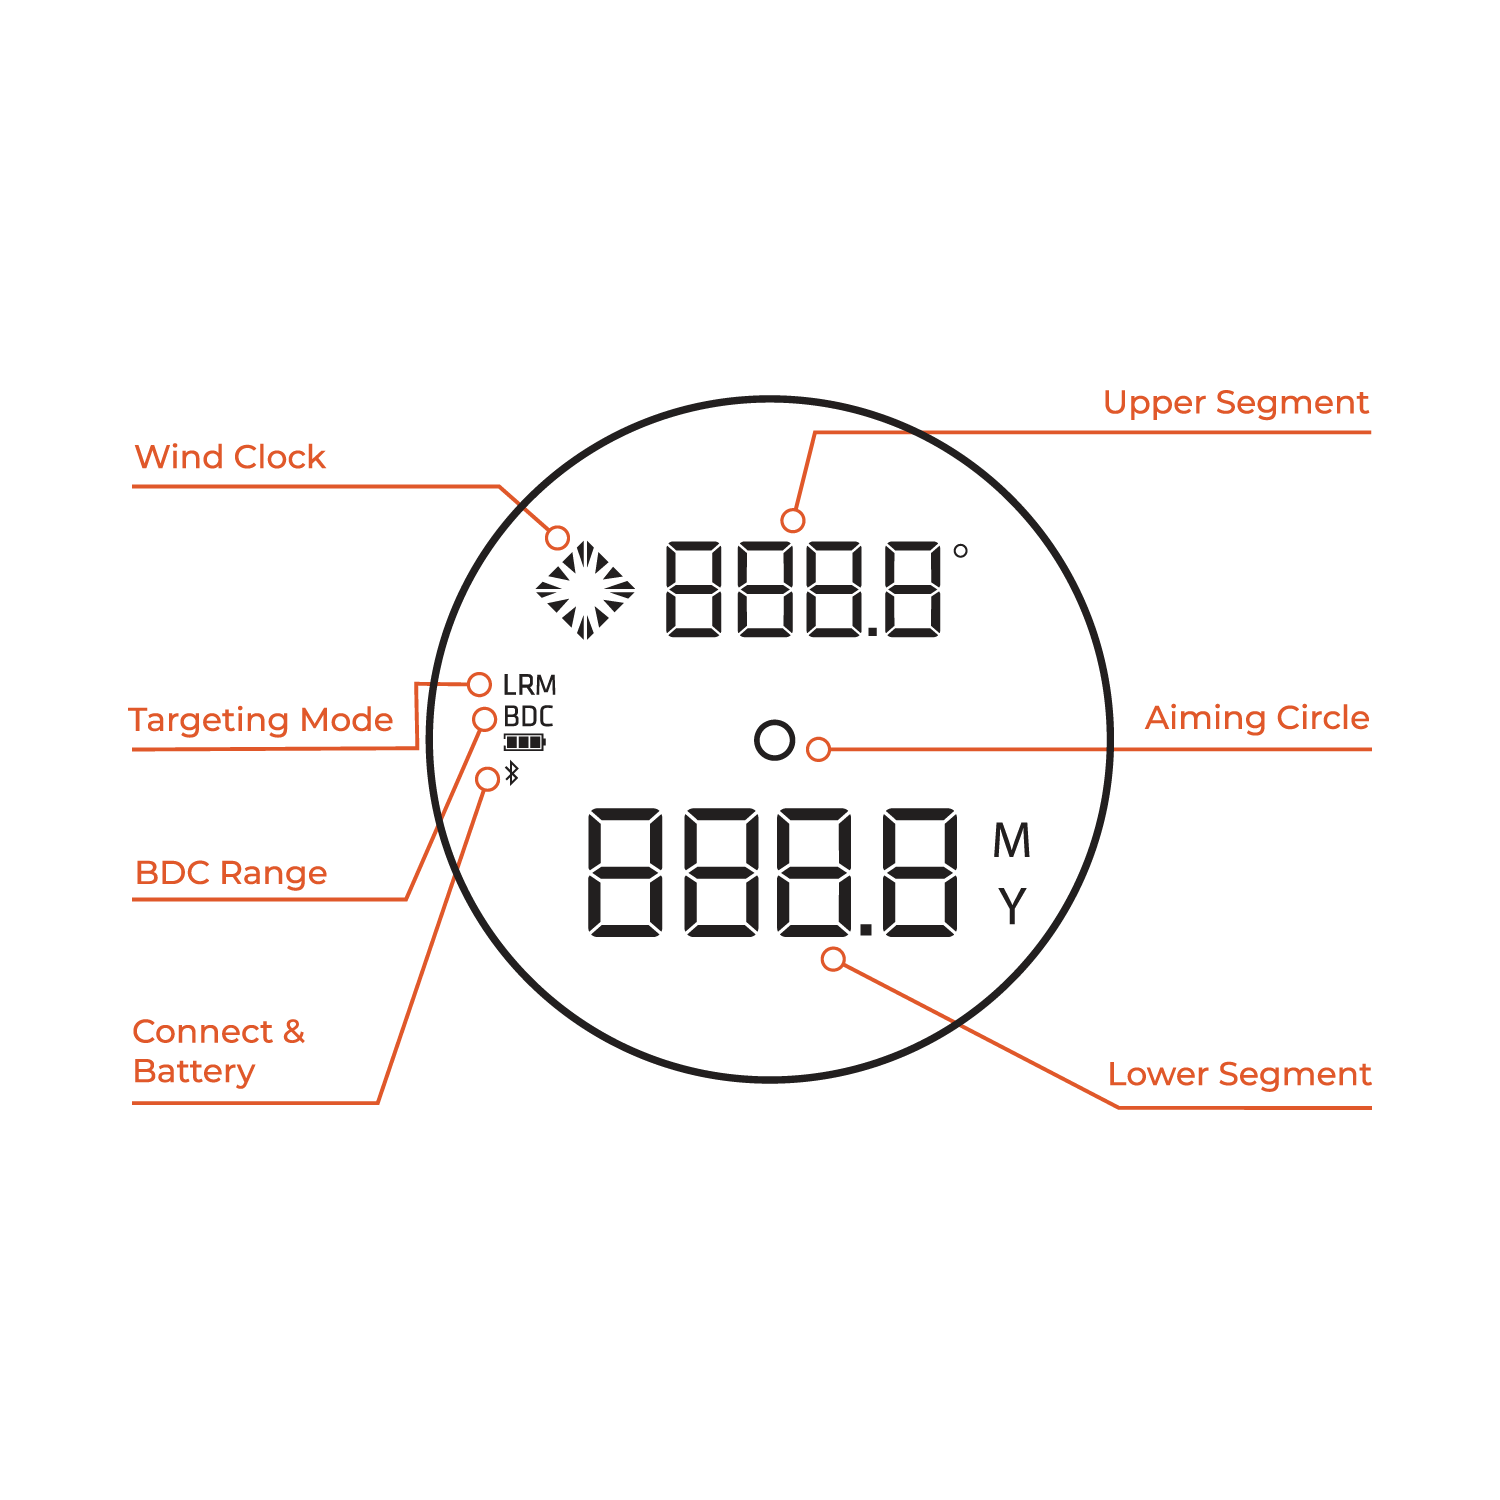
The Organic Light-Emitting Diode (OLED) Display projects information into the field of view and provides the aiming reticle in the center of the display.
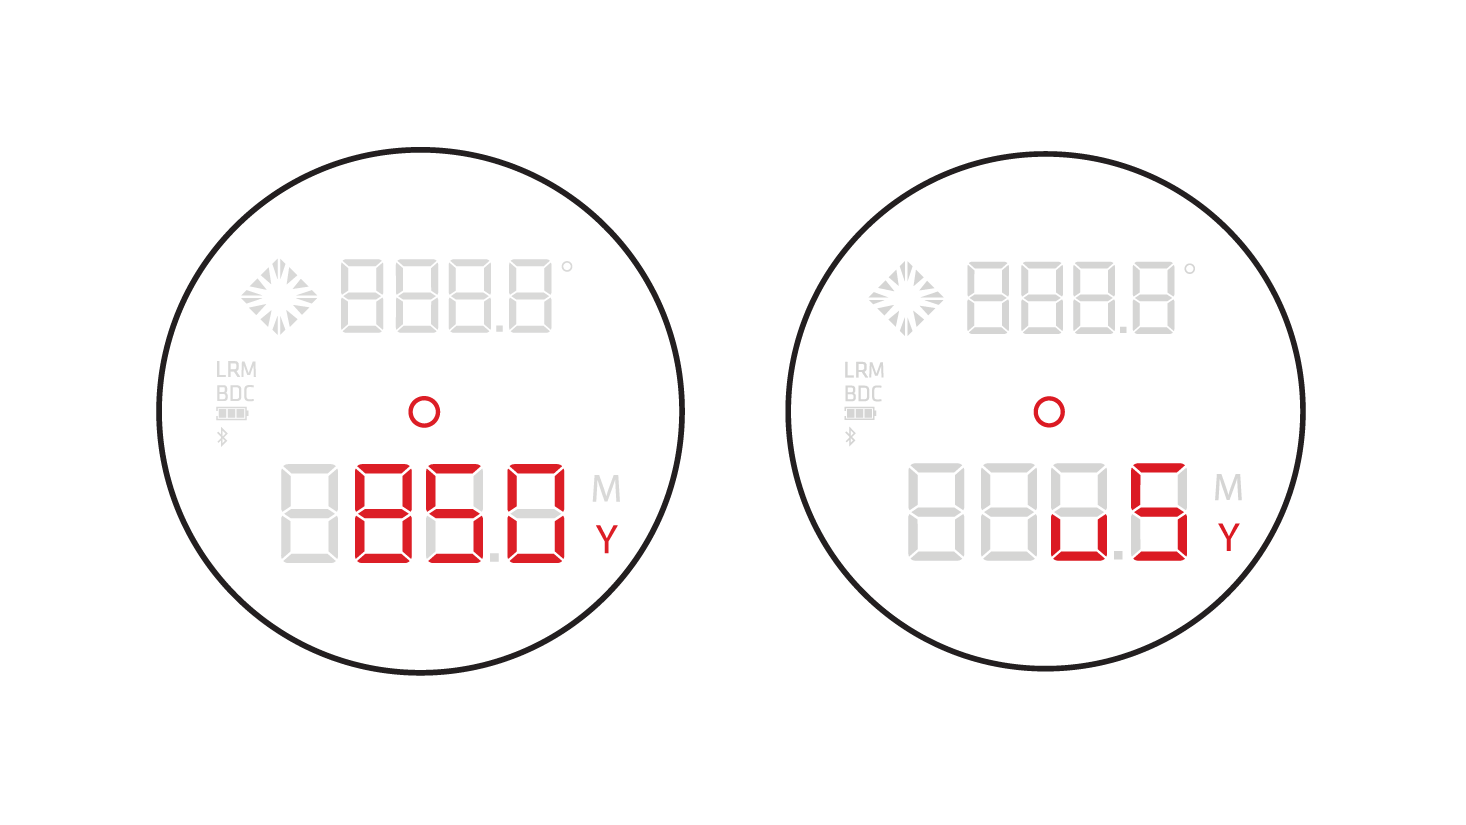
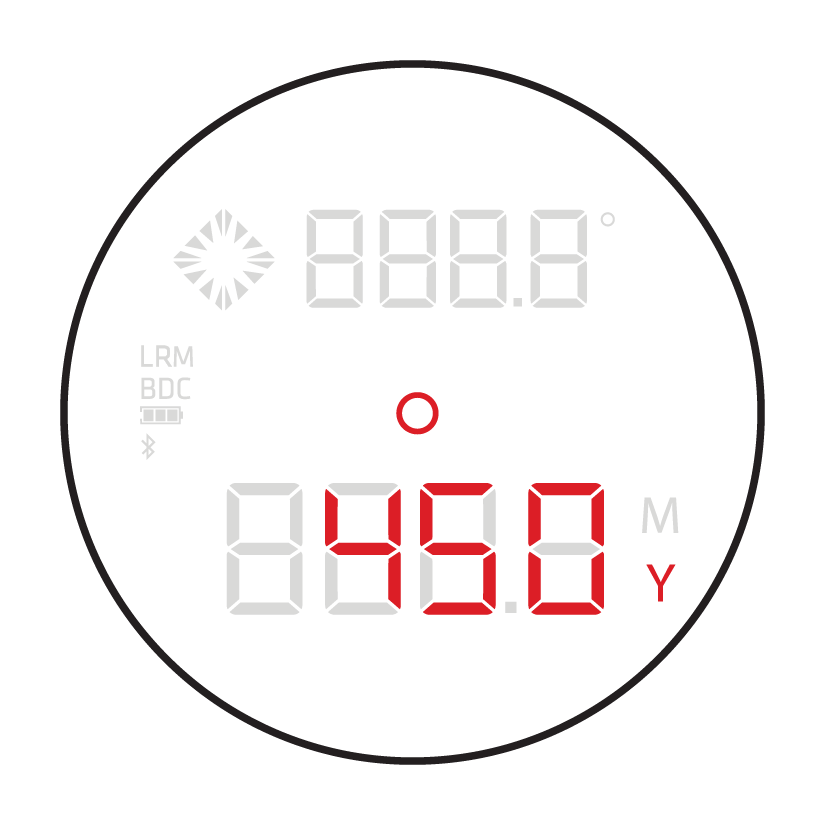
The Lower Segment of the display is used primarily for displaying the Range and the BDC “Shoot-To” Range, if enabled by the ballistic profile and displayed in alternating fashion. It is also used in the Settings Menu and Quick Keys to display the values. Ranges over 999.9 yards or meters will not display the decimal place, eg 1245 yards. The selected range unit is displayed to the right.
The Upper Segment of the display is primarily used to show the calculated elevation and windage correction values from the ballistic solver in alternating fashion. The Upper Segment is also used to input a wind direction in clock position, and the wind speed in the selected units. When entering the Settings Menu or Quick Keys, the menu item is displayed here.
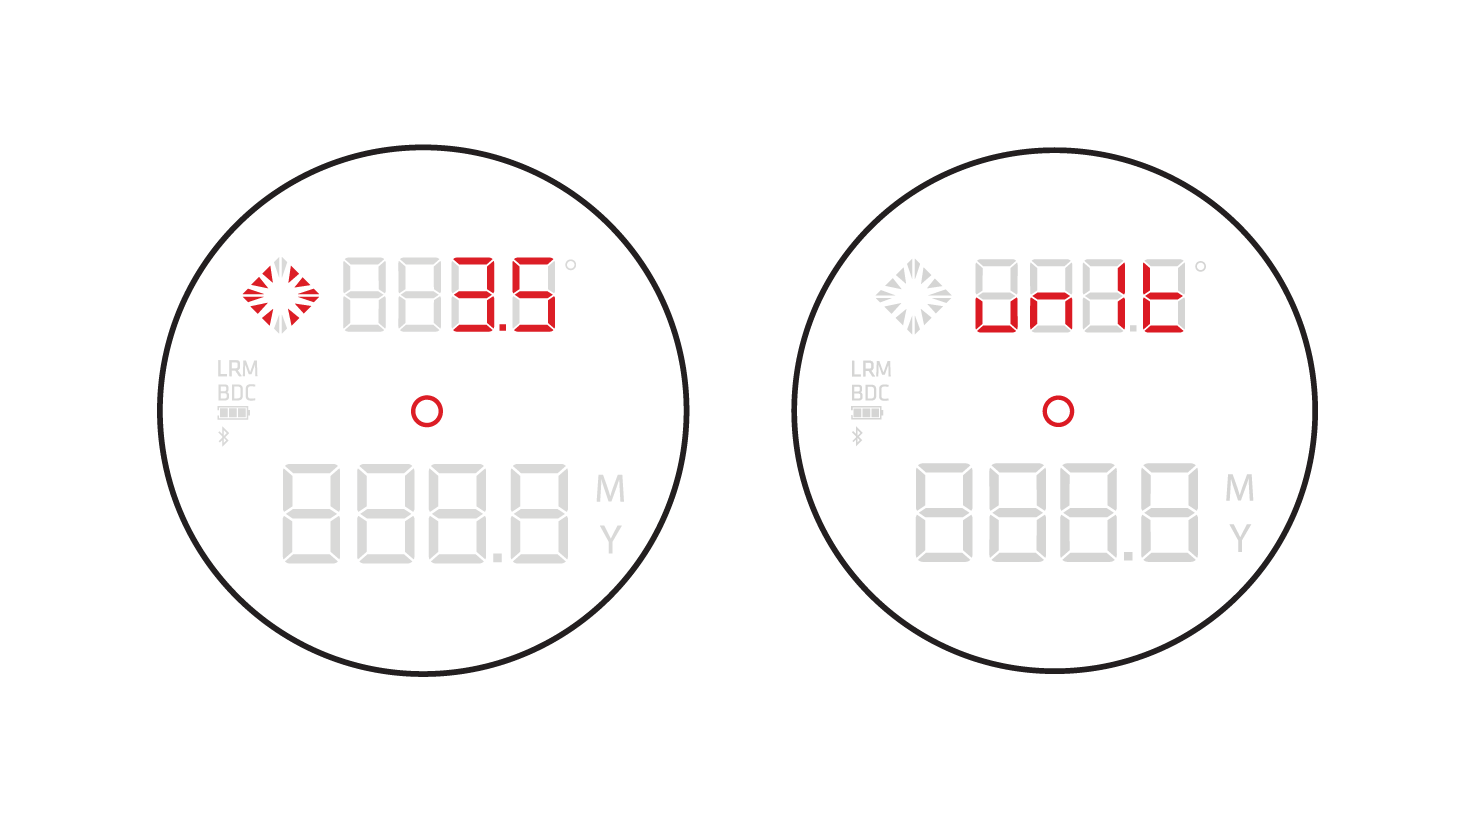
The diamond pattern of arrows to the left of the Upper Segment serves double duty by using combinations to indicate the direction of correction needed when displaying the elevation and windage correction.
Additional information is shown on the left of the display. This information includes an indicator when the LRM Target mode is selected, the BDC range icon, the battery level indicator and the Bluetooth icon.
Aiming Reticle and Beam Divergence
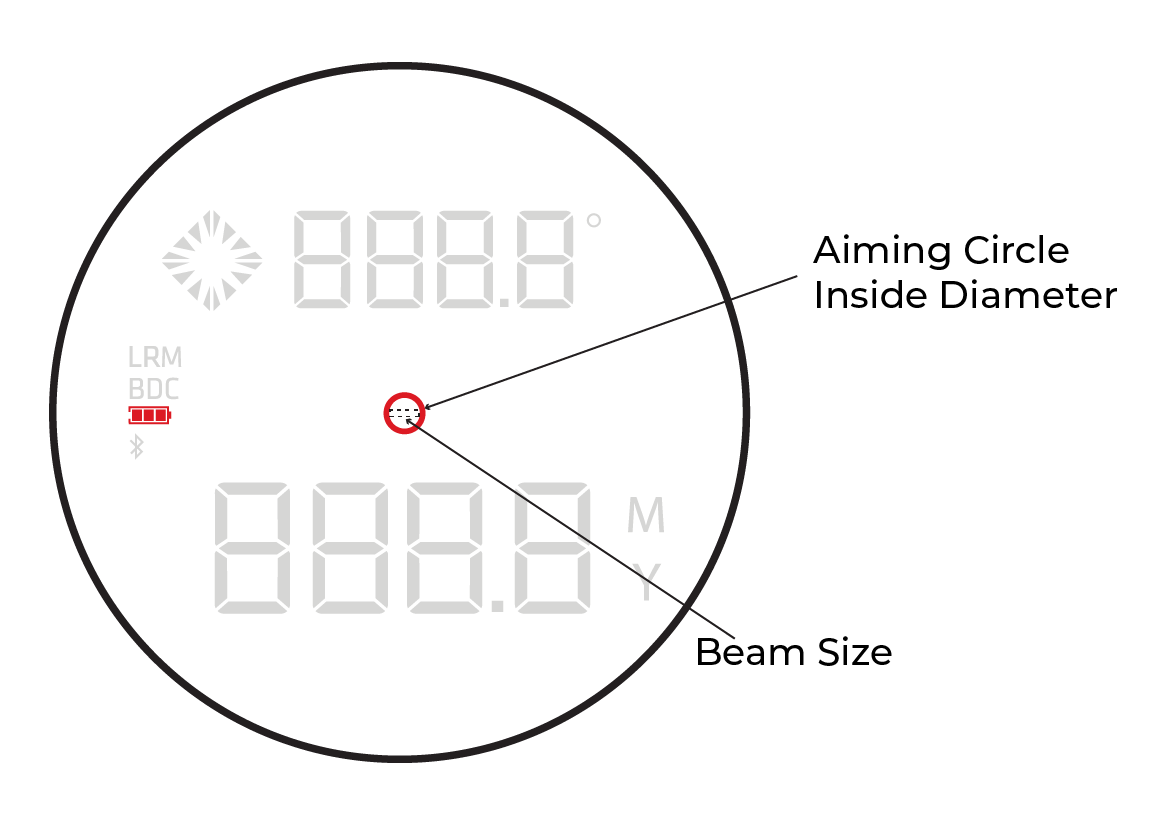
The Acura BLR10b beam divergence is approximately 1.5 x 0.06 milliradians (or 54 x 2 inches at 1000 yards), while the inside diameter of the aiming reticle measures approximately 1.5 milliradians (or 54 inches at 1000 yards).
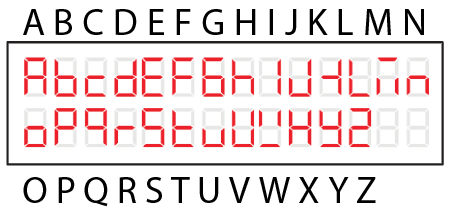
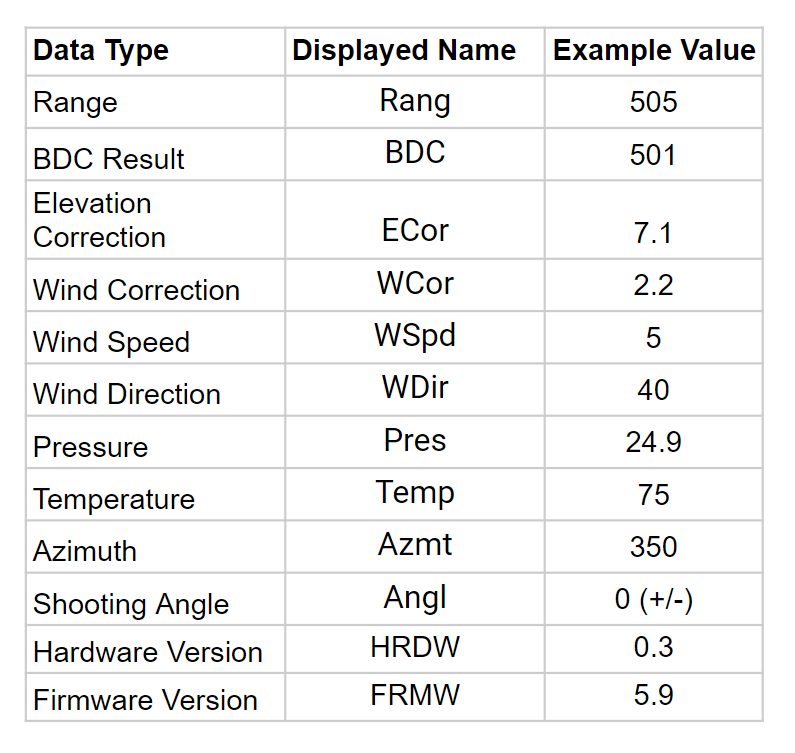
7 Segment Alphabet
When limited to 7 segments for each character, the alphabet is displayed in a combination of upper and lower case letters. The alphabet of the 7 segment display is shown below:
Buttons
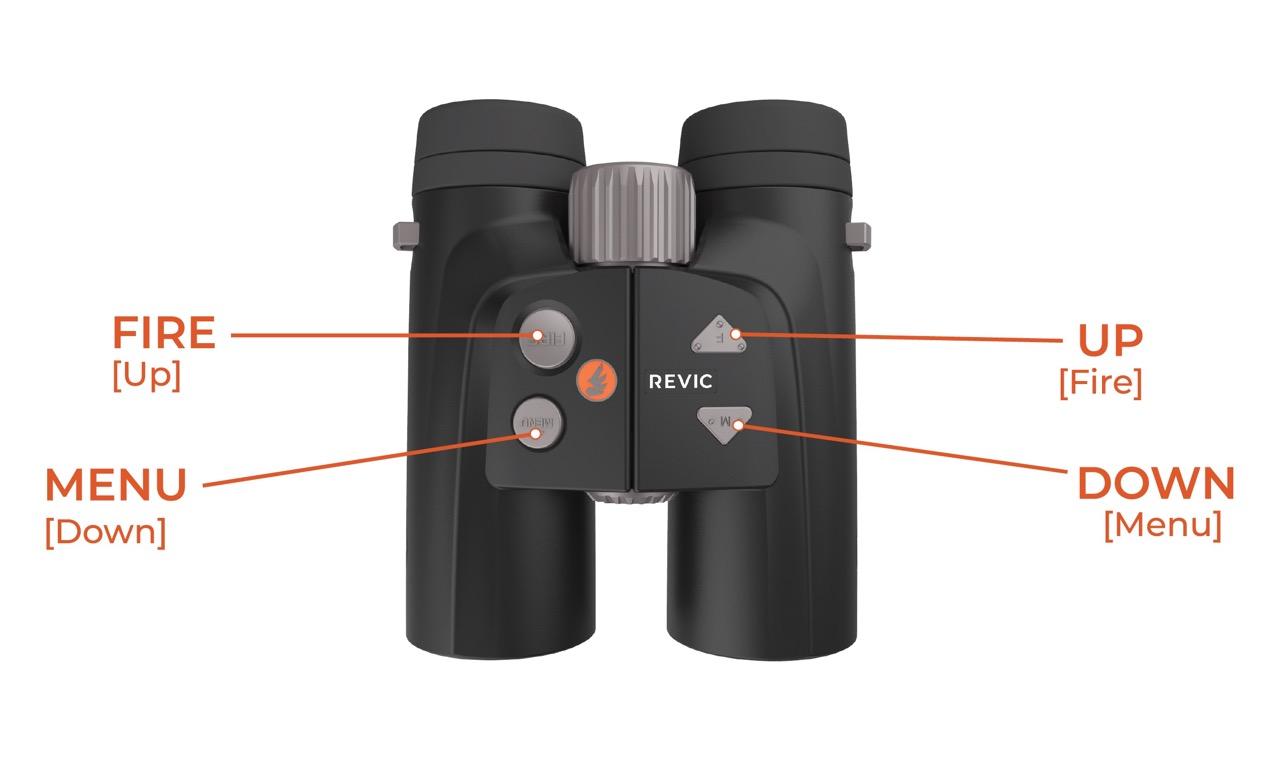
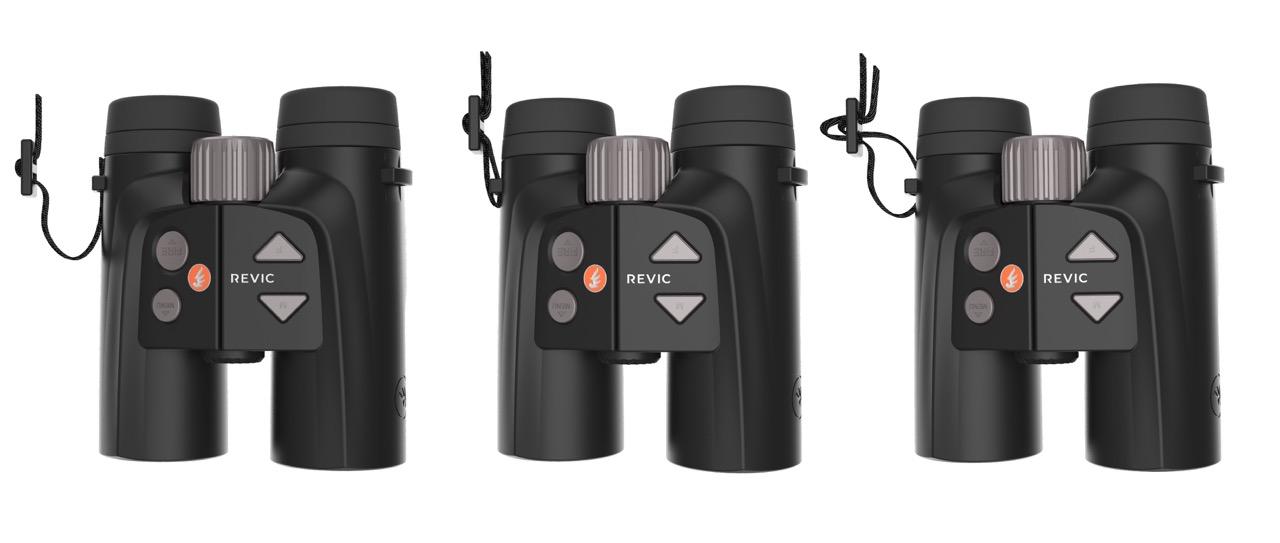
The Acura BLR10b has a 4-button keypad located on the top panel of the binocular. The buttons provide easy access to the binocular functions, programming, and operating commands while using your BLR10b. The buttons can be configured for use in Left or Right hand dominant configurations. The Right Hand configuration layout is shown above (Left Hand configuration shown in [ ]). The default configuration is Right Hand.
FIRE Button
When off, Press and Hold to power on. When on, Press to initiate a Range sequence, Press and Hold to enter Multi Measurement Mode. When navigating the Settings Menu, this button saves selections and inputs, and is the return button.
Menu Button
When on, Press and Hold for 3 seconds to enter the Settings Menu. When navigating the Settings Menu, this button selects menu items for editing.
Up Button
Scroll up input or menu item.
Down Button
Scroll down input or menu item.
Settings Menu
Overview and Accessing
The settings menu can be accessed with a long press (3+ seconds) of the MENU button. To scroll through the menu, use the UP and DOWN arrow buttons. To select, press the MENU button again. When a value is selected it will flash. To save the setting and return to the previous screen, press the FIRE button.
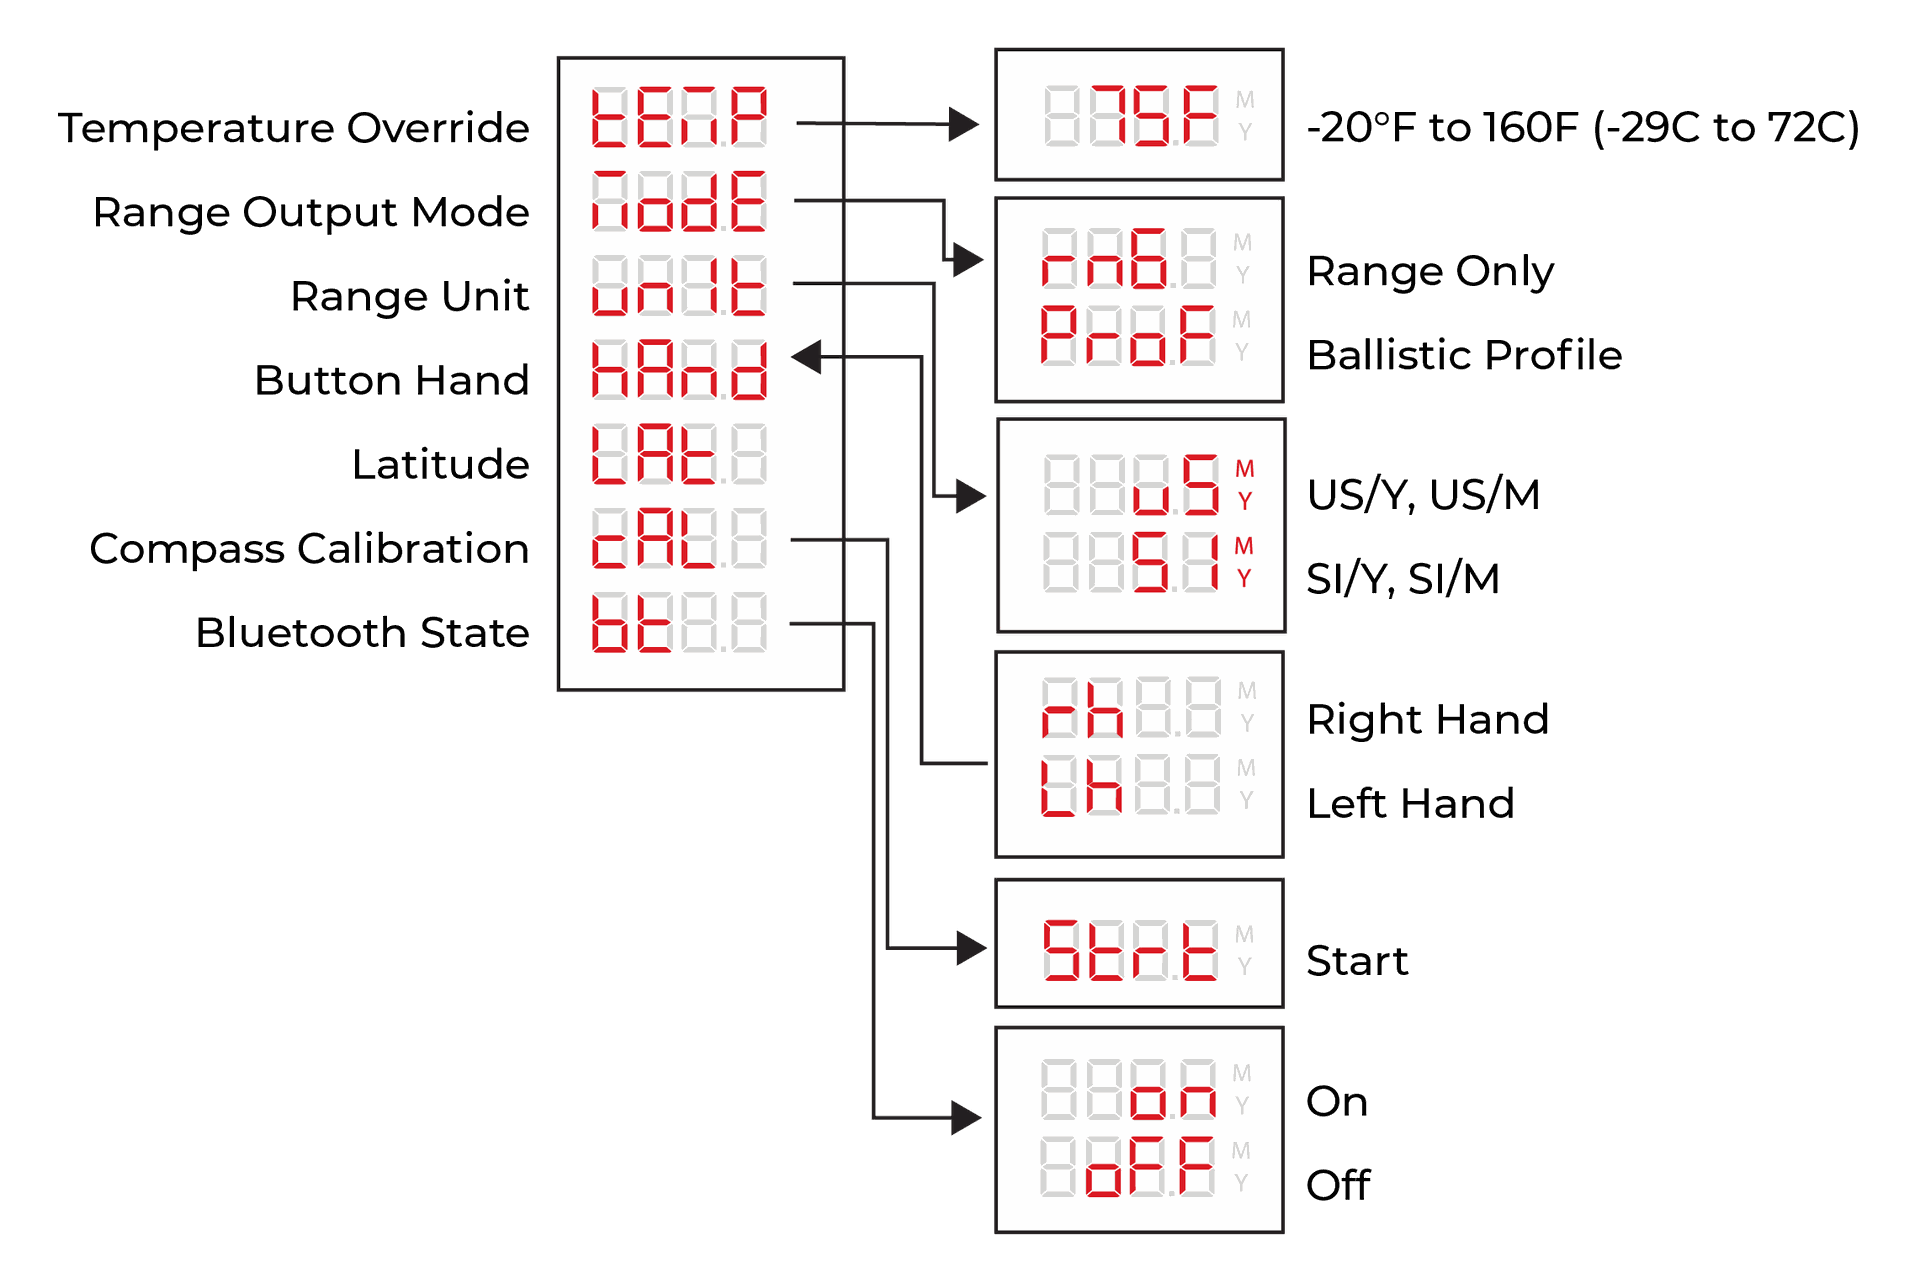
Menu Items
Temperature Override
If the sensor temperature does not match the ambient temperature, you can manually override the sensor temperature value. To reset the temperature to automatically display the sensor temperature, press and hold the MENU button while the value is selected (flashing). The displayed temperature will update to the sensor temperature and stop flashing.
Range Output Mode
Select between Range only (RNG) or Ballistic Profile (Prof) if a Ballistic Profile has been loaded from the Revic App. There is an option to Clear the Ballistic Profile by selecting (Clr). With the limited display character, when Prof is selected, the profile name will display after 1.5 seconds.
Range Unit
Select from the following Unit options:
-
US/Y outputs (Y)ards for distance and (US) Customary Units for other units
-
SI/Y outputs (Y)ards for distance and (SI) System International units for all other units
-
US/M outputs (M)eters for distance and (US) Customary Units for other units
-
SI/M outputs (M)eters for distance and (SI) System International units for all other units
Button Hand
Select from Right Hand and Left Hand button configuration.
Latitude
Set the Latitude to an integer value between 90° S to 90° N. The default setting is 44° N.
Compass Calibration
Frequent calibration of the compass will ensure the shooting vector used in the ballistic calculation and provided to the app is accurate. Navigate to the Calibration menu item and press MENU to start the calibration. During calibration, rotate the binocular on all axes in an infinity pattern until the unit reads “Pass.” This will take approximately 5-10 seconds.
Bluetooth State
When powered on, the Bluetooth radio is configured to be on and actively searching for a device to connect to. The Bluetooth icon will flash until connected to the Revic app. You can manually set the Bluetooth state to ON or OFF.
Quick Keys
Overview and Button Combinations
Targeting Mode
 Short press the MENU button until the desired Targeting Mode is displayed. Press the FIRE button to save the selection and return to the main screen.
Display Brightness
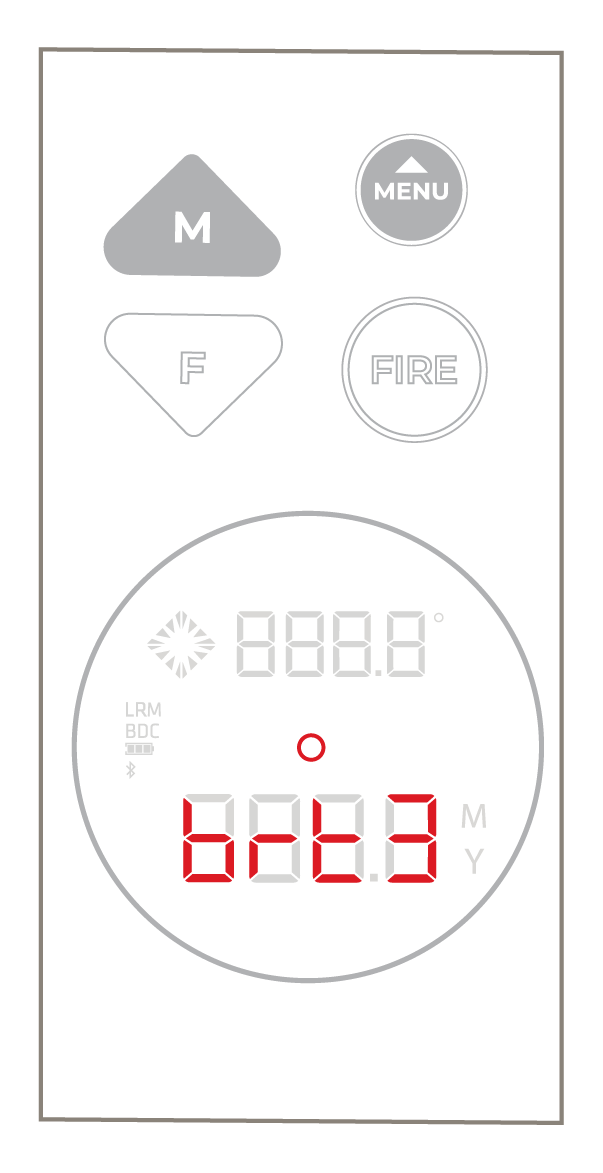 Press and hold the MENU button, and within three seconds press the up or
down arrow until the desired brightness setting is displayed.
Press and hold the MENU button, and within three seconds press the up or
down arrow until the desired brightness setting is displayed.
Wind Vector
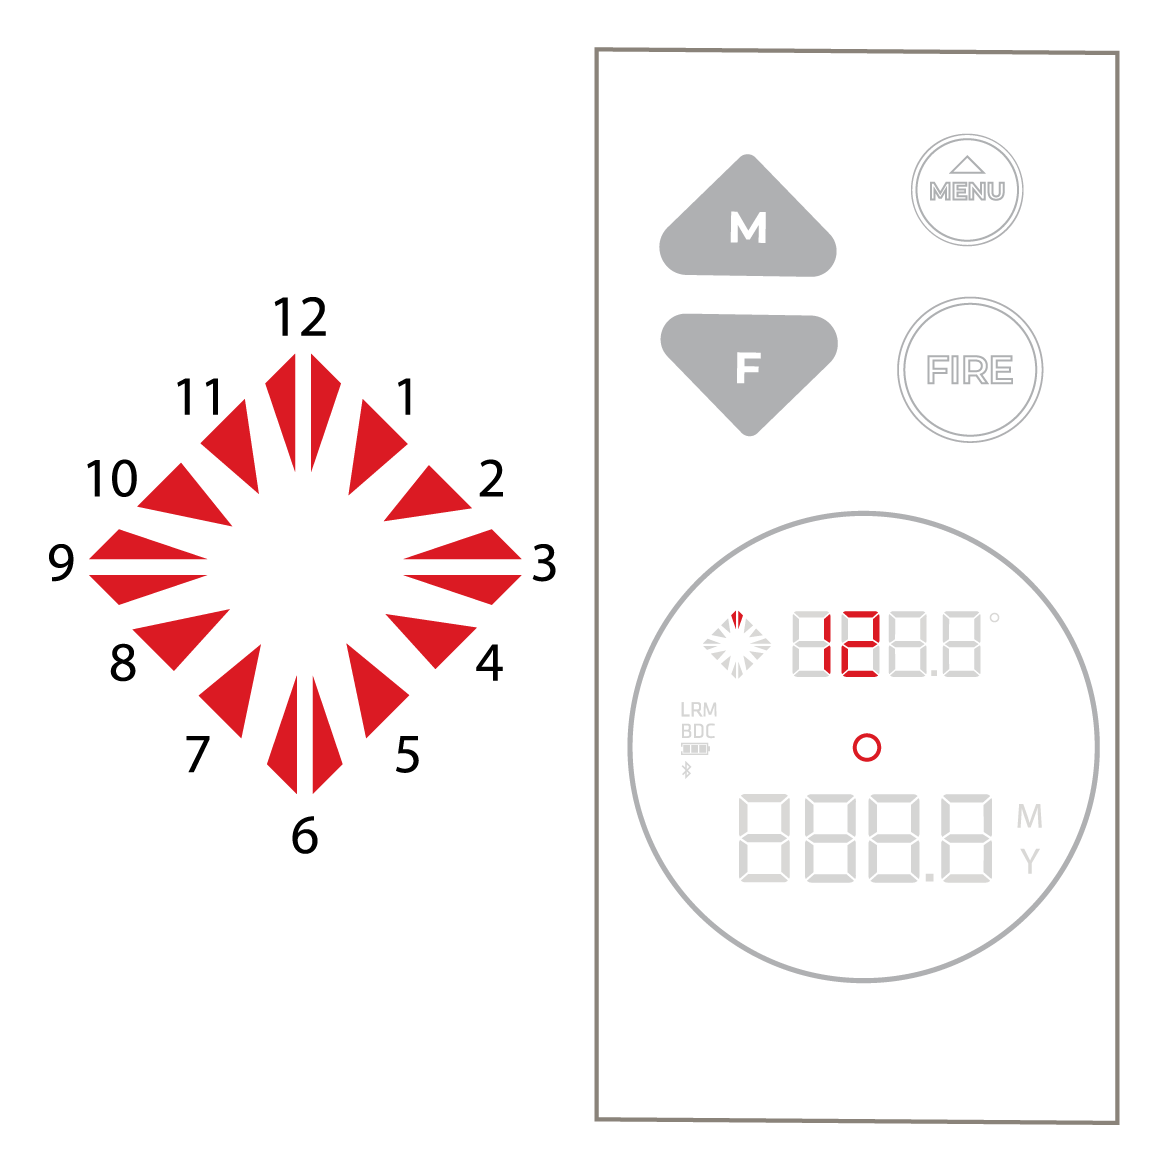 direction the wind is coming from. The Wind Clock will adjust simultaneously. Then press MENU to advance to the speed input. Press the UP or Down button to enter the wind speed. The Wind Clock indicator does not move. Press the FIRE button to save the selection and return to the main screen.
Base Wind
Measured Values Review
 To review all sensor data, and ballistic solution data (if applicable) for the last range collected press and hold the MENU button, and within three seconds press the FIRE button. Use the UP or DOWN buttons to review. To return to the main screen press the FIRE button.
Targeting Modes
The Targeting Modes of the Acura BLR10b allow you to select or eliminate targets to take the most accurate measurements possible in various field conditions. Switch between the Targeting Modes through the Quick Key of short pressing the MENU button. Press the MENU button repeatedly until the desired mode is displayed.
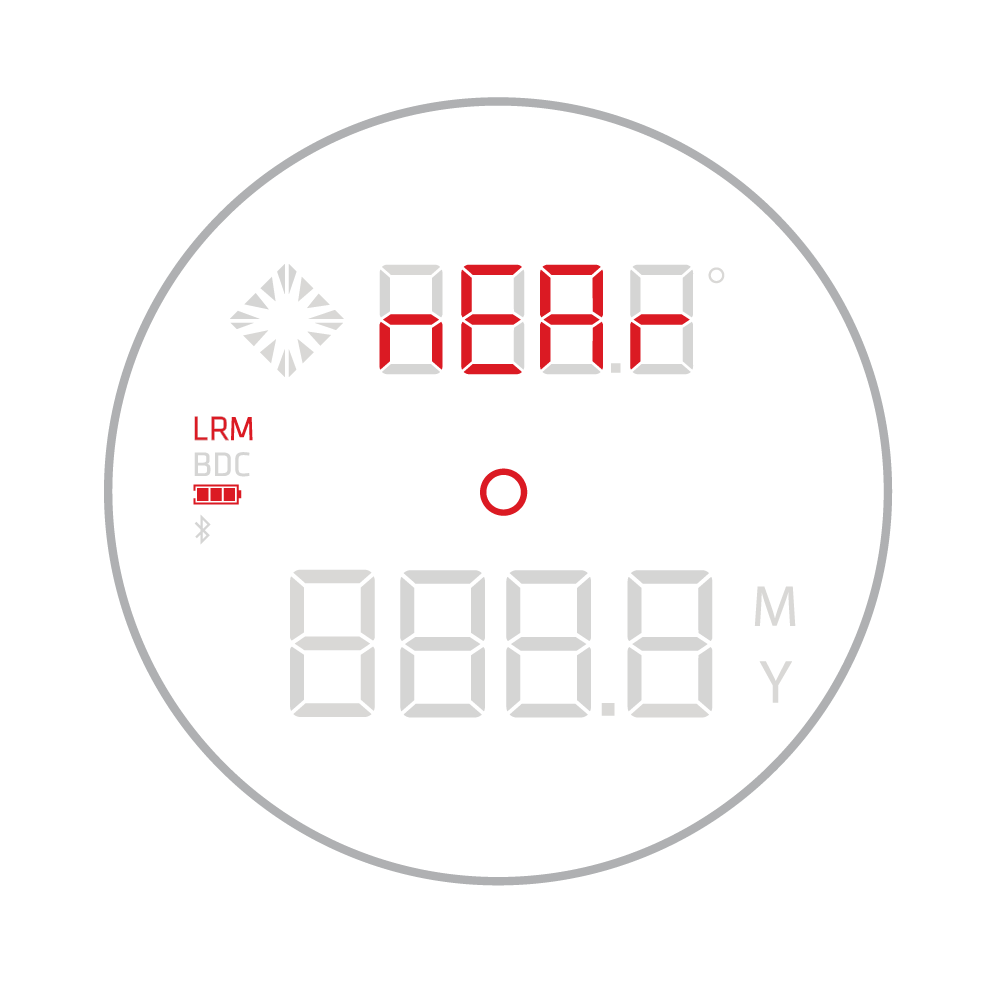
Near Target Mode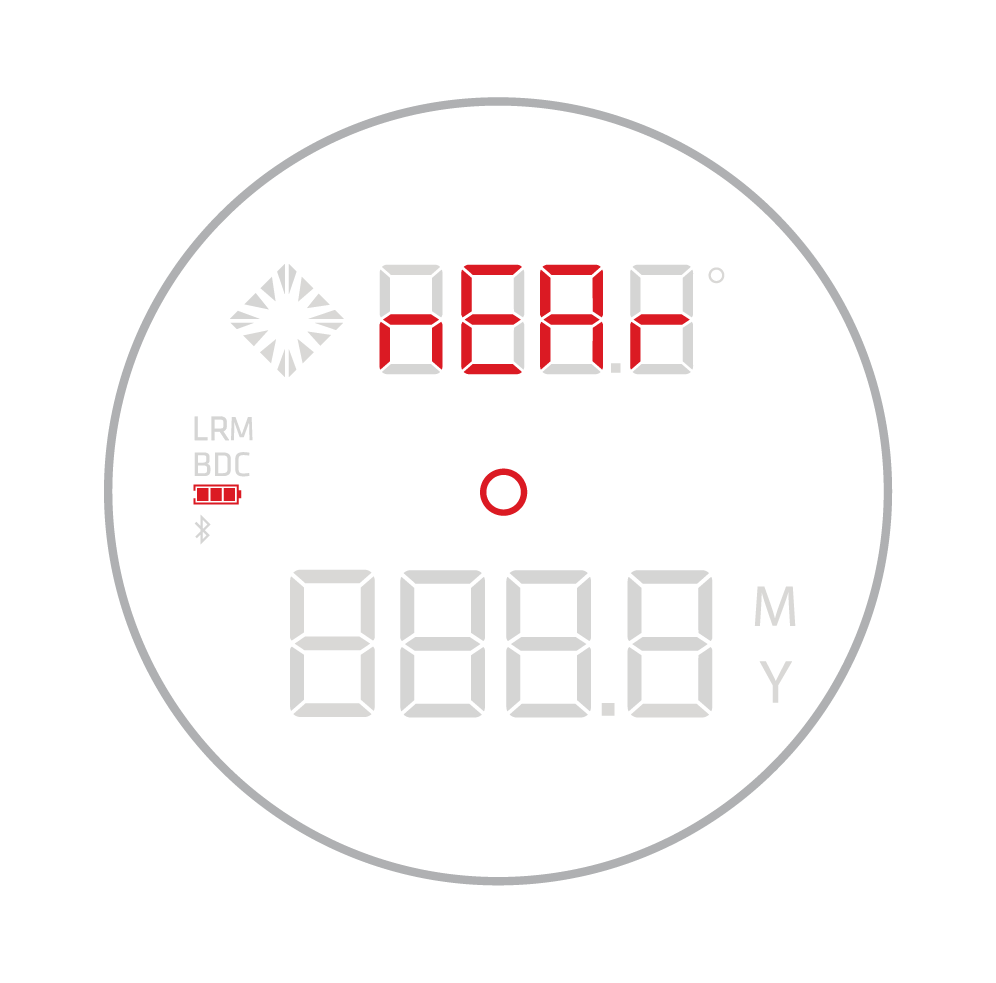
The Near Targeting Mode allows for easy acquisition of small targets without inadvertently getting background targets that have stronger signal strength.
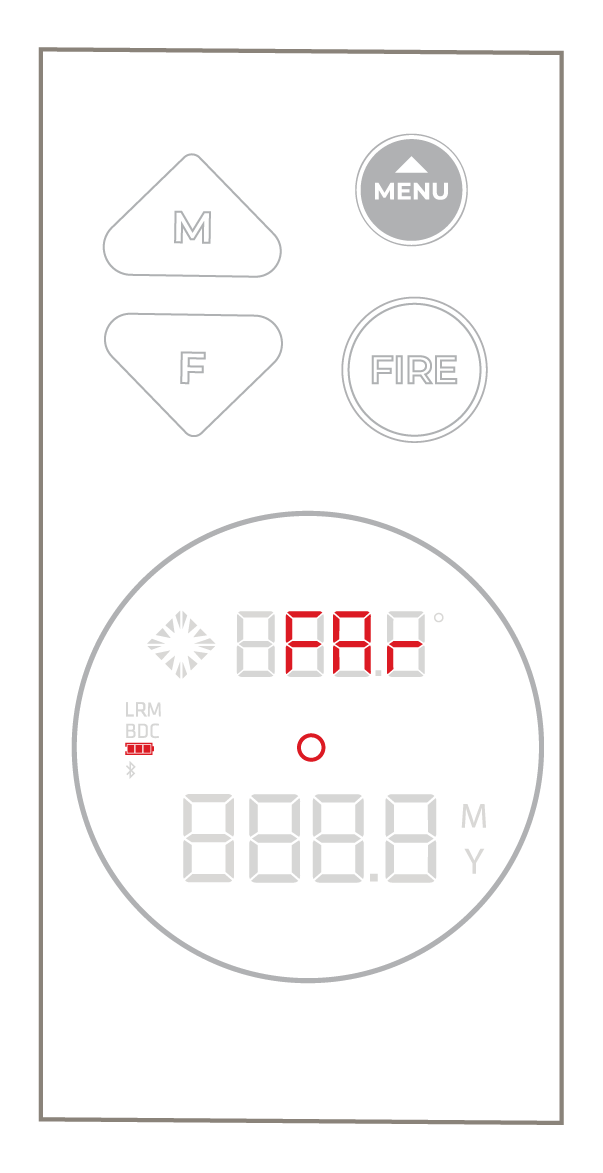
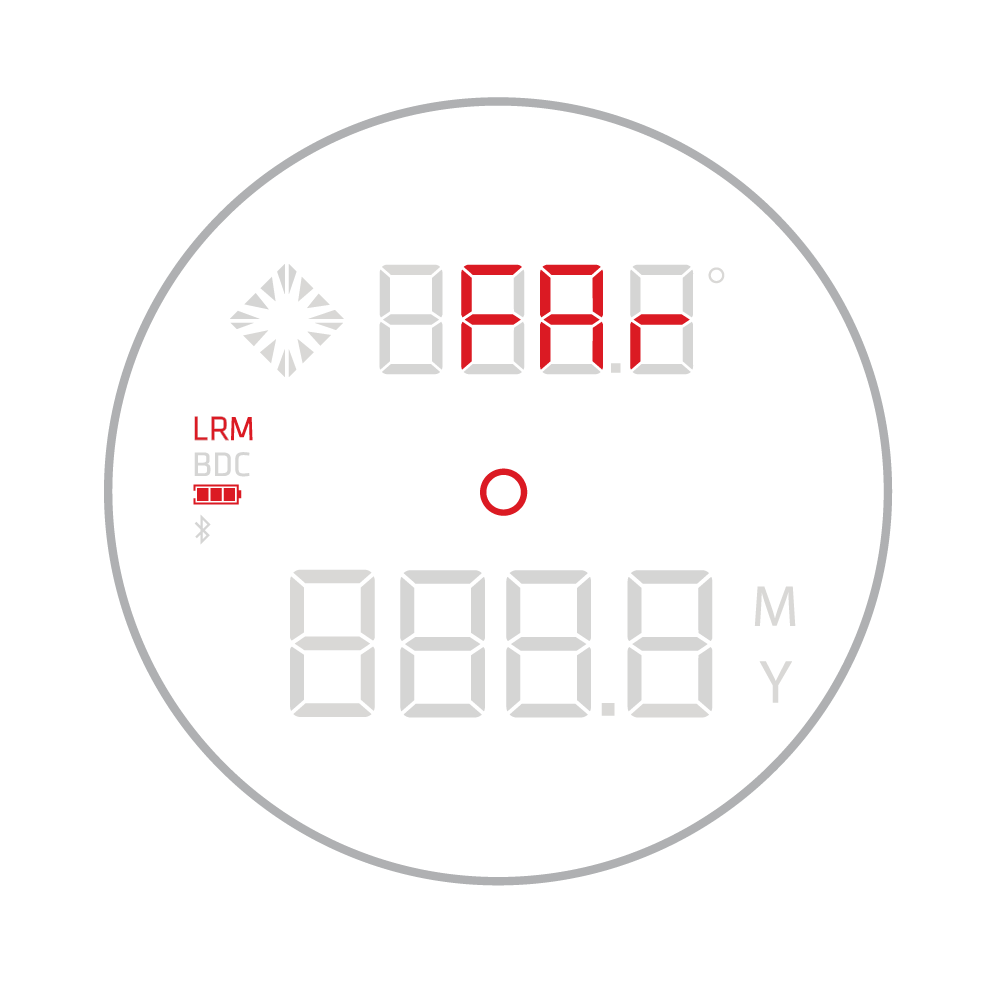
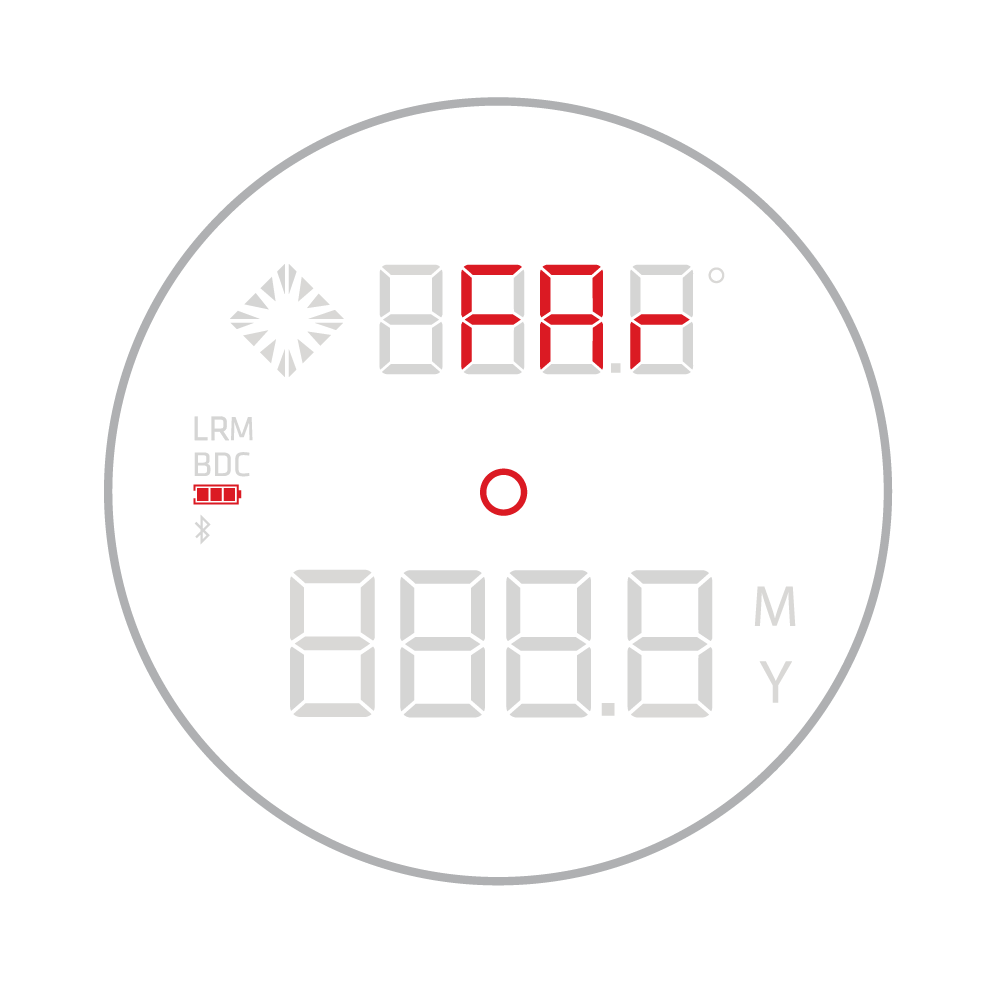 Far Target Mode
The Far Targeting Mode allows obstructions such as brush or fog to be ignored so that only background targets are acquired.
 Long Range Mode (LRM) Near Target Mode
The Long Range Modes (LRM) increases the data collection cycle of the laser sensor to improve the target signal and successful ranging at long distances (distances over 1000 yards). Combined with the Near function, the device returns ranges on the nearest target, ignoring the signal from further objects.
 Long Range Mode (LRM) Far Target Mode
The Long Range Modes (LRM) increases the data collection cycle of the laser sensor to improve the target signal and successful ranging at long distances. Combined with the Far function, the device returns ranges on the farthest target, ignoring the signal from obstructions.
Power States and Timing
The Acura BLR10b has three power states, ON, SLEEP and OFF. If no button presses are detected after 20 seconds, the BLR10b will enter SLEEP mode to conserve battery power. The BLR10b will power OFF automatically after 60 seconds in SLEEP mode. If a Bluetooth connection was established, power OFF will occur automatically 5 minutes from the last button press. To prevent inadvertent battery consumption, if any button is held down for more than 10 seconds (without acquiring a range) the BLR10b will automatically power OFF.
These settings are maintained during the SLEEP state, but reset once the BLR10b powers OFF:
-
Manual Wind Vector
-
Temperature Override
-
Measured Values Data
-
Bluetooth Connection
Installing and Using the Revic Ops App
Install the Revic App
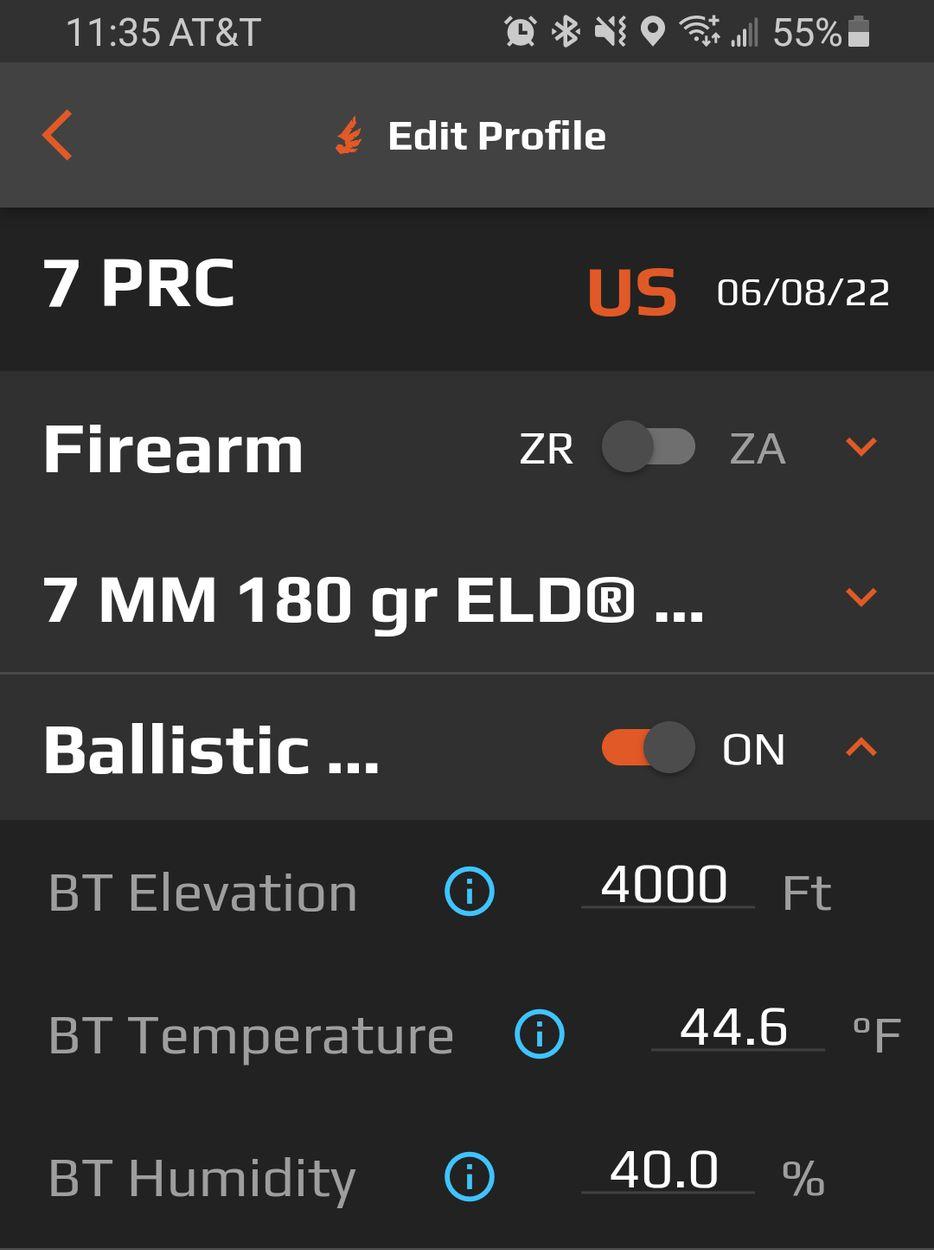
Your BLR10b calculates a ballistic solution based on a specific ballistic profile. Profiles are created and stored on the Revic Ops App and synced to the BLR10b through bluetooth communication.

Download the Revic app from the Google Play Store or the Apple App Store, revicoptics.com/app, or simply take a picture of the QR code and you will be taken directly to the app store
Creating a ballistic profile
With the Revic app installed ballistic profiles can be created to sync with the Acura BLR10b. Use the Profile Module within the app to program the ballistic profile of your rifle. The Creating A Ballistic Profile video details how to create ballistic profiles.
Connect devices
To connect the BLR10b to the Revic app, navigate to the sync module in the app then power on the binocular. In the Revic app, the available devices will be shown in the Sync Module. Select your BLR10b Device ID number from the list by tapping the grey connection signal icon next to the device name. Once the device is connected via bluetooth, the bluetooth icon in the BLR10b will remain solid, and the signal icon in the app will be illuminated.
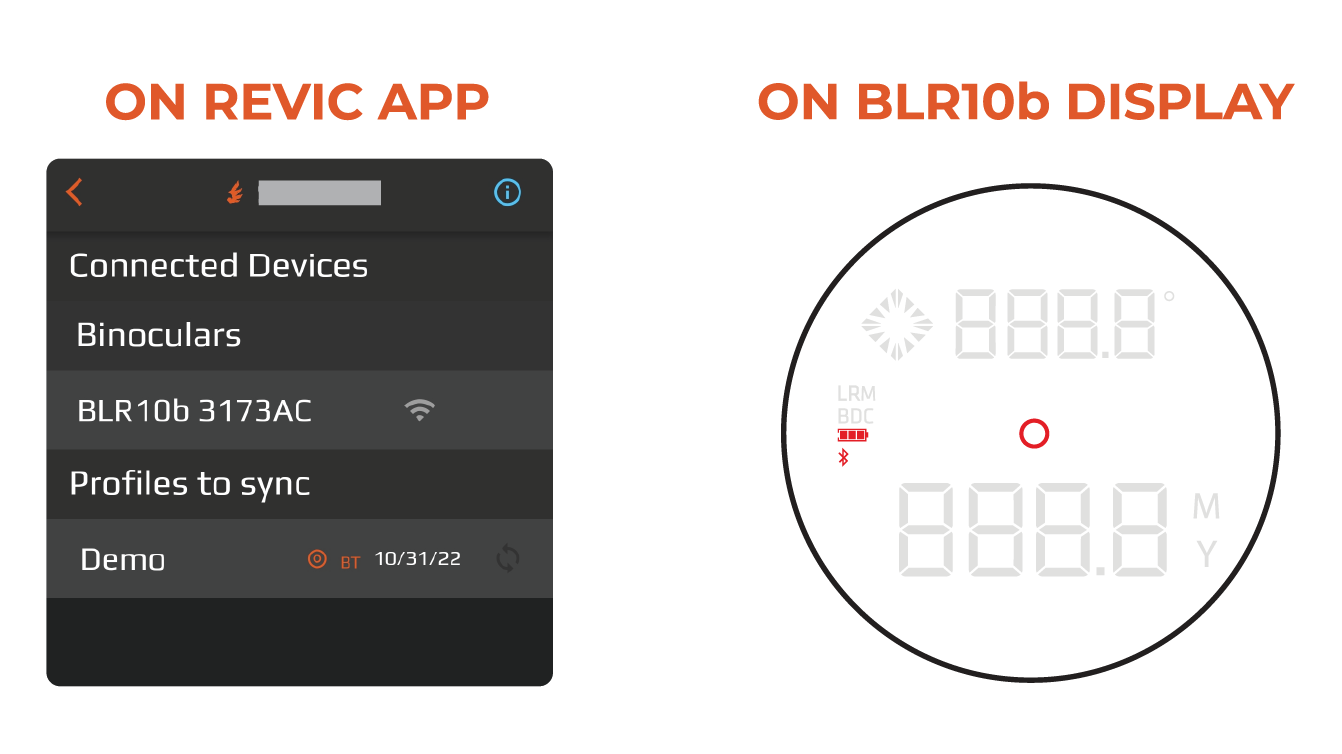
Sync a Profile
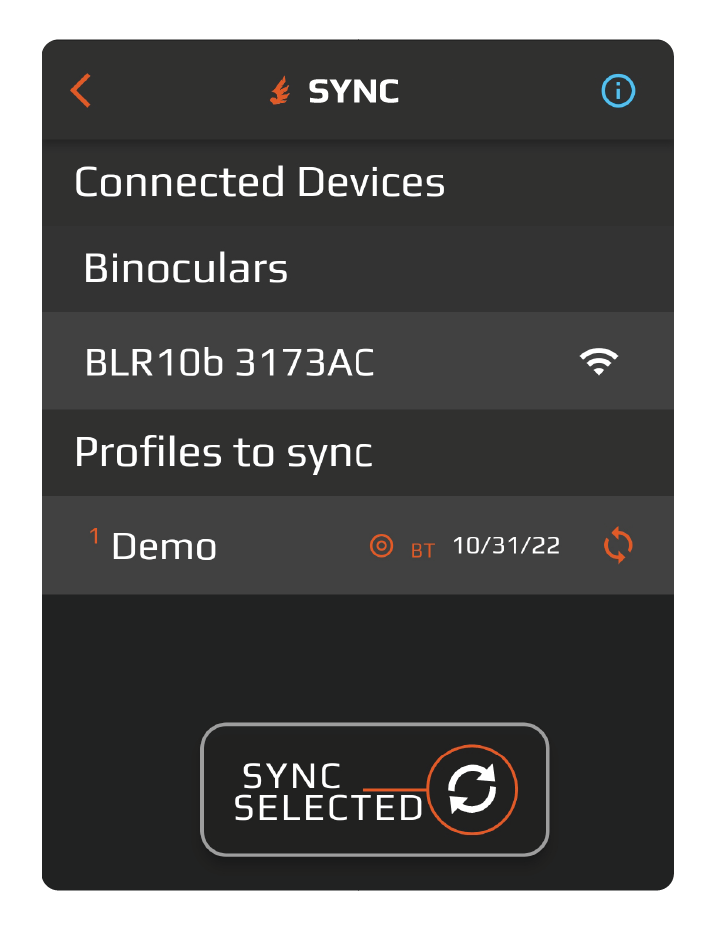 The Acura BLR10b will provide the ballistic solution for a specific ballistic
profile in the rangefinding binocular display once the profile is synced to the BLR10b. To sync a profile, select your desired rifle’s profile listed in the Sync
Module of the Revic app by tapping the sync icon next to the profile name. Next, press the Sync button to transmit your desired profile to the connected BLR10b device. The app will confirm the selected profile has been successfully synced to the binocular.
The Acura BLR10b will provide the ballistic solution for a specific ballistic
profile in the rangefinding binocular display once the profile is synced to the BLR10b. To sync a profile, select your desired rifle’s profile listed in the Sync
Module of the Revic app by tapping the sync icon next to the profile name. Next, press the Sync button to transmit your desired profile to the connected BLR10b device. The app will confirm the selected profile has been successfully synced to the binocular.
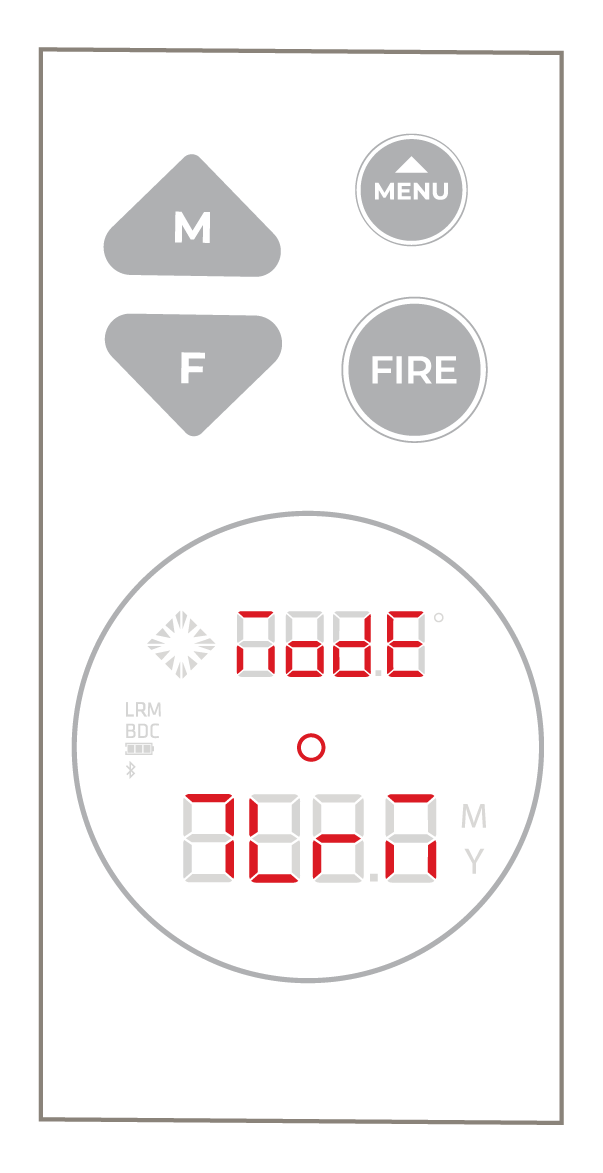
To confirm which profile is loaded into the BLR10b, navigate to
MENU>MODE>PROF. The profile name will be displayed scrolling on the Lower Segment display in up to 8 characters.
Bonus Function: Transmitted Shot Vector Data
With a Bluetooth connection established between the Revic App and the Acura BLR10b, shot vector data can be transmitted to the app. To display the shot vector data, navigate to the Ballistic Calculator Module in the app. The laser icon will be displayed in the range window of the Ballistic Calculator Module indicating the app is ready to receive the shot vector data. When a range is acquired by the BLR10b the range distance, azimuth direction, and shot angle will be transmitted and displayed in the Ballistic Calculator Module.
Ranging a Target
The steps and behavior of ranging a target is the same for either Range Only or Profile ranging mode settings, however, the Main Screen will have more or less information respectively.
Press and hold the FIRE button to initiate power on. From the Main Display, the FIRE button can initiate three methods for ranging - Single Measurement Mode (SMM), Multi Measurement Mode (MMM), and Long Range Mode (LRM).
Single Measurement Mode
Multi Measurement Mode
Long Range Mode
Tripod Mounting
Ballistic Solutions
Base Wind Mode
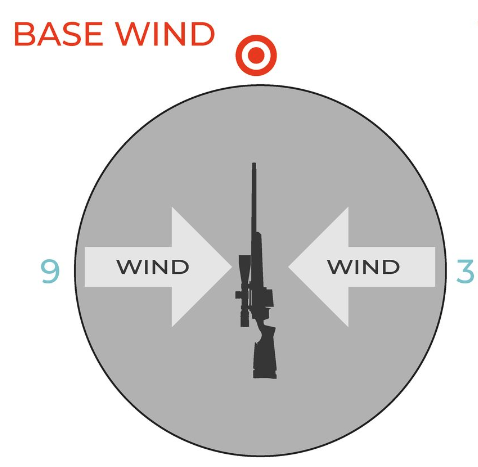
 display. The base wind speed is shown in the Upper Segment display.
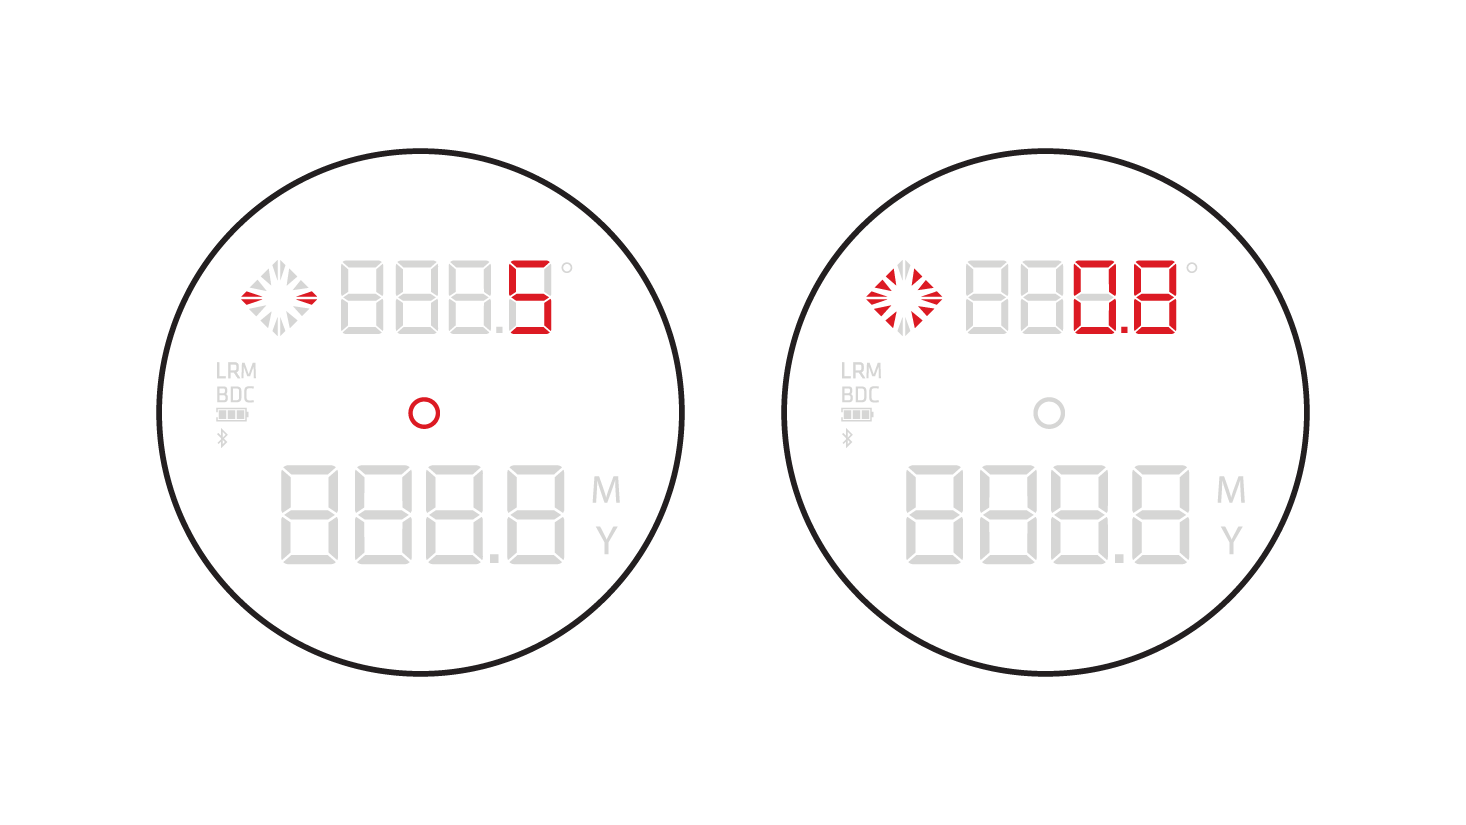
Vector Wind Method
Many advanced ballistic calculations have wind and elevation corrections that are directionally dependent. For example, spin drift is always the same direction as the barrel twist. To add spin drift to the wind deflection, the wind direction must be identified. Elevation and windage corrections for aerodynamic jump face a similar requirement. In scenarios where advanced corrections are required, we enable the Vector Wind Method by
 entering a wind direction and the wind speed. The direction entered is the target relative clock direction of wind origin.
Enter a wind vector using the method outlined in Quick Keys.
The resulting wind solution is shown in the Upper Segment display, and the Wind Clock indicates the direction of the wind adjustment.
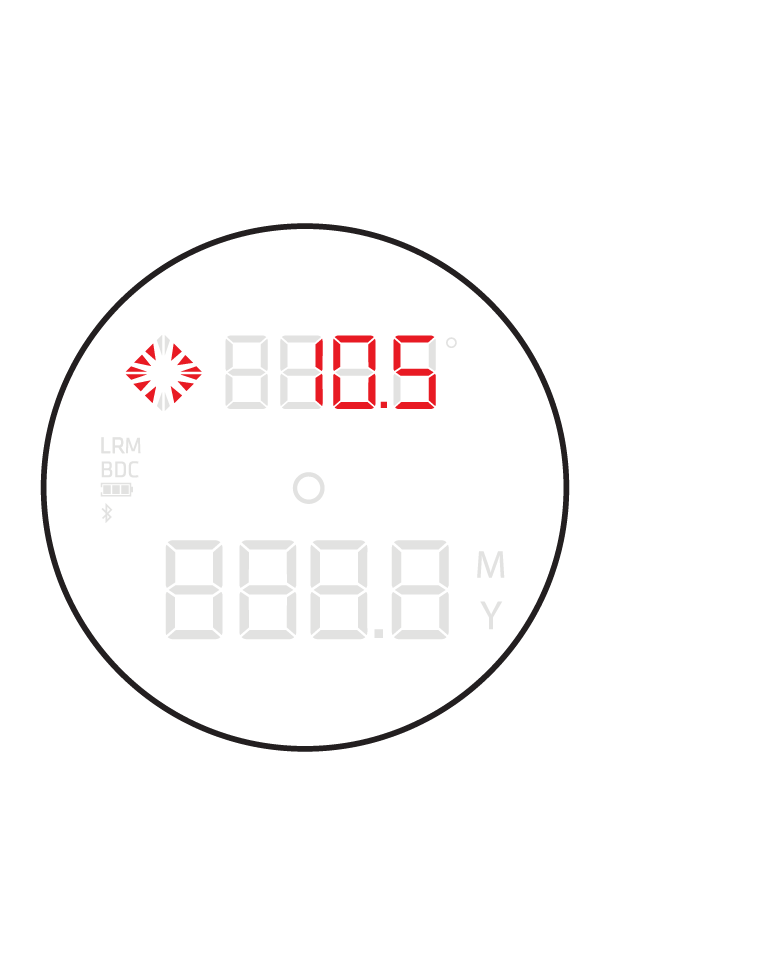
Elevation Adjustment
The ballistic elevation adjustment solution is calculated for each range acquired while the device ranging mode is set to profile. The elevation adjustment is displayed in the Upper Segment and the Wind Clock displays the vertical direction of the adjustment.
Ballistics with Shoot To Range Enabled
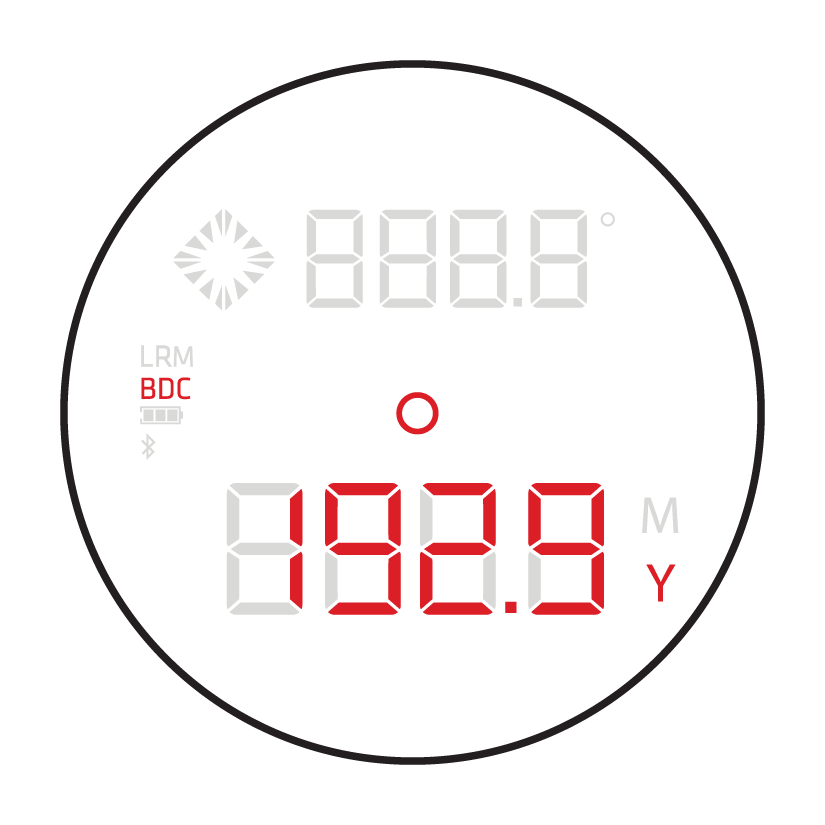
The Shoot to Range or Bullet Drop Compensation (BDC) is enabled in the Ballistic Profile of the Revic app. With the profile synced, the BLR10b will display the BDC solution as well as the line of sight range and the ballistic elevation and windage corrections. The shoot to range or BDC is displayed in the Lower Segment (when the BDC icon is shown on the left), alternating with the range distance.A Back Mask Liquid Crystal Display (BMLCD) is mounted within the optical system and projects information into the field of view using a beamsplitter.
To enable the shoot to range in the Revic app toggle the Ballistic Turret option on in the Ballistic Profile.
Ballistic Solution Temperature Sensitivity
The ballistic solution is dependent on the environment conditions. The BLR10b is equipped with on board sensors to measure the pressure and temperature each time a range is acquired. There will be a response time (typically between 2°F- 4°F per minute) while the unit reaches ambient temperature if your binocular has been warmed by your body or vehicle climate. Allow time for the device to acclimate to the environmental temperature, or manually adjust the binocular temperature with the temperature override as described in the Settings Menu section of this manual.
Appendix
Care and Maintenance
Low Battery Warning
 located on the left side of the display. When the battery indicator reaches one bar, we suggest you replace the battery as soon as possible.
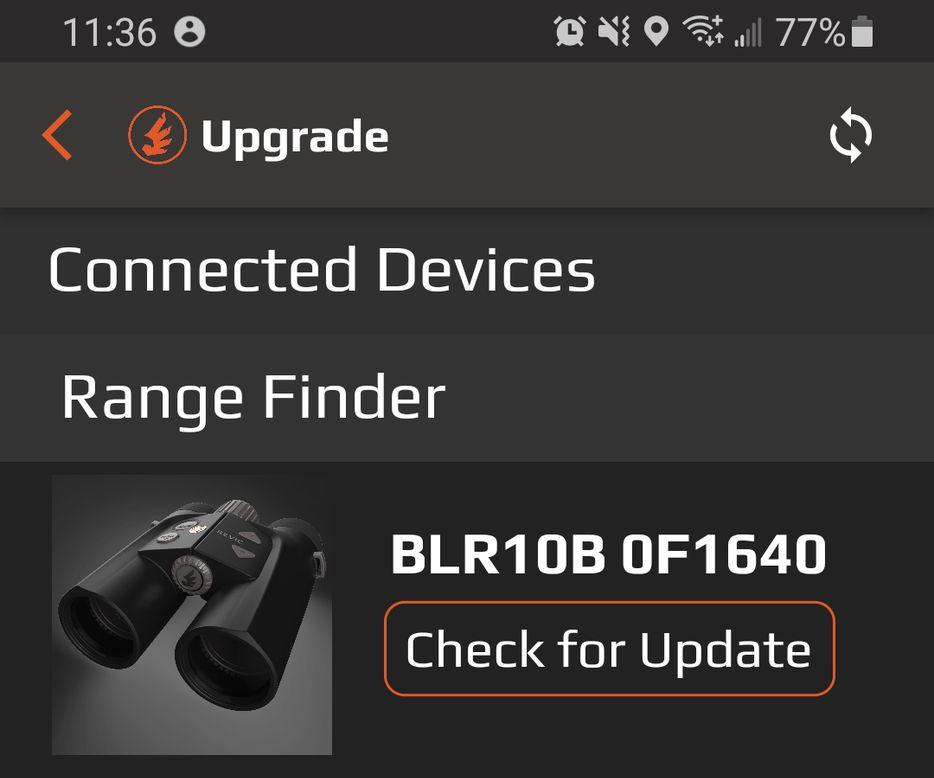
Firmware Update
Cleaning
Dust and Water Protection
Transporting
Storage
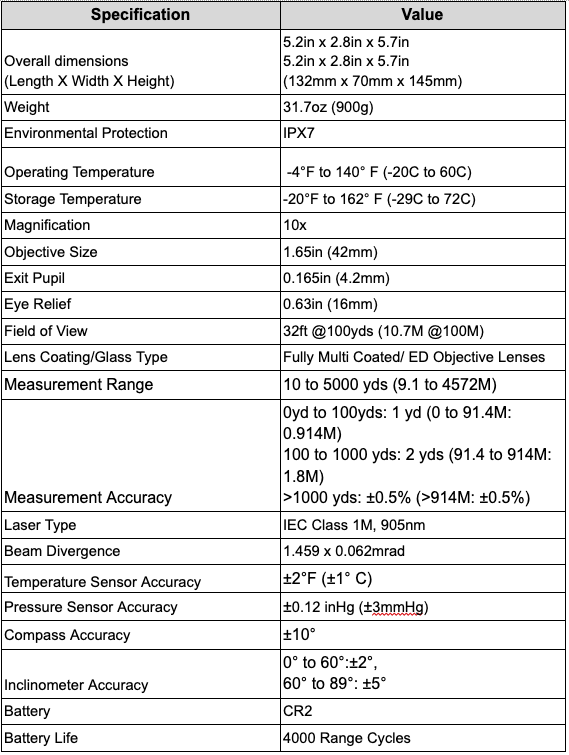
Specifications
FCC Statement
Supplier's Declaration of Conformity
47 CFR § 2.1077 Compliance Information
Gunwerks LLC
201 Blackburn St Cody Wy, 82414
T: (307) 296-7301
FCC Compliance Statement (e.g., products subject to Part 15) This device complies with Part 15 of the FCC Rules. Operation is subject to the following two conditions: (1) This device may not cause harmful interference, and (2) this device must accept any interference received, including interference that may cause undesired operation.
Changes or modifications not expressly approved by the party responsible for compliance could void your authority to operate the equipment.
Note:
This equipment has been tested and found to comply with the limits for a Class B digital device, pursuant to part 15 of the FCC Rules. These limits are designed to provide reasonable protection against harmful interference in a residential installation.
This equipment generates, uses, and can radiate radio frequency energy and, if not installed and used in accordance with the instructions, may cause harmful interference to radio communications. However, there is no guarantee that interference will not occur in a particular installation. If this equipment does cause harmful interference to radio or television reception, which can be determined by turning the equipment off and on, the user is encouraged to try to correct the interference by one or more of the following measures:
- Reorient or relocate the receiving antenna.
- Increase the separation between the equipment and receiver.
- Connect the equipment into an outlet on a circuit different from that to which the receiver is connected.
- Consult the dealer or an experienced radio/TV technician for help.
Industry Canada Notice
This device contains license-exempt transmitter(s)/receiver(s) that comply with Innovation, Science and Economic Development Canada’s license-exempt RSS(s). Operation is subject to the following two conditions:
This device may not cause interference.
This device must accept any interference, including interference that may cause undesired operation of the device.
Le présent appareil est conforme aux CNR d’industrie Canada applicable aux appareil radio exempts de licence.
L'exploitation Est Autorisée aux deux conditions suivantes:
l’appareil ne doit pas produire de brouillage, et
L'utilisateur de l'appareil doit accepter tout brouillage radioélectrique subi, même si le brouillage est susceptible d'en compromettre le fonctionnement.
This device meets the exemption from the routine evaluation limits in sections 2.5 of RSS 102 and compliance with RSS-102 RF exposure, users can obtain Canadian information on RF exposure and compliance.
Warning:
This product can expose you to chemical including Di(2-ethylhexyl) phthalate (DEHP), which is known to the State of California to cause cancer and birth defects or other reproductive harm, and Diisononyl Phthalate (DINP), which is known to the state of California to cause cancer. For more information go to www.P65Warnings.ca.gov.
Warranty and Legal
Revic Optics, a subsidiary of Gunwerks LLC, warranties the mechanical and optical parts of their products to be free from defects in material or workmanship for a period of five (5) years, and the electronic parts for a period of two(2) years from the date of purchase.
After the manufacturer's warranty period, Revic Optics at its sole discretion will cover the costs of labor and/or materials of repairs for mechanical and optical parts for an additional period of five (5) years, and for electronic parts for a period of three (3) years on a goodwill repair basis There is no legal entitlement to goodwill repairs.
During the warranty period, if the product is found to have a defect in material or workmanship,
Revic Optics will, at its option and without charge for labor and materials, repair or replace the
defective parts or the product. If the product is no longer available, Revic Optics reserves the
right to replace the product with an equivalent product offered for sale at the time of the repair.
This limited warranty does not cover failures resulting from abuse, negligence, or unauthorized alterations, modifications or repairs. Wear parts such as rubber armoring, eyecups, carrying straps or cases and direct or indirect damages caused by defects in the product are not covered by the warranty.
This warranty is only valid with proof of purchase or warranty repair documentation from Revic Optics (RMA). Return shipping will be provided for warranty repairs. If the product is shipped abroad any duties or taxes incurred must be paid by the customer. Products without a proof of purchase will be repaired at the customer’s expense.
If other warranties or guarantees (either statutory or voluntary) are agreed to in other countries they must be fulfilled by the agreeing parties. This warranty is granted by Revic Optics a subsidiary of Gunwerks LLC. The place of jurisdiction is Park County, Wyoming USA.
To complete the warranty registration process for your product, please visit www.revicoptics.com/product-registration
Should you require assistance or service, please submit a support request to https://www.revicoptics.com/helpdesk or call (307) 296-7300
Copyright (c) [202]3 Gunwerks, LLC. All Rights Reserved
Information in this document is subject to change without notice. No part of this manual may be reproduced in any form or by any means, electronic or mechanical, including photocopying, recording, or information storage and retrieval systems, for any purpose other than the purchaser’s personal use, without express written consent.
This product is covered by patents pending and the following US Patents: Find our patents at patent-list.info
Gore-Tex is a registered trademark of W. L. Gore and Associates. Google Play Store is a registered trademark of Google, LLC. App Store® is a registered trademark of Apple Inc. All other trademarks are the property of their respective owners.