Congratulations!
Thank you for purchasing the Acura BR10 Ballistic Rangefinding Binoculars!
The BR10 seamlessly integrates high-performance binocular optics with an advanced laser rangefinder, weather station, and our lightning-fast ballistic solver powered by the proprietary Revic Ballistic Engine.
Once a ballistic profile is synced from the Revic Ops app to the BR10, pressing the FIRE button activates the on-board sensors. These sensors measure distance, incline angle, barometric pressure, temperature, and compass bearing. The collected data is then processed by the on-board ballistic solver, which rapidly calculates a firing solution in MOA, MILs, or our NEW Revic Smart Range (RSR) which provides a Shoot-To-Range for use with BDC turrets.
For wind hold corrections, the BR10 offers both Base Wind and Vector Wind modes, providing basic and advanced solutions with ultra-fast adjustments displayed in MOA or MILs at the measured distance.
Additionally, the BR10 features Bluetooth connectivity, allowing seamless communication with the Revic Ops app, Revic rifle scopes, and other compatible peripheral devices.
WELCOME TO THE REVIC OPTICS FAMILY!
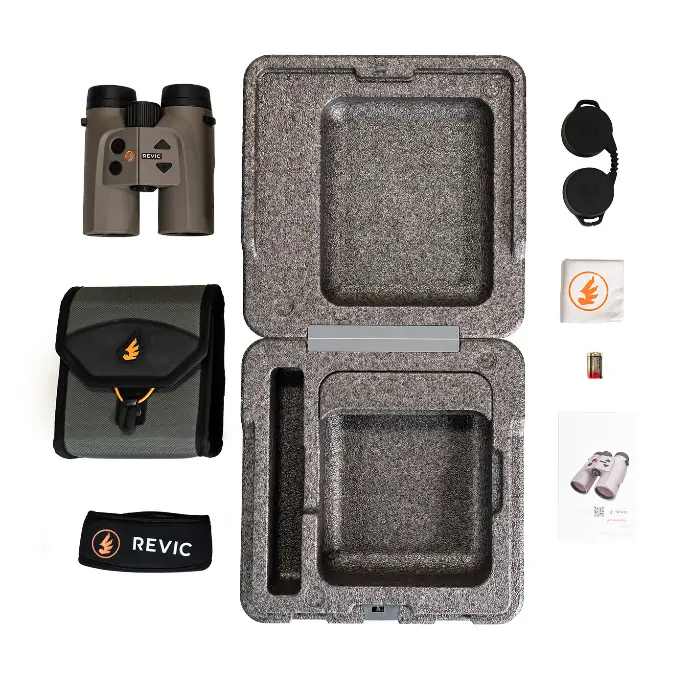
What's in the Box
- BR10 Binocular
- Soft Carrying Case
- Carry Strap
- Lens Cap
- Lens Cloth
- CR2 Battery
- Quickstart Guide
Getting Started
Getting Started
Battery Installation
CR2 battery access is on the bottom of the rangefinder. Be careful to not cross thread and be sure to tighten fully for waterproof function.
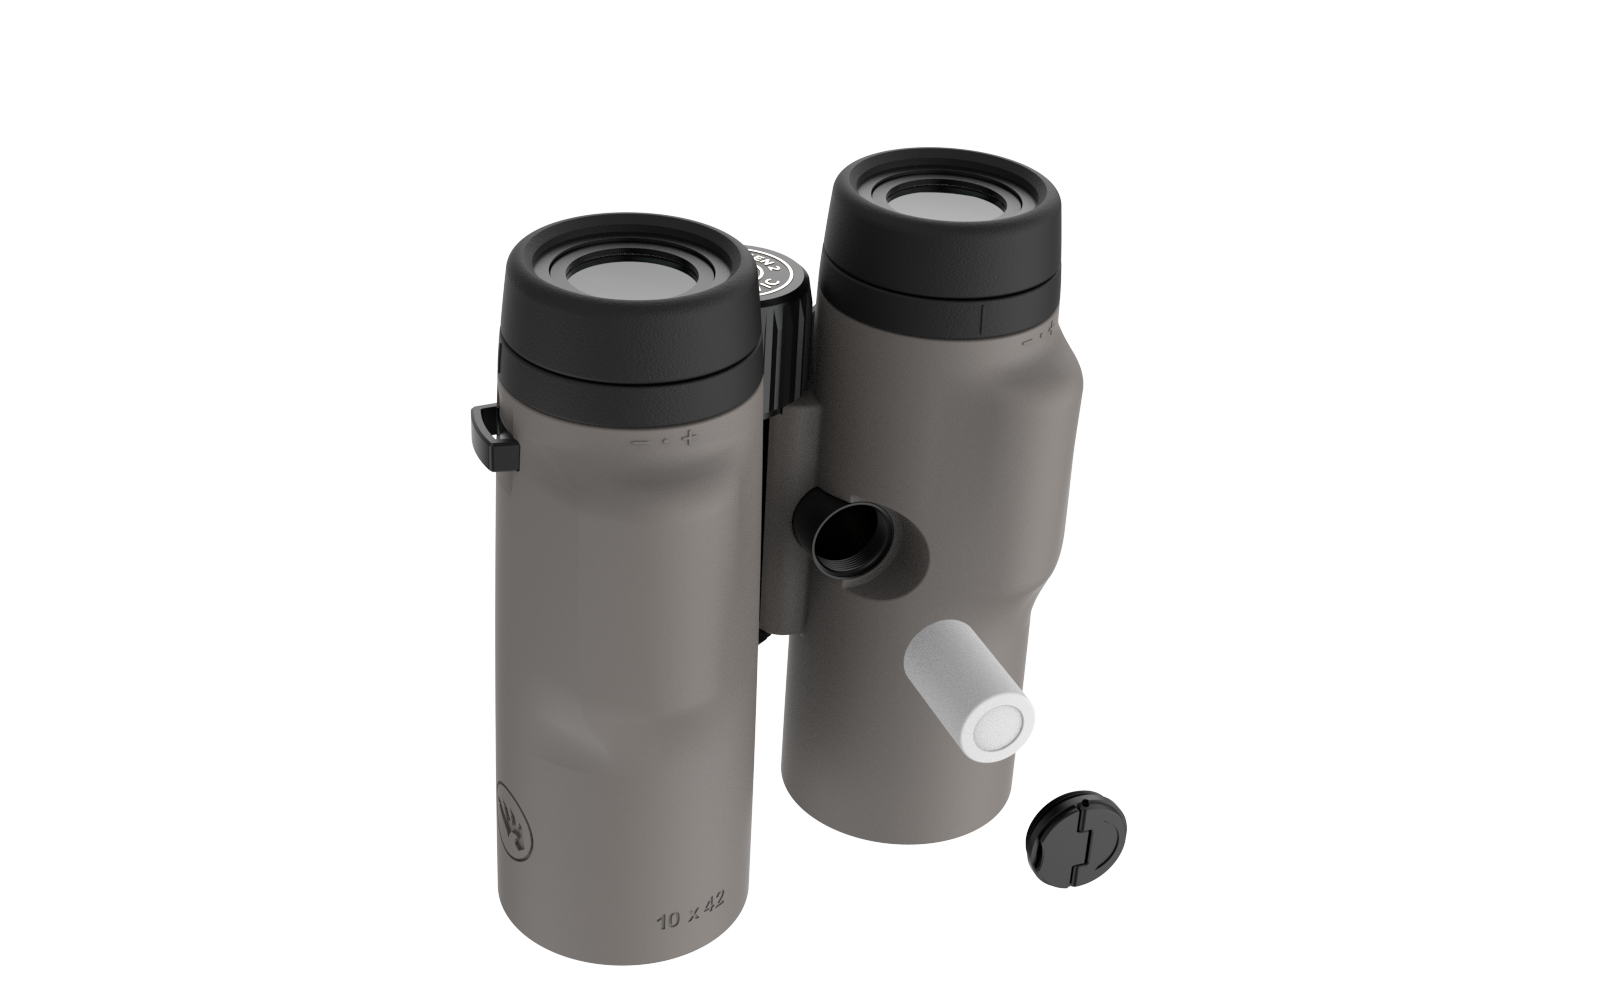
- Battery Installation
CR2 battery access is on the bottom of the rangefinder. Be careful to not cross thread and be sure to tighten fully for waterproof function.
Carry Strap Installation
- The Binocular Carry Strap is routed through the attachment points on each side of the Binocular. To attach the carry strap:
- Pass the strap webbing through the attachment point from the bottom.
- Thread the strap through the buckle (under the 1st layer of the strap).
- Adjust the strap to the desired length (ensuring the strap does not slide out of the buckle).
- Pull the strap tight through the buckle to secure the strap.
Product Guide
Product Identification
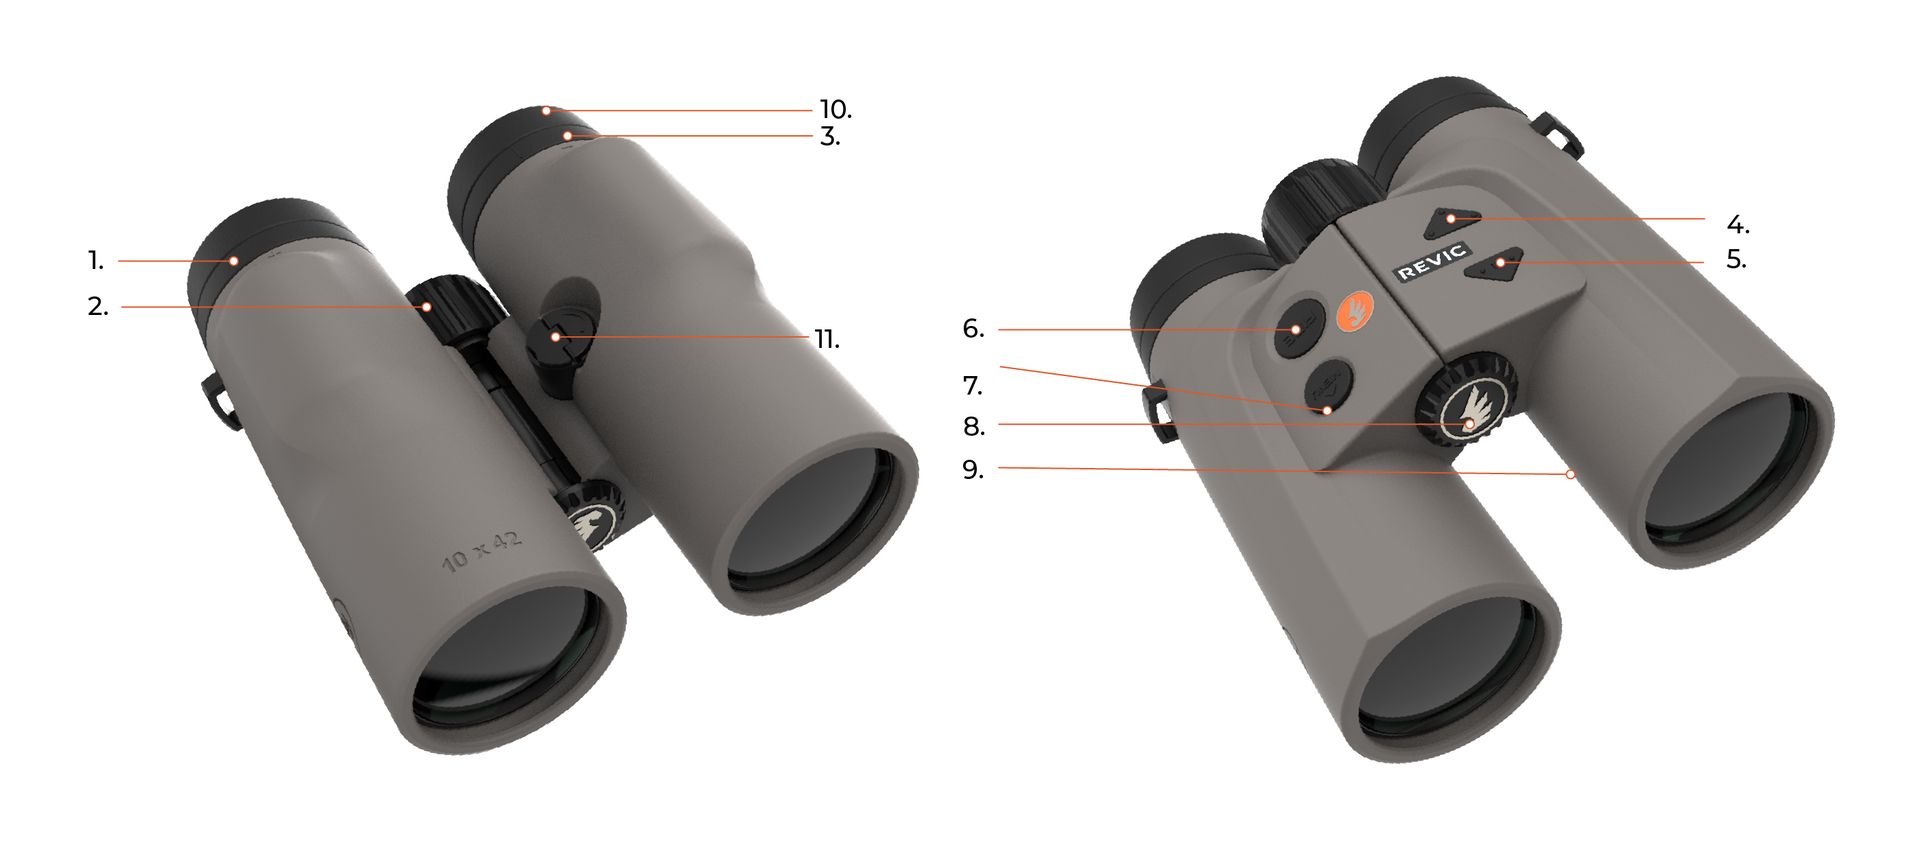
- Diopter Focus
- Image Focus
- Display Focus
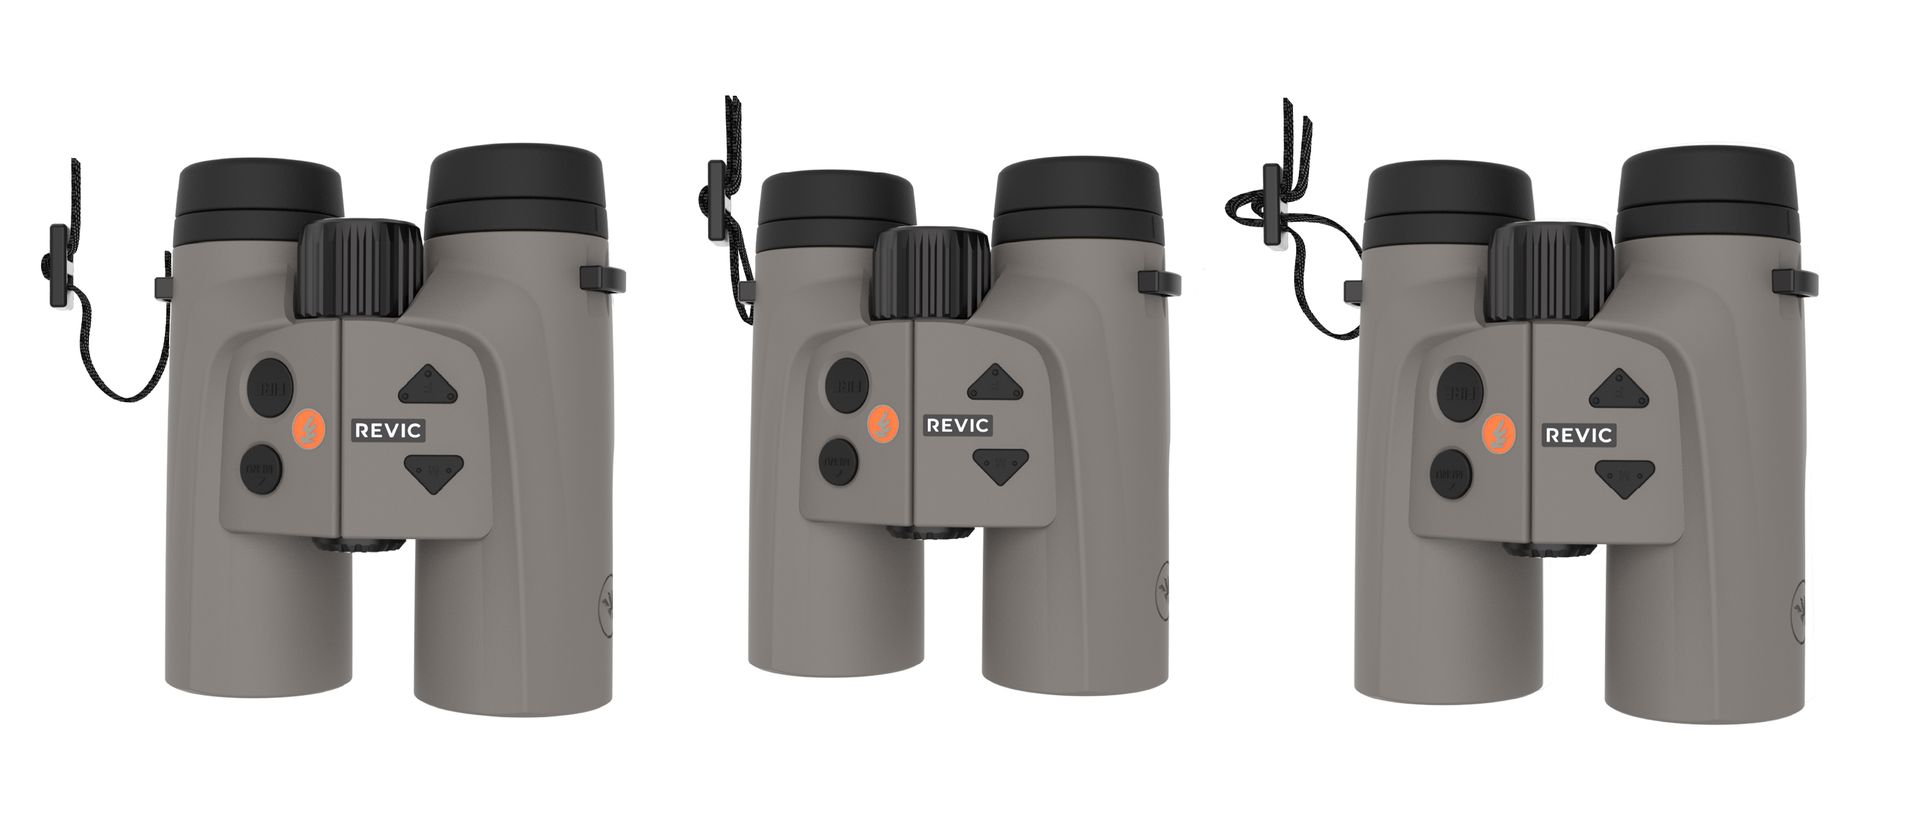
- UP Button
- DOWN Button
- FIRE Button
- MODE button
- Tripod Attachment Point
- Device Information Panel
- Eyecup
- Battery Compartment
- Diopter Focus
- Image Focus
- Display Focus
- UP Button
- DOWN Button
- FIRE Button
- MENU Button
- Tripod Attachment Point
- Device Information Panel
- Eyecup
- Battery Compartment
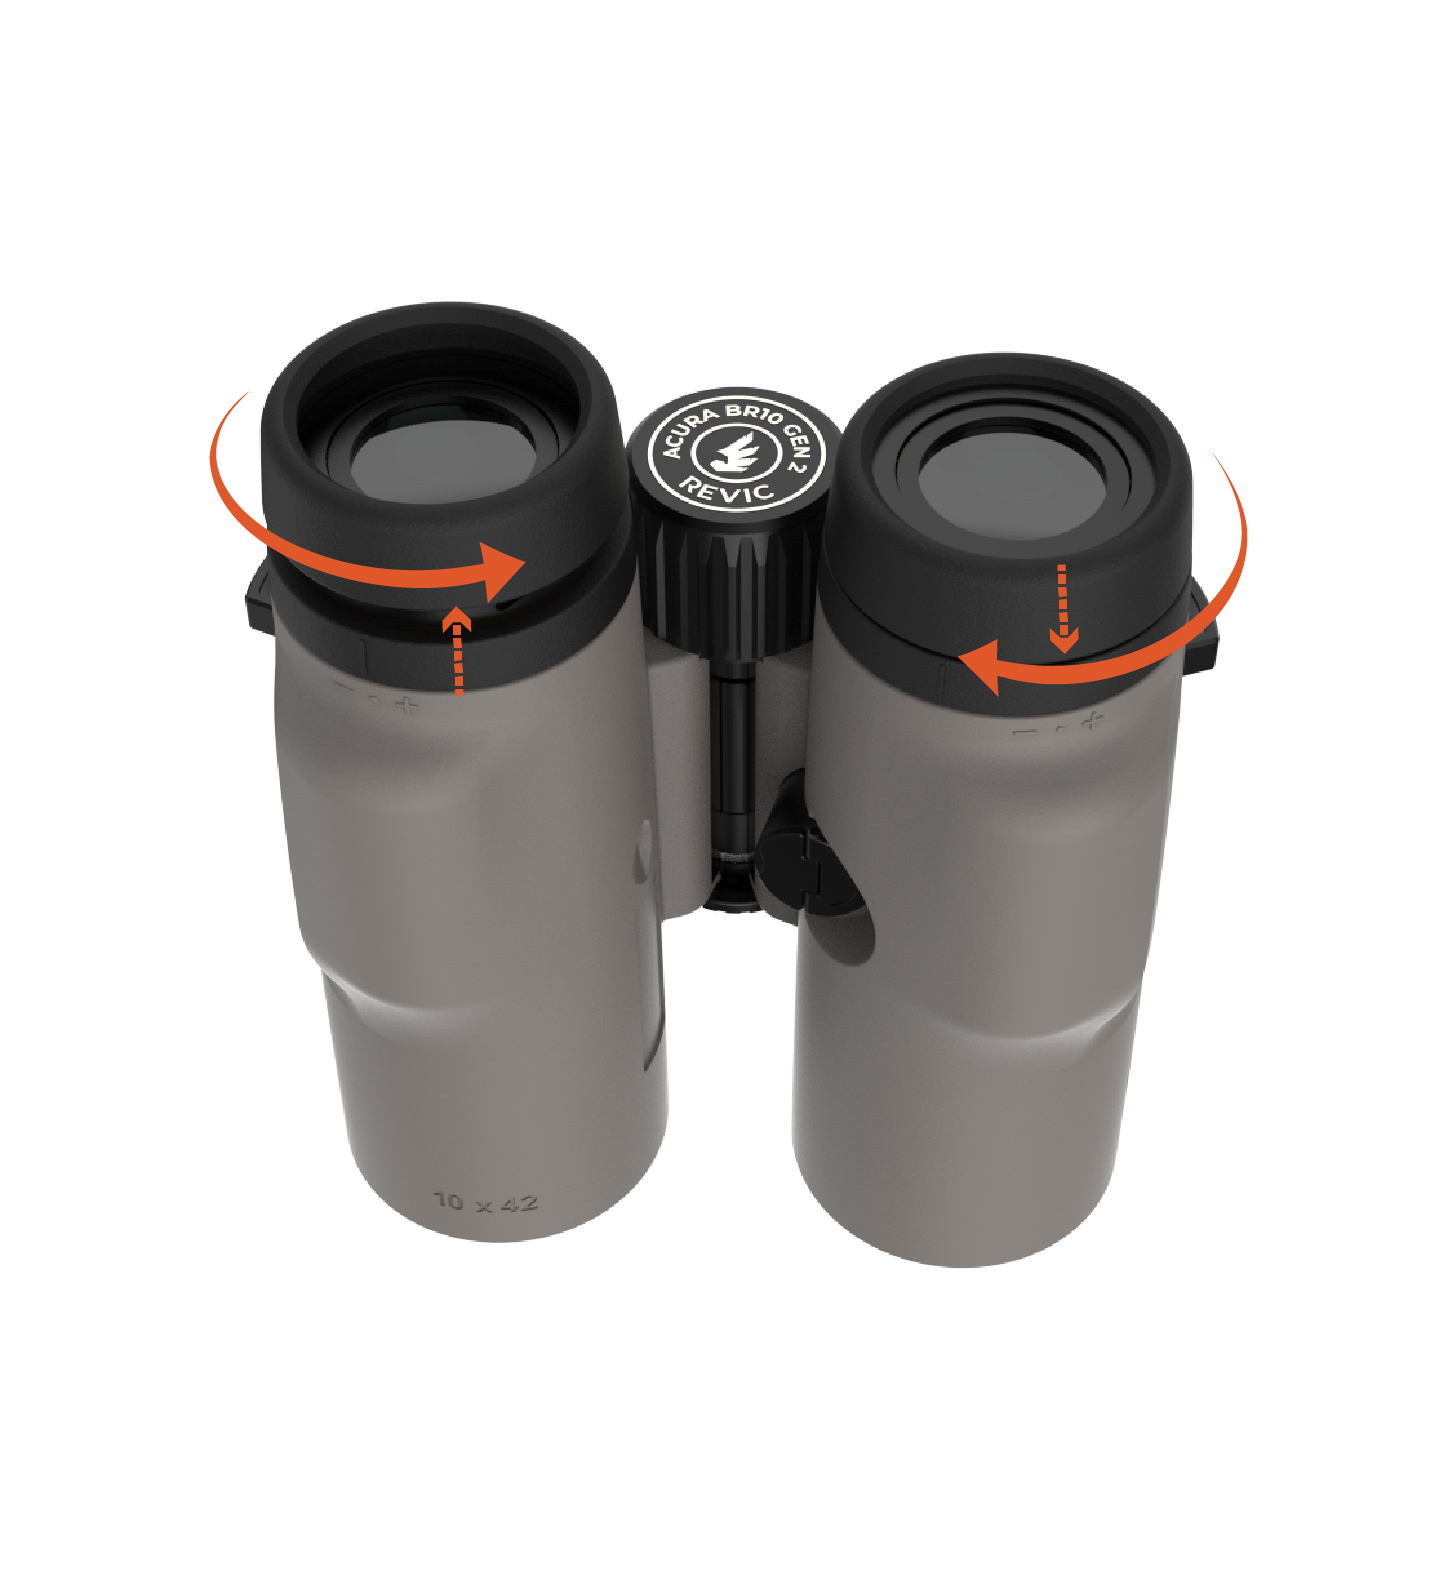
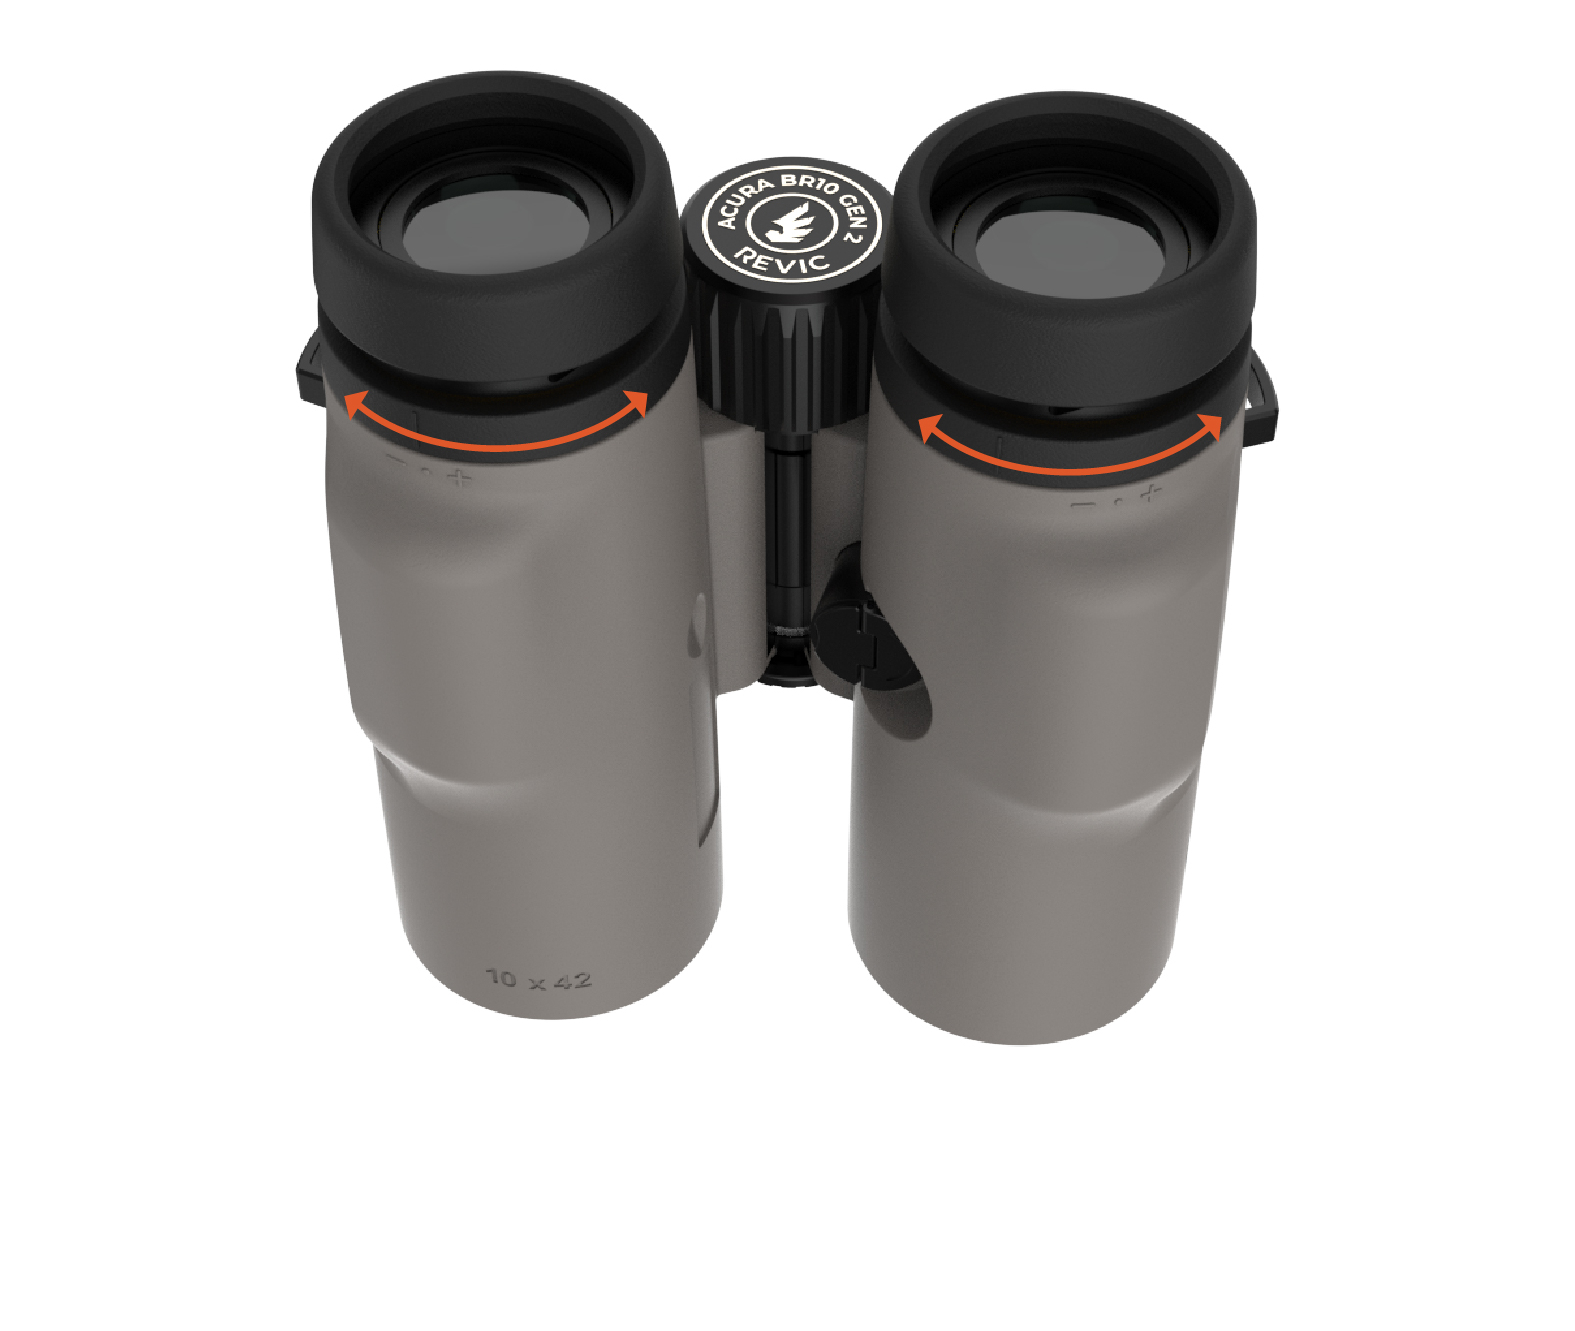
Adjust Eye Relief
The adjustable eyecups are designed for comfort and to set the correct eye relief. To adjust the eyecup up, increasing the eye-relief, turn it counter-clockwise. To return the eyepiece down, decreasing the eye-relief, turn it clockwise.
Adjust Eye Relief
The adjustable eyecups are designed for comfort and to set the correct eye relief. To adjust the eyecup up, increasing the eye-relief, turn it counter-clockwise. To return the eyepiece down, decreasing the eye-relief, turn it clockwise.
Focusing the Binocular
The two eyepiece diopter adjustment rings allow you to focus the OLED display and the viewable image for each eye independently. To adjust the focus:
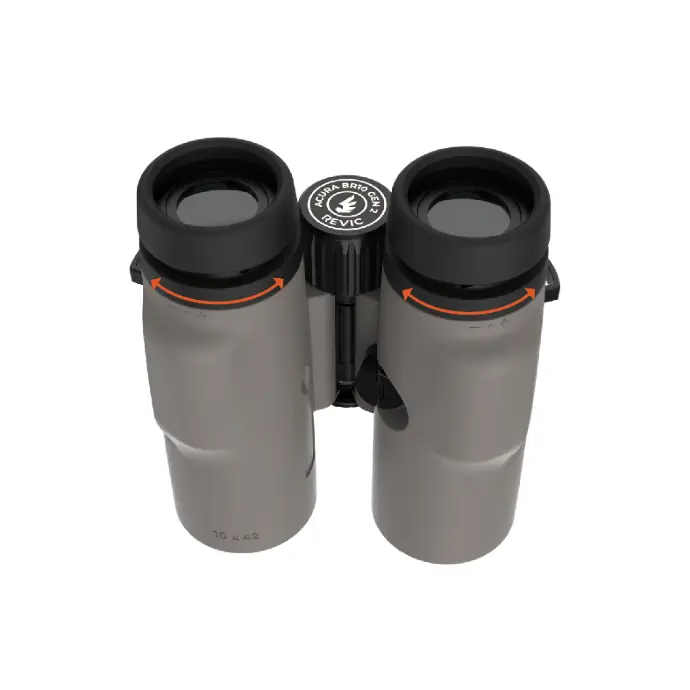
1. Cover the right objective lens with your left hand, press the fire button to turn on the display. Turn the (right) Display Focus ring until the display is optimally focused to your right eye.
2. Now, cover the left objective lens with your left hand, look through the right barrel at a distant object, then adjust the (center) Image Focus knob until the image is optimally focused to your right eye.
3. Then, cover the right objective lens with your right hand, then turn the (left) Diopter Focus ring until the same object is optimally focused to your left eye.
4.. Confirm focus and repeat as needed.
- Cover the right objective lens with your left hand, press the fire button to turn on the display. Turn the (right) Display Focus ring until the display is optimally focused to your right eye.
- Now cover the left objective lens with your left hand, look through the right barrel at a distant object, then adjust the (center) Image Focus knob until the image is optimally focused to your right eye.
- Now cover the right objective lens with your right hand, then turn the (left) Diopter Focus ring until the same object is optimally focused to your left eye.
- Confirm focus and repeat as needed.
Menu and Navigation
Display Guide

Menu Items
The MENU can be accessed with a long press (3+ seconds) of the MENU button. To scroll through the menu, use the UP and DOWN arrow buttons. To select and edit a particular item, press the MENU button. When an item is selected and able to be changed/edited the value will flash. To save the setting and return to the previous screen, press the FIRE button (double click FIRE button to return to main screen).
- Temperature Override (Temp)- If the sensor temperature does not match the ambient temperature, you can manually override the sensor temperature value. To return/reset the temperature to the device sensor temperature, press and hold the MENU button while the value is selected (flashing).
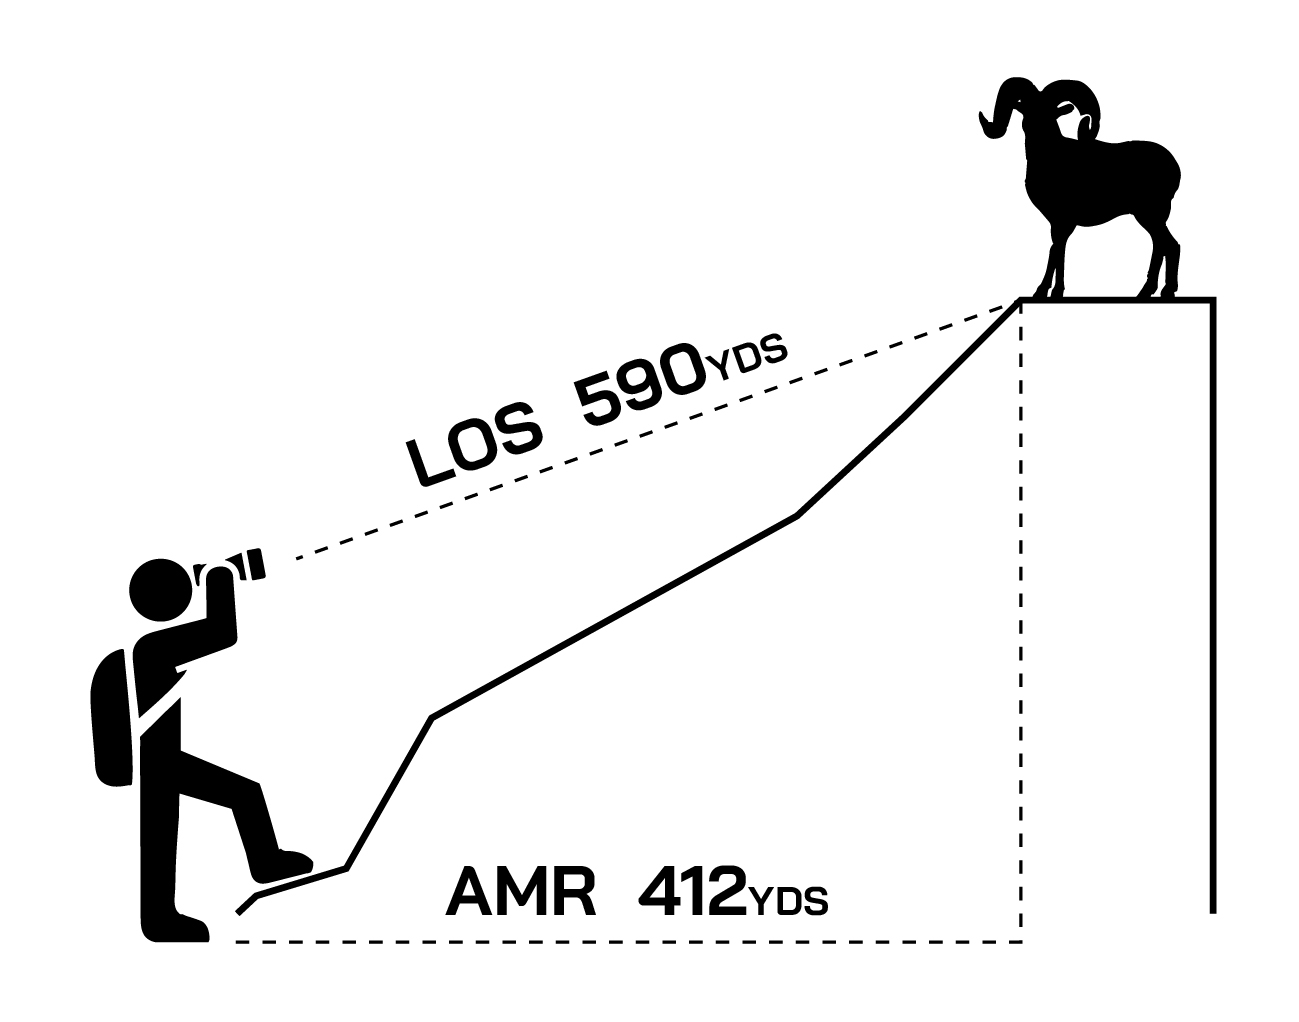
- Range Output Mode (Mode) - Select between Range only (RNG), Angle Modified Range (AMR), or Ballistic Profile (Prof) if a Ballistic Profile has been loaded from the Revic App. There is an option to Clear the Ballistic Profile by selecting (Clr). With limited display characters, when Prof is selected, the profile name will display after 1.5 seconds for confirmation.
- Range Only: Line of sight range to your target with no ballistic information. This is shown in the display as just the range.
- Angle Modified Range: Straight line distance/map distance to your target. This will highlight AMR underneath the range readout in the BR10 display. <Add Image>
- *Ballistic Profile Range: Shown in line of sight range that includes the ballistic calculation in the BR10 display.
- *Ballistic Profile Range: Shown in line of sight range that includes the ballistic calculation in the BR10 display.
- * If a Revic Smart Range(RSR) profile is being used, "RSR" will be highlighted underneath the range. RSR is the SHOOT-TO-RANGE for the ballistic turret being used. Refer to the Revic Smart Range (RSR) section to learn more.
- * If a Revic Smart Range(RSR) profile is being used, "RSR" will be highlighted underneath the range. RSR is the SHOOT-TO-RANGE for the ballistic turret being used. Refer to the Revic Smart Range (RSR) section to learn more.
- Range Only: Line of sight range to your target with no ballistic information. This is shown in the display as just the range.
- Range Units (Unit) - Select from the following Unit options:
- US/Y outputs (Y)ards for distance and (US) Customary Units for other units
- SI/Y outputs (Y)ards for distance and (SI) System International units for all other units
- US/M outputs (M)eters for distance and (US) Customary Units for other units
- SI/M outputs (M)eters for distance and (SI) System International units for all other units
- Button Hand (Hand) - Select from Right hand and left hand button configuration. This switches which side your FIRE and MENU buttons are on.
- Latitude (Lat) - Set the Latitude to an integer value between 90° S to 90° N. The default setting is 44° N.
- Compass Calibration (Cal) - Frequent calibration of the compass will ensure the shooting vector used in the ballistic calculation and App features like Waypoint Drop are accurate. Navigate to the Calibration menu item and press MENU to start the calibration. During calibration, rotate the binocular in a figure 8 pattern ensuring the front of the binos points in all directions. When complete the unit display will read “Pass.” This will take approximately 5-10 seconds.
- Brightness (Brt)- The BR10 has five brightness settings, 1-4 and Auto which will automatically select the brightness setting based on ambient light conditions.
- Bluetooth (BT) - On/Off - When powered BT will broadcast its signal to be paired with the Revic Ops App or other compatible Revic Optics products.
- Temperature Override (Temp)- If the sensor temperature does not match the ambient temperature, you can manually override the sensor temperature value. To return/reset the temperature to the device sensor temperature, press and hold the MENU button while the value is selected (flashing).
Wind
The BR10 is equipped with BASE wind and VECTOR wind Modes.
Base Wind
- Base Wind provides a fast and simple wind hold solution for situations where every second counts. The Base Wind speed is preset within the ballistic profile you created in the Revic Ops app. We recommend setting it to 5 MPH—this allows for quick mental calculations in the field.
- For example:
- If the actual wind speed is 10 MPH, simply double the ballistic wind correction.
- If the wind is 2.5 MPH, take half of the 5 MPH ballistic wind correction.
- Base Wind is displayed with the 9 O’Clock and 3 O’Clock wind clock indicators both on. (show an visual example)
- This intuitive system ensures rapid adjustments, so you can focus on making the shot. Base Wind speed can be quickly changed on the fly if you prefer a more accurate ballistic solution.
- Note: Base Wind does not account for Spin Drift, Aero Jump, or Coriolis Effect since a wind direction is not given.
Vector wind
- Vector wind allows you to set your wind speed and direction, to give you the most accurate ballistic solution. This mode accounts for Spin Drift, Aero Jump and Coriolis Effect.
- Vector wind is shown with one wind clock indicator on, unless 12:30, 5:30, 6:30 or 11:30.
- Example: A 12:30 wind will show the 12 O’Clock and 1 O’Clock positions turned on.(show one with a 2:00 wind as well)
- Refer to Quick Key Wind input section for instructions.
Wind Recalculation
- The BR10 allows you to quickly update your ballistic solution by inputting new wind data—no need to re-range your target. If you range first and then adjust the wind speed or direction, or if wind conditions change after your last ballistic solution, simply update your wind call.
- After entering your wind speed and/or direction, you can either wait for the automatic timeout or press the FIRE button once. The Revic Ballistic Engine will instantly recalculate a new ballistic solution based on the updated wind information.
- This feature helps conserve battery life and saves valuable time in the field, allowing you to make quick adjustments without needing to re-range when you already have a range distance you trust.
Quick Keys
Wind Inputs:
- Wind Speed Input: From the main screen, use the ARROW keys to increase or decrease the wind speed. You can either wait for the automatic timeout or press the FIRE button to save and exit.
If a range has been previously taken, this action will automatically trigger a ballistic wind recalculation, ensuring an updated ballistic solution based on the new wind input. - Vector Wind Input: From the main screen use the ARROW keys to increase or decrease the wind speed. After wind speed is set press the MENU button to input the wind direction. Input the direction of the wind relative to your target. The direction options are shown as a clock. You have the ability to enter any clock position as well as 12:30, 5:30, 6:30, or 11:30. Example: A 12:30 wind will show the 12 O’Clock and 1 O’Clock positions turned on. You can either wait for the automatic timeout or press the FIRE or MENU button to save and exit.
If a range has been previously taken, this action will automatically trigger a ballistic wind recalculation, ensuring an updated ballistic solution based on the new wind input.
- Wind Speed Input: From the main screen, use the ARROW keys to increase or decrease the wind speed. You can either wait for the automatic timeout or press the FIRE button to save and exit.
- Base Wind Reset: To reset wind to the default Base Wind setting from your ballistic profile, press both ARROW buttons simultaneously.
- Change Targeting Mode: Targeting modes allow users to optimize laser ranging performance based on target acquisition needs. Choose between single or multiple laser ranges to improve accuracy when engaging hard-to-acquire targets. Press the MENU button to cycle through targeting modes.
- Near (N): Prioritizes the closest target.
- Far (F): Ignores the closest target and prioritizes the furthest target. *Recommended when inclement weather is making it difficult to acquire a range.
*Near and Far Modes include Scan Mode. Simply press and hold the Fire button while scanning, and the BR10 will continuously update the yardages. - Long Range Near (LRN): Prioritizes the closest target in long-range scenarios.
- Long Range Far (LRF): Ignores the closest target and prioritizes the furthest target in long-range scenarios.
*Recommended when inclement weather is making it difficult to acquire a range.
These modes ensure flexibility and precision when ranging targets in varying conditions.
- Change Display Brightness: To quickly change display brightness while holding the MENU button use the ARROW keys to toggle between settings
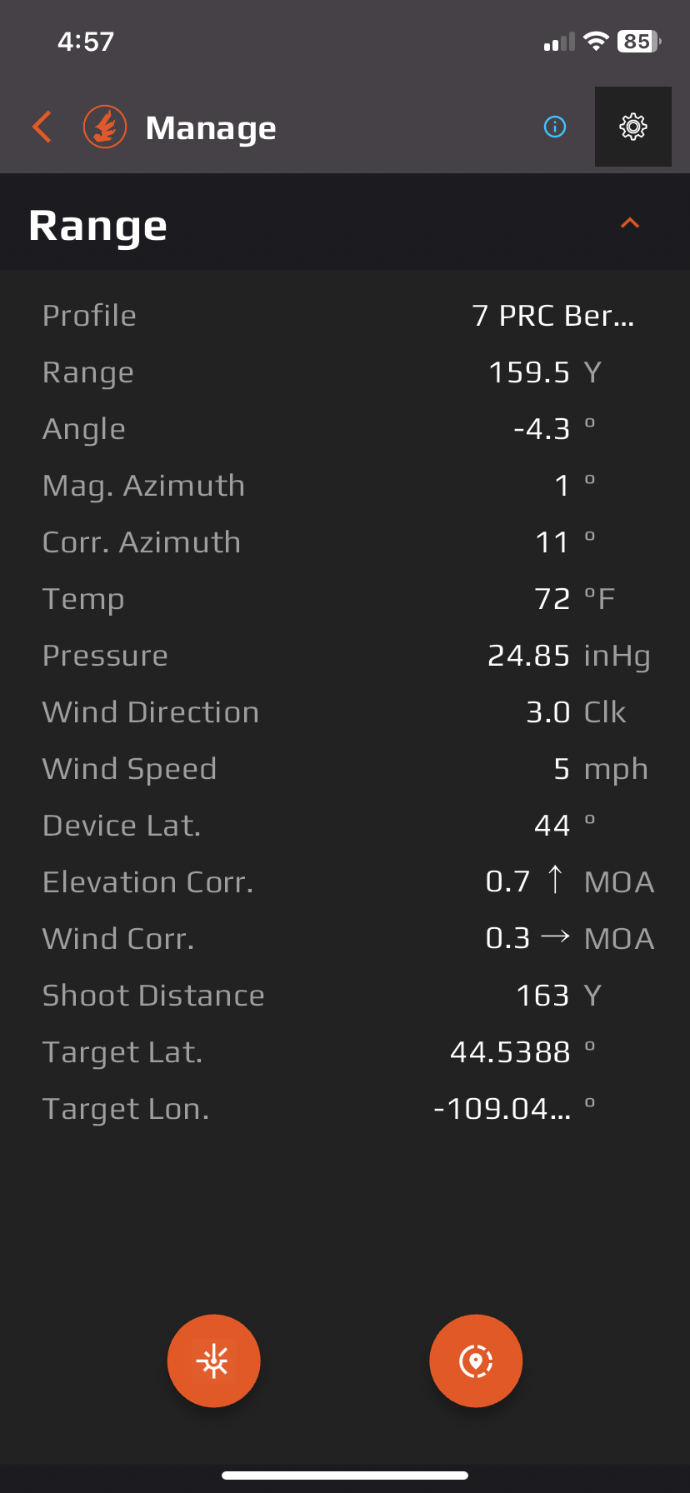
- View Previous Range Data: After taking a range, the BR10 allows you to review all the data used to calculate your ballistic solution.
- To access previous range data: While holding the MENU button -> Press the FIRE button -> Release both buttons simultaneously.
- The following information will be displayed:
- Range – Rng
- Revic Smart Range (if applicable) – RSR
- Elevation Correction – Ecor
- Wind Correction – Wcor
- Wind Speed – Wspd
- Wind Direction – Wdir
- Pressure – Pres
- Temperature – Temp
- Azimuth – Azmt
- Angle – Angl
- Hardware Version – Hrdw
- Firmware Version – Frmw
- This feature provides quick access to critical range data, ensuring you have all the necessary details for an accurate shot placement.
- To access previous range data: While holding the MENU button -> Press the FIRE button -> Release both buttons simultaneously.
Revic Ops App
Download the Revic Ops App to create a Ballistic Profile and get started using your BR10.
Creating a Ballistic Profile
- Navigate to the Profile Manager Module.
- Tap the Plus icon in the bottom right and select “Manual” to create a new Ballistic Profile or Ballistic Data Ring Profile.
- Navigate to the Profile Manager Module.
- Profile Sync
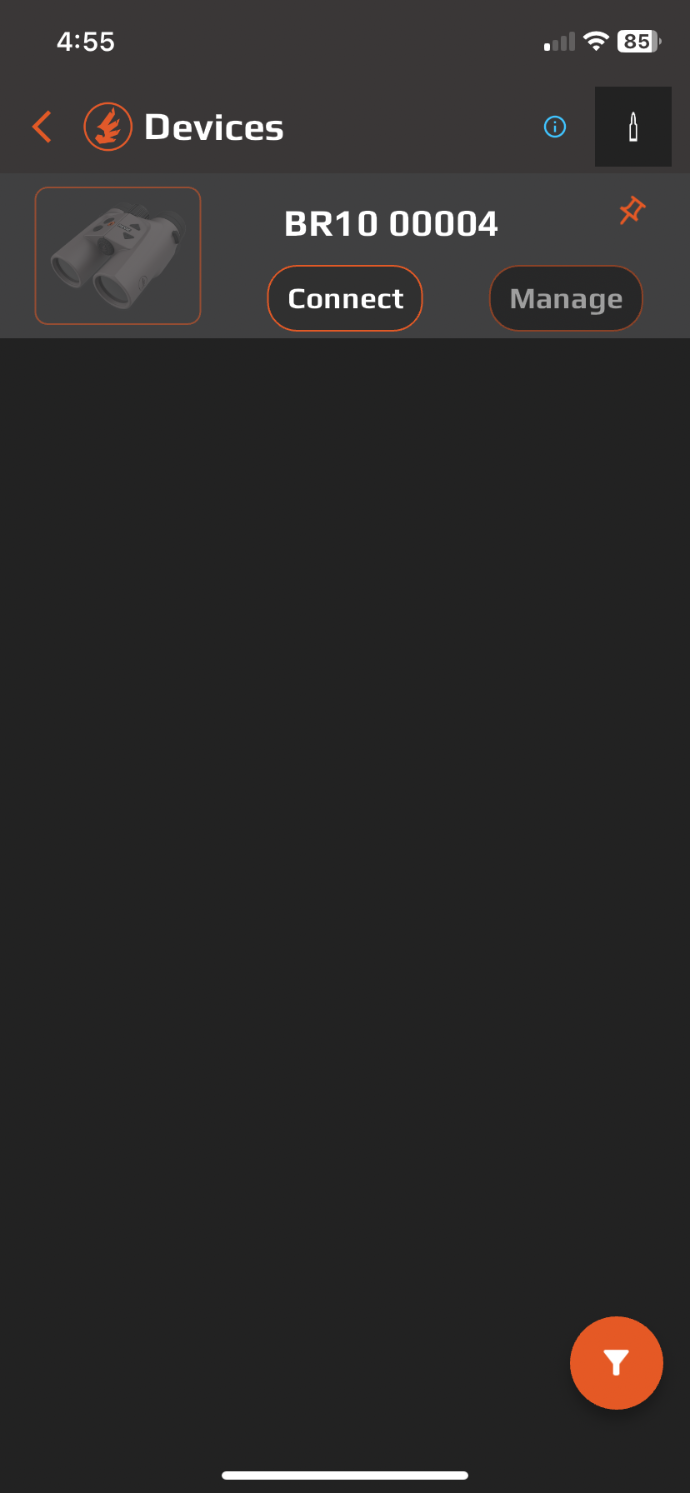
Follow the following steps to sync your profile. - Navigate to the Device Manager Module
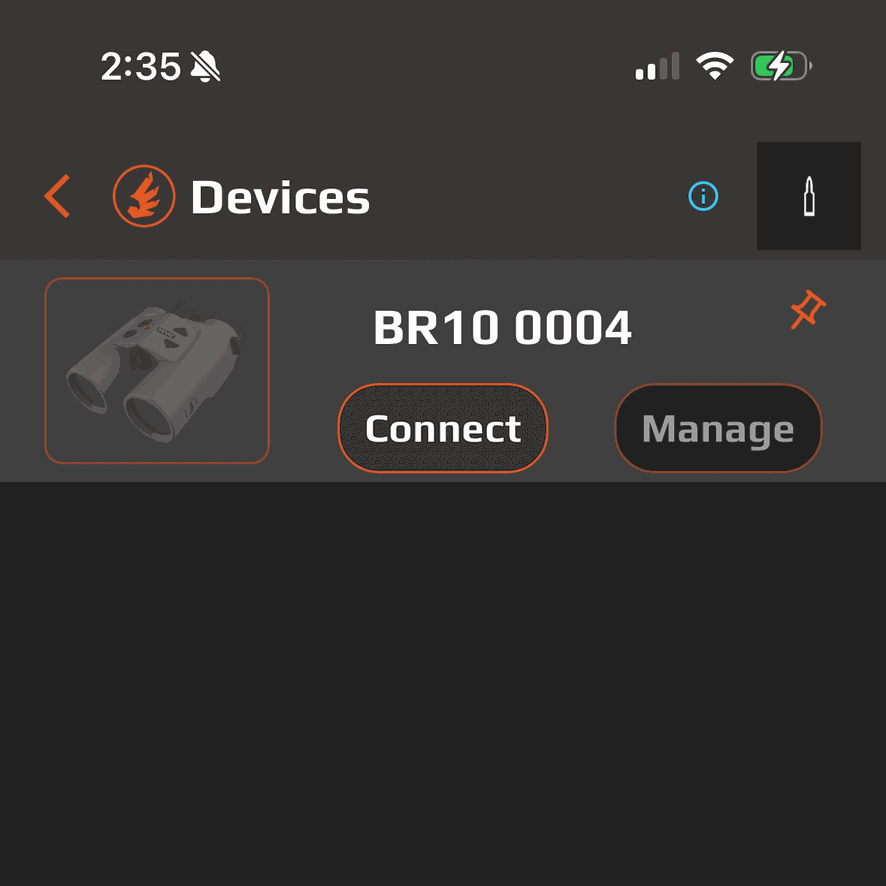
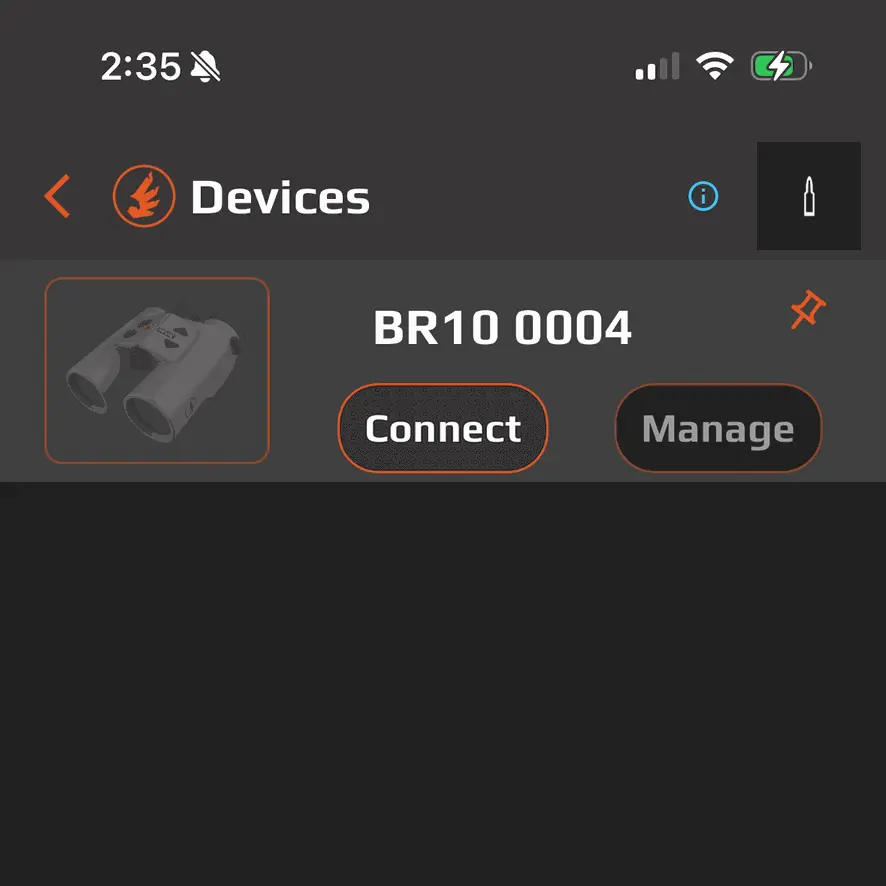
- Power on your BR10 Device
- Tap “Connect”
- Tap “Connect”
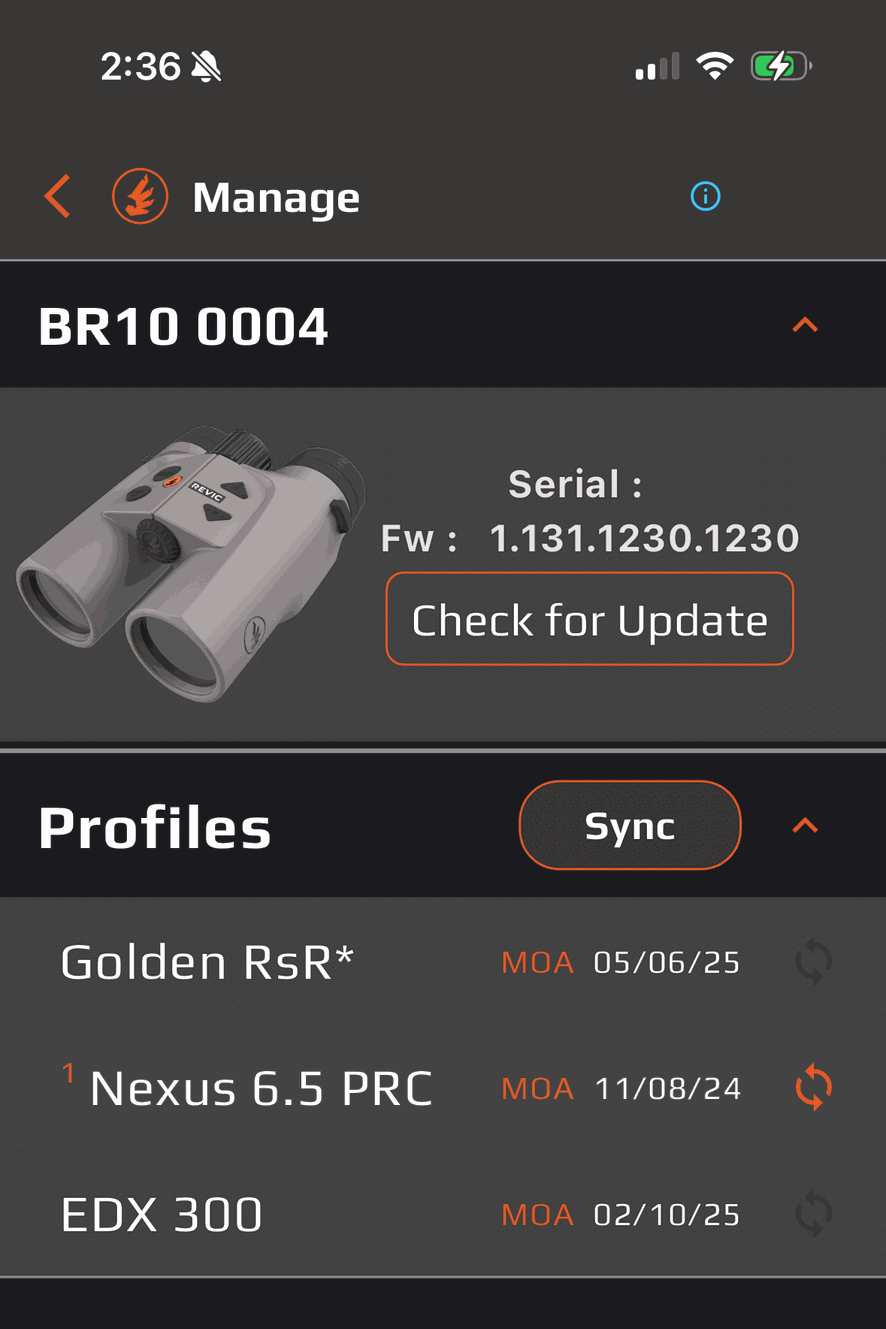
- After connecting select “Manage”
- After connecting select “Manage”
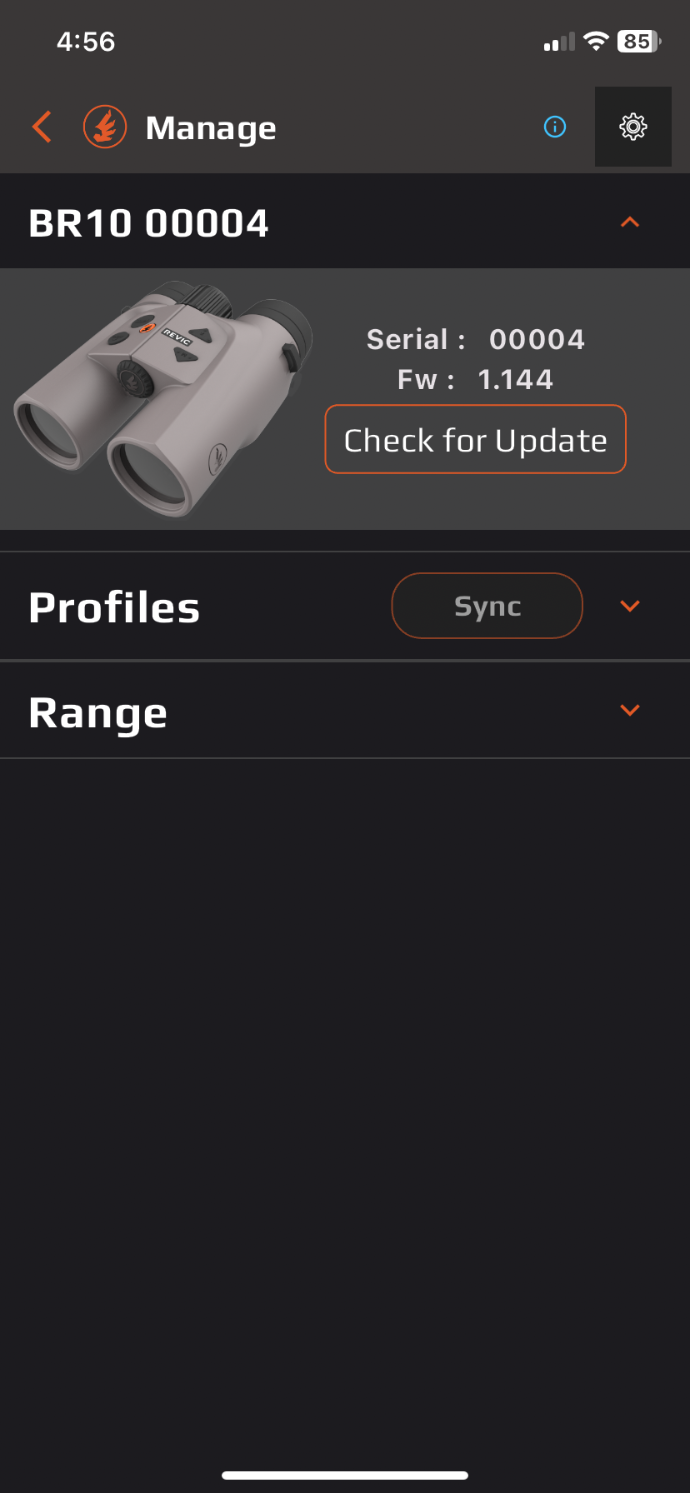
- Select the Profile you would like to sync then press “Sync”
- Select the Profile you would like to sync then press “Sync”
- You should get a confirmation message.
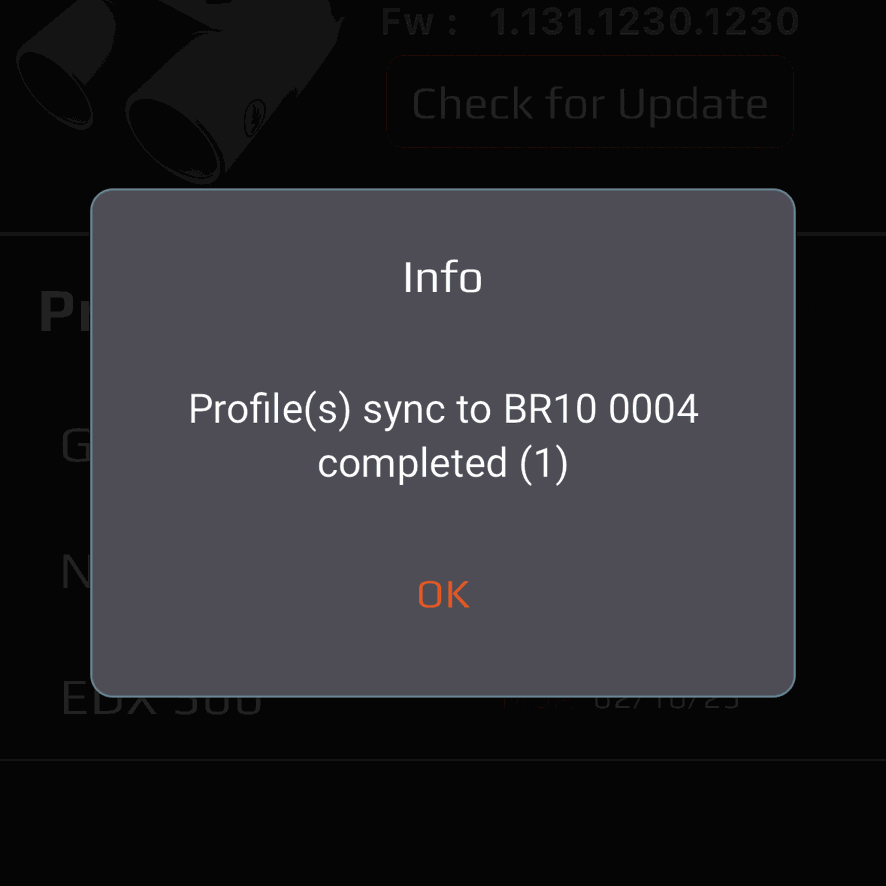
- You should get a confirmation message.
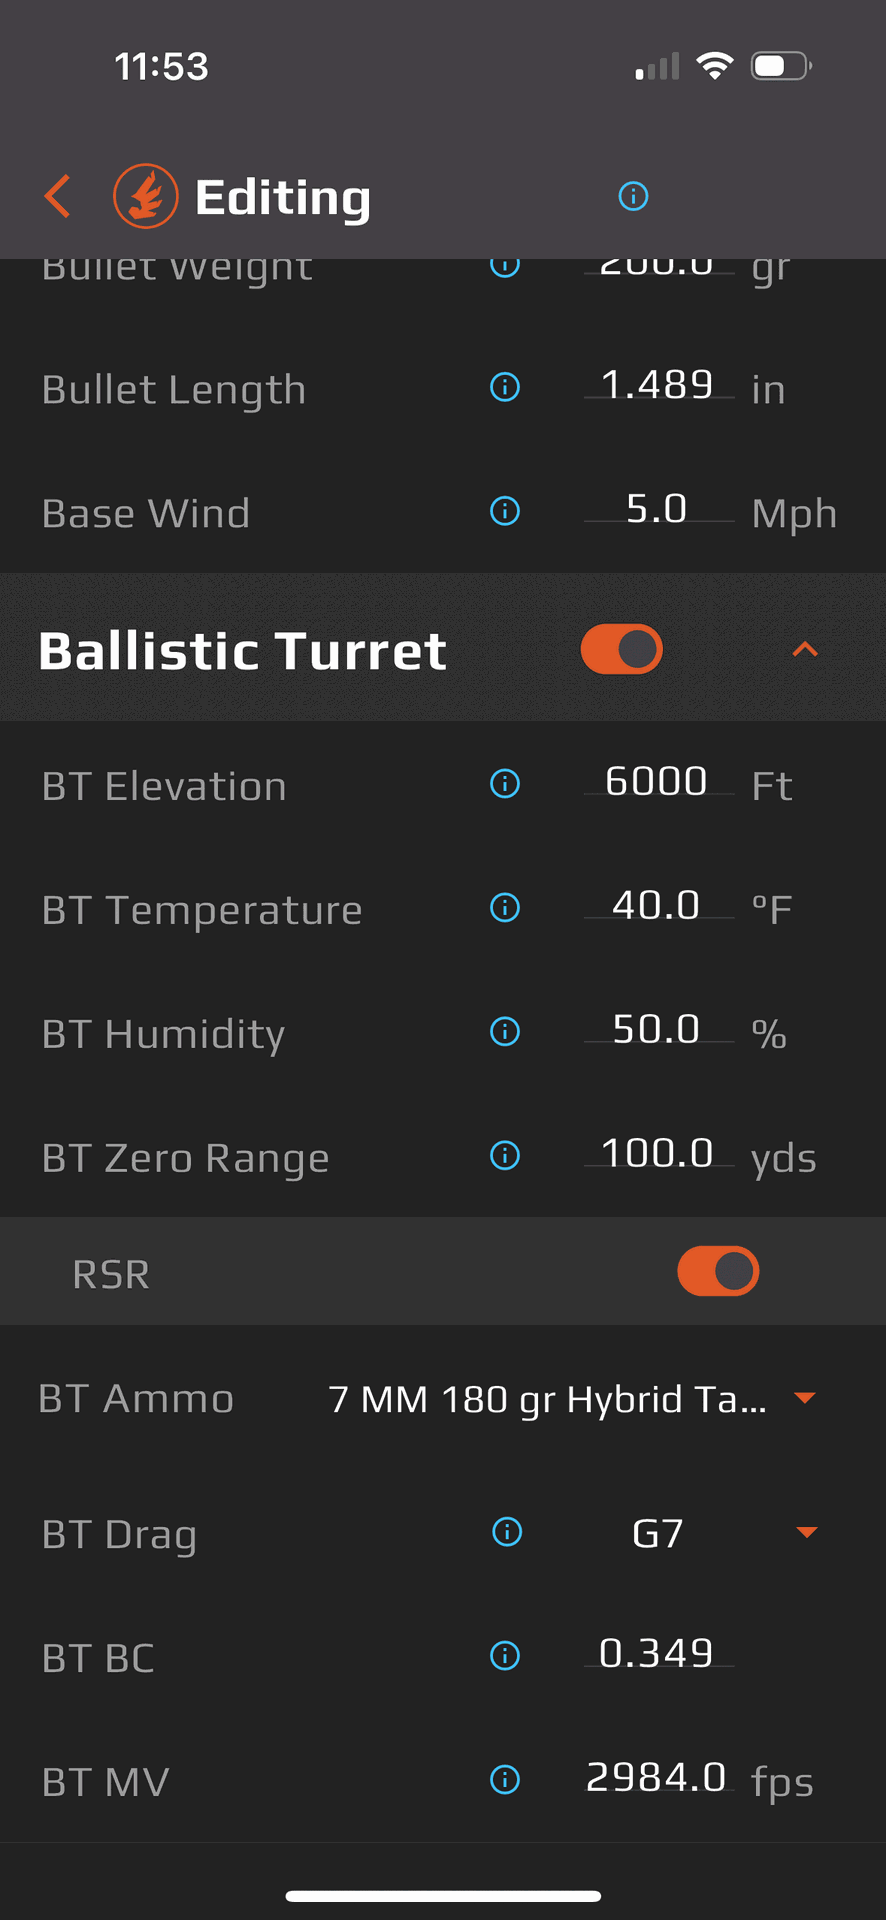
- Revic Smart Range (RSR)
The new standout feature, Revic Smart Range (RSR), enhances hunting success by allowing users to simply dial to a range on a ballistic turret while solving for all ballistic and/or environmental variables. This works with any ballistic turret like the Revic Ballistic Data Ring, Leupold CDS Ballistic Dials, or Swarovski Ballistic Turret Flex.
The real value of our patent pending Revic Smart Range (RSR) is that a ballistic turret made for one set of ballistics and environmental conditions can now be used with any other set of ballistics and/or environmental conditions, and still output a perfect Shoot-to-Range solution from a Revic smart device or the Revic Ops App. For example, no matter whether you change ammo, switch muzzle velocity, try a different rifle altogether - with RSR, you don’t need a new BDC turret every time something changes. Simply update your ballistic profile and RSR recalculates a new Shoot-to-Range for your existing turret.
*Please note that RSR only displays for targets over 100 yards. For distances under 100 yards, the BR10 will only display Line of Sight (LOS) range.
To make an RSR Profile follow these steps - Open the Revic Ops App
- Navigate to the Profile Manager Module
- Select the Ballistic Profile you want to add a Ballistic Turret to.
- Turn on Ballistic Turret and add the data on etched on your Ballistic Turret.
- Turret Elevation
- Turret Temperature
- Turret Humidity
- Turret Zero Range - If your first number on your turret is 1. Then this number will be 100yds.
- Turn on RSR and add the remaining information that your turret is etched for.
- Turret Ammo
- Turret Drag
- Turret BC
- Turret MV
- You can now go edit any of the firearm and ammo data in the top portion of the profile and your Revic product will give you a perfect Shoot-to-Range.
- Open the Revic Ops App
Raypoint Drop
- Revic’s new Raypoint drop feature is designed to work with the Revic Ops App. Simply connect your device with the App and take a range. A waypoint will be dropped on your target. There is a band attached to the waypoint that represents the potential accuracy of your azimuth reading. The green band represents a plus or minus 5 degree range, with 2.5 degrees on each side of the waypoint. It indicates expected accuracy when the compass is properly calibrated. The combined green and yellow bands represent a plus or minus 8 degree range. This reflects potential accuracy if the compass has not been regularly calibrated.
- To drop a waypoint:
- Open Revic Ops App.
- Navigate to Mapping Target Module
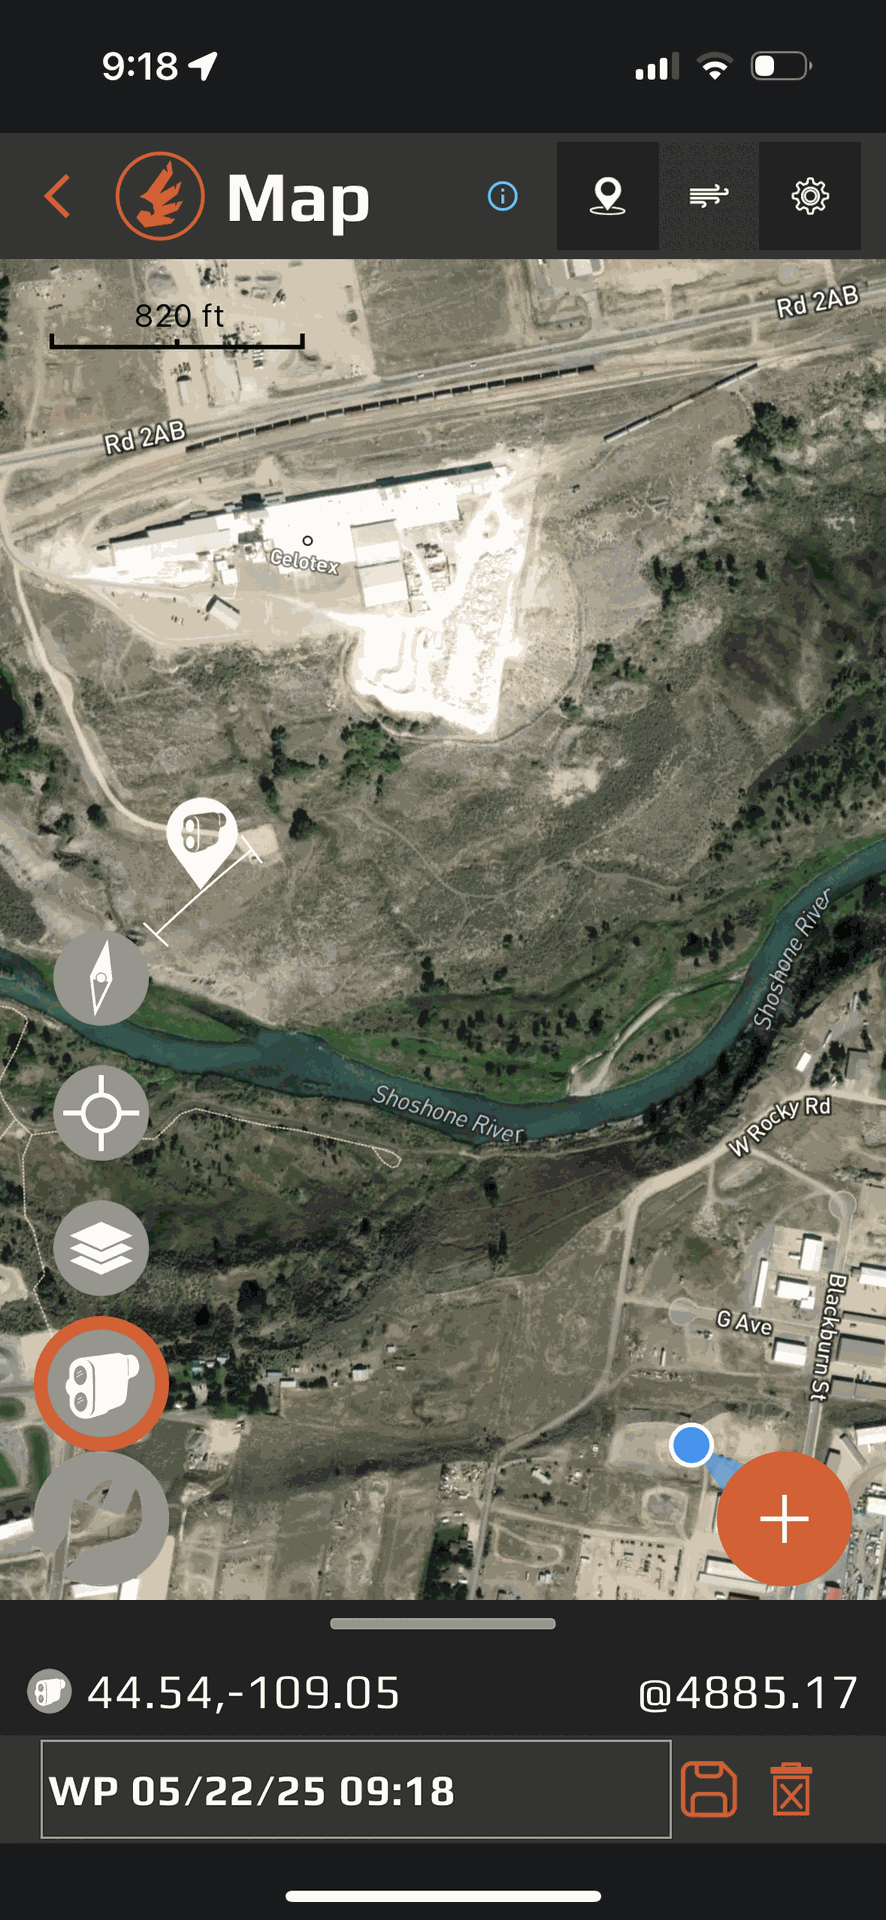
- Navigate to Mapping Target Module
- Tap on the Rangefinder Device in the bottom left hand corner.
- Power on BR10 and select from the list to connect.
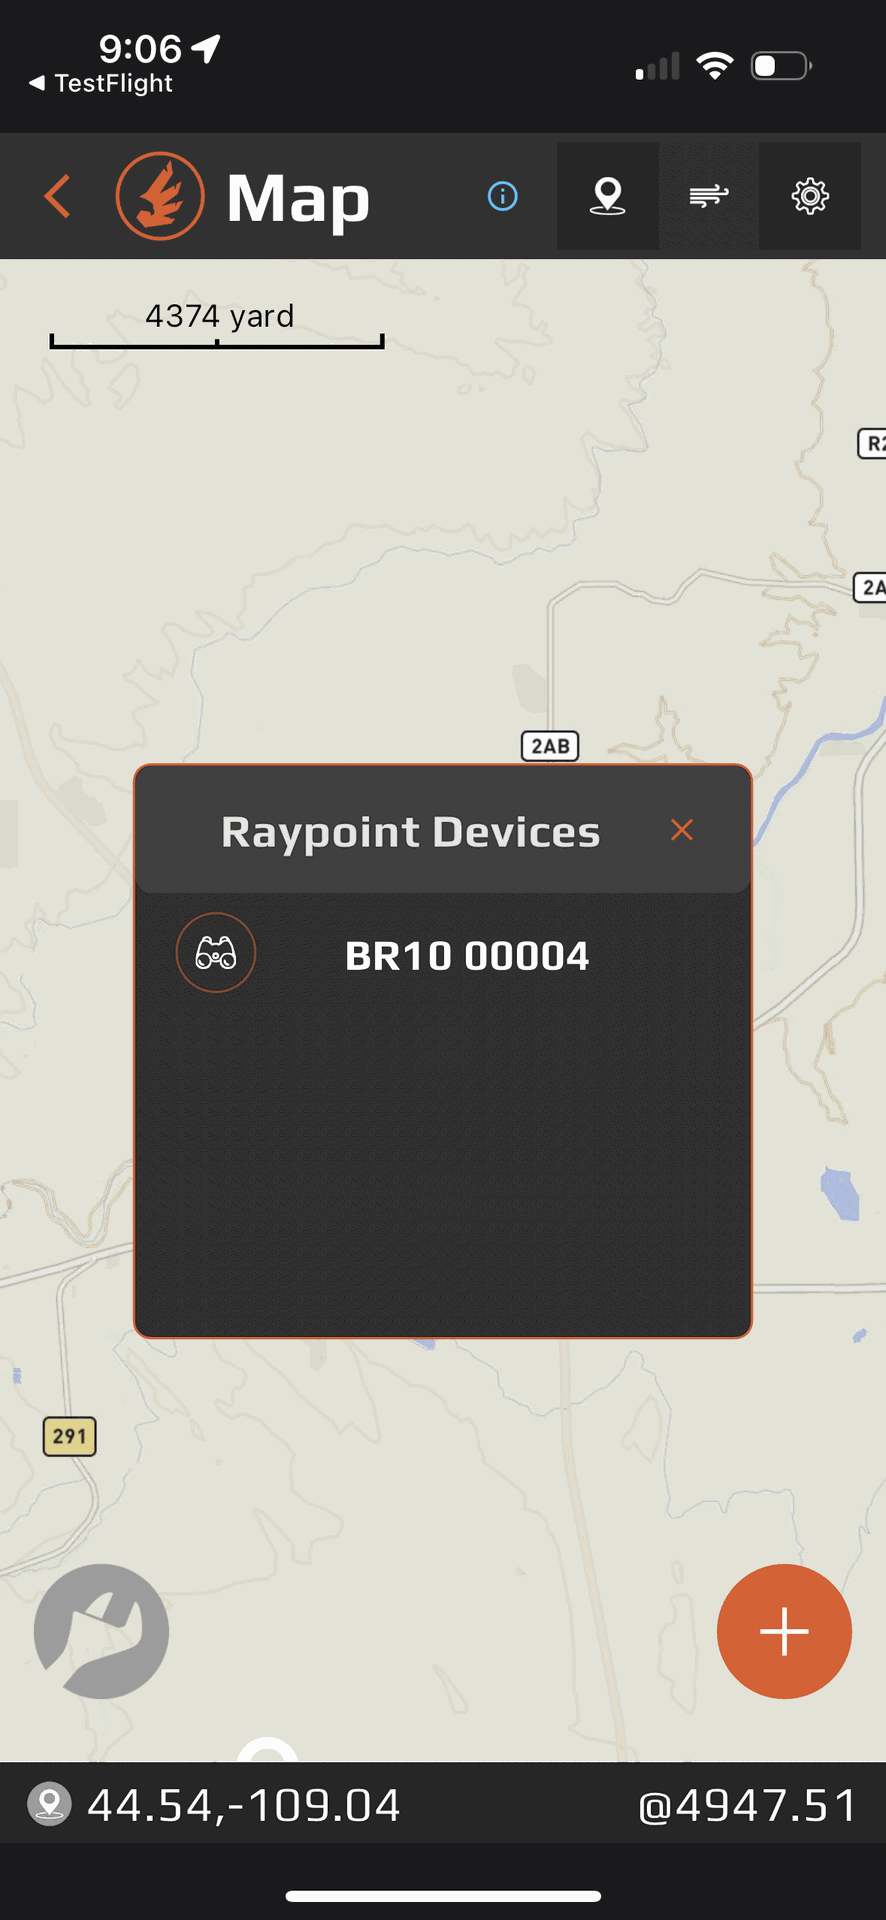
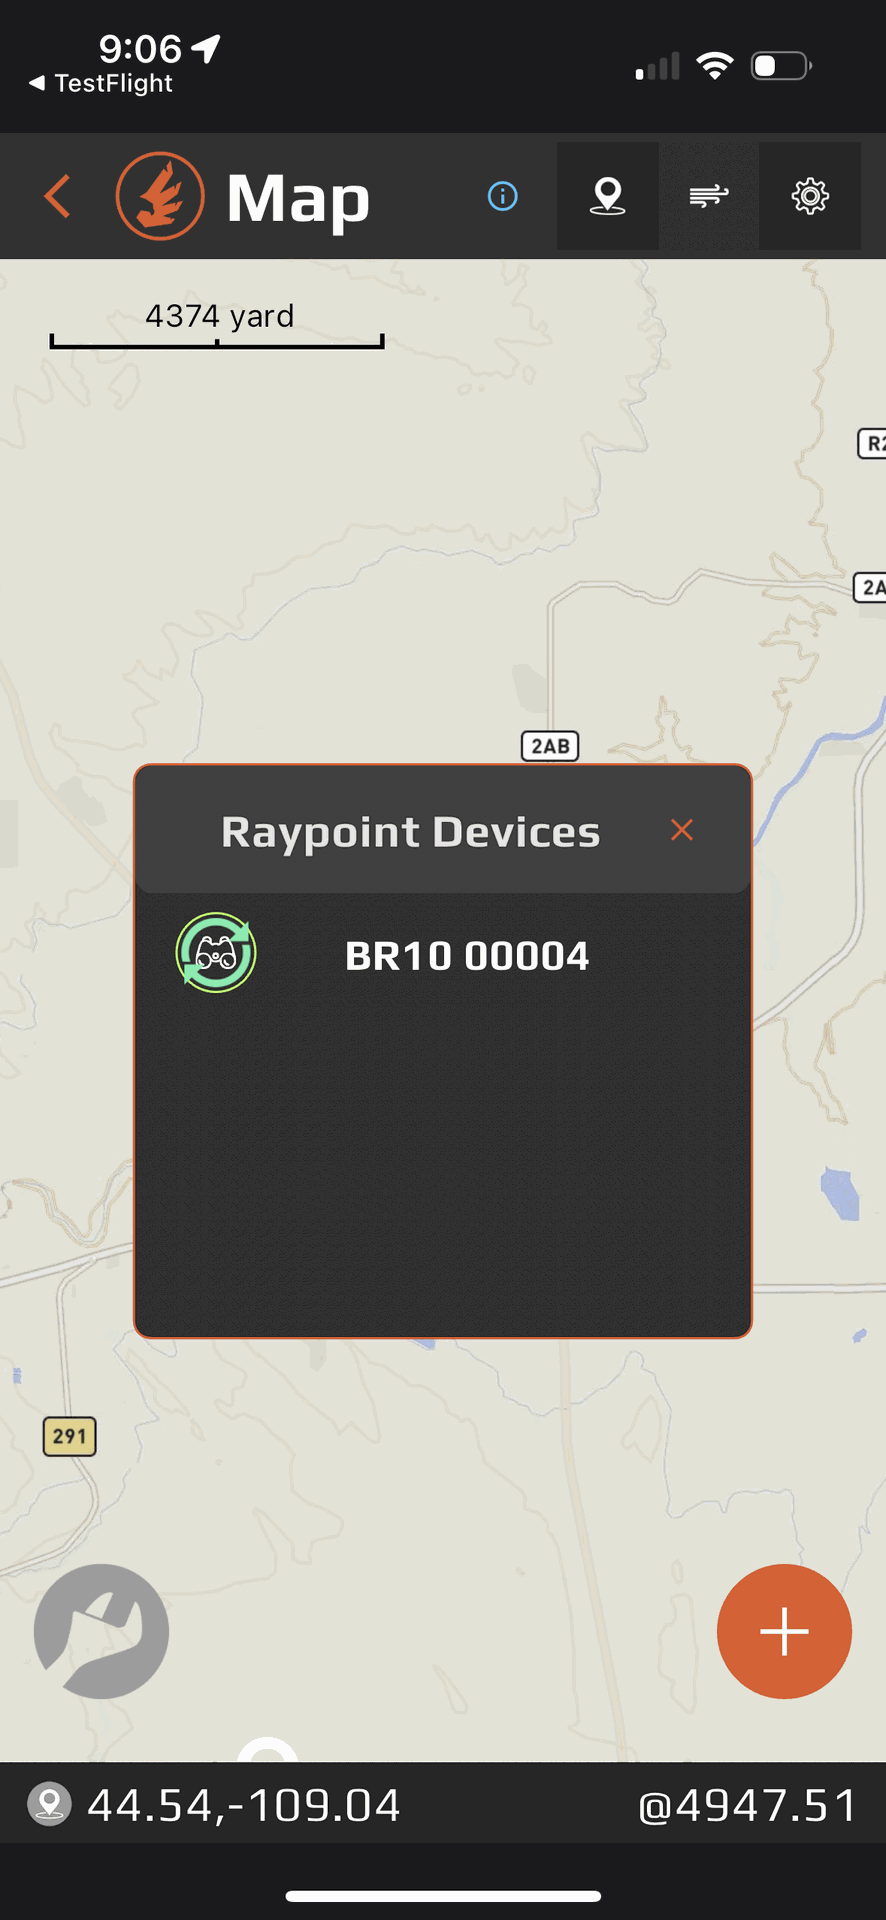
- Power on BR10 and select from the list to connect.
- Each range will drop a waypoint and replace the last waypoint unless saved.
- Raypoint Drop with OnX
- Open Revic Ops App, Scroll to Device Manager.
- Power on the BR10 unit and select connect.

- Power on the BR10 unit and select connect.
- *** (If you don’t see the device or are having trouble pairing follow these steps.)
- Make sure the Bluetooth icon is flashing.
- If it’s solid, press and hold the Menu button, use the arrow keys to find “bt,” press Menu, then use the arrows to set it to “on.” Toggling Bluetooth off and on can help resolve connection issues.
- Select Manage
- Collapse the “Profiles” section by tapping the orange carat on the right side of the screen.

- Collapse the “Profiles” section by tapping the orange carat on the right side of the screen.
- Expand the Range section by pressing the orange carat on the right hand side of this field.
- Expand the Range section by pressing the orange carat on the right hand side of this field.

- You will now see two orange buttons. The button on the left hand side is for remote ranging. (We recommend only using this feature for very specific applications, tripod mounted BR10 for extra long range shots).
- The button on the right is for waypoint drop.

- Click the gear icon in the upper right corner. You will see “Map Prov.” and a drop down of available Map providers. Select the desired Map software, OnX in this case.
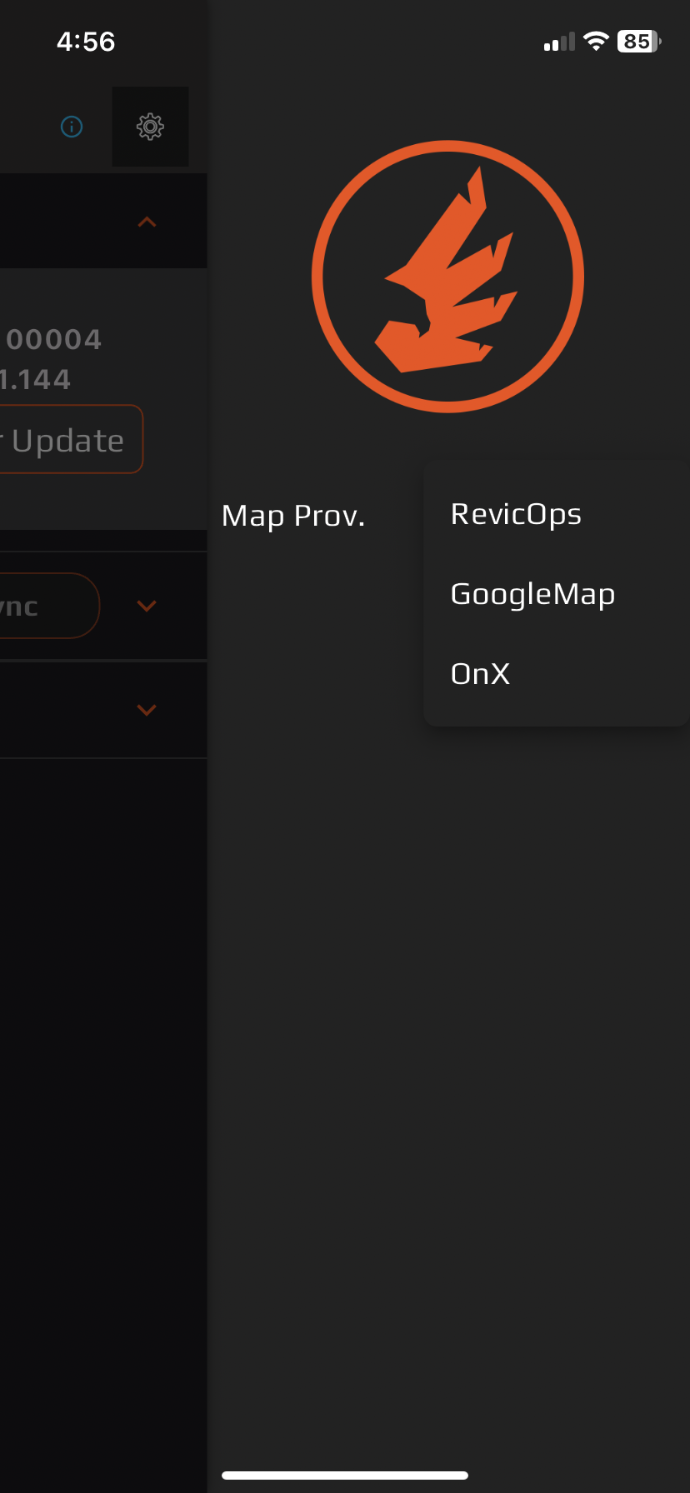
- Click the gear icon in the upper right corner. You will see “Map Prov.” and a drop down of available Map providers. Select the desired Map software, OnX in this case.
- Take a range of your desired target with the BR10. (See image below)
- Take a range of your desired target with the BR10. (See image below)
- If you have selected OnX as your map provider, you will see something similar to the following image below:
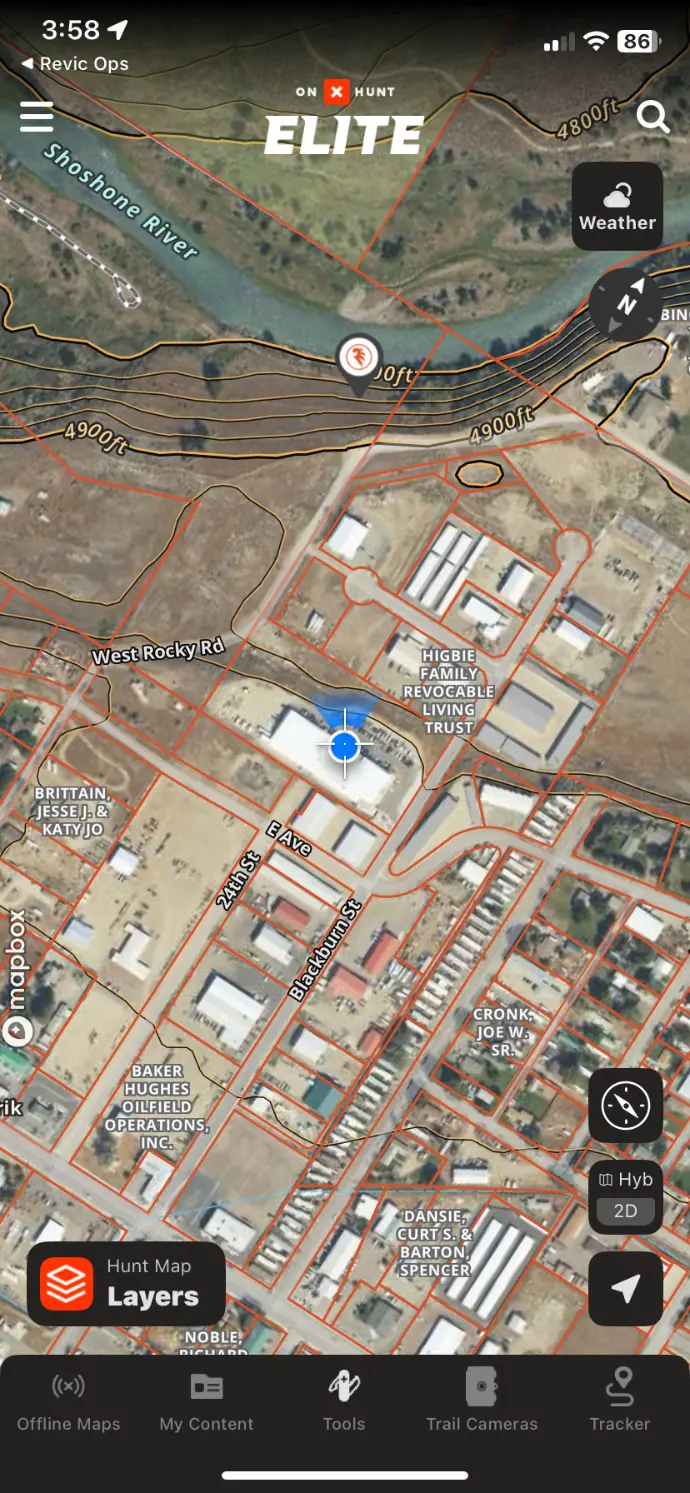
- If you have selected OnX as your map provider, you will see something similar to the following image below:
- Revic’s new Raypoint drop feature is designed to work with the Revic Ops App. Simply connect your device with the App and take a range. A waypoint will be dropped on your target. There is a band attached to the waypoint that represents the potential accuracy of your azimuth reading. The green band represents a plus or minus 5 degree range, with 2.5 degrees on each side of the waypoint. It indicates expected accuracy when the compass is properly calibrated. The combined green and yellow bands represent a plus or minus 8 degree range. This reflects potential accuracy if the compass has not been regularly calibrated.
*For the best accuracy, ensure the BR10 is properly calibrated and used in open environments—away from vehicles or large metal structures.
How To Use RSR
The Ballistic Turret and RSR sections are static fields that mirror a permanently etched physical Ballistic Data Ring. This ring includes a fixed set of ballistic variables: elevation, temperature, humidity, muzzle velocity, ballistic coefficient (BC), caliber, bullet weight, and zero range. Enter the exact values etched on the physical ring into the app’s “Ballistic Turret” and “RSR” sections. Any changes or updates you want to make should be performed in the main ballistic profile section of the app. See below for common situations.
Common Scenarios to Use Revic Smart Range
New Lot of Ammo with a New Muzzle Velocity
- In the main Ballistic Profile section, go to the Ammo field and enter the new muzzle velocity for your updated ammunition.
- We recommend using a chronograph and inputting the average velocity from multiple shots for best results.
- We recommend using a chronograph and inputting the average velocity from multiple shots for best results.
- ⚠️ Do not modify the RSR or Ballistic Turret sections. These values match your physical turret and must stay unchanged.
- Tap the Back button (top left) to save.
- Go to Device Manager and sync the new profile to your Radikl Smart Scope or Laser Rangefinder.
Switching to a new Ammunition (Factory or Custom Loads)
- In the Ballistic Profile, open the Ammo field and tap your current selection (e.g. 7mm 180 gr. Hybrid Target)
- Select the correct manufacturer, then choose your new factory ammunition from the list
- This will automatically populate the key ballistic data field.
- If you're using a custom load, select "Manual" from the dropdown menu. You will need to enter all ammo data fields manually.
- Enter the muzzle velocity for your new ammo using the average speed measured with a chronograph and your rifle configured for hunting, including any muzzle brake or suppressor.
- ⚠️ Do not modify the RSR or Ballistic Turret sections. These values match your physical turret and must stay unchanged.
- ⚠️ Do not modify the RSR or Ballistic Turret sections. These values match your physical turret and must stay unchanged.
- Tap the Back button (top left) to save.
- Go to Device Manager and sync the new profile to your Radikl Smart Scope or Laser Rangefinder.
Change the barrel on your rifle and are shooting a new caliber.
- If you’ve changed your rifle barrel and are now shooting a different caliber, we recommend creating a new ballistic profile. This allows you to easily revert to your original setup if needed.
- Open the Revic Ops App and go to the Profile Manager module.
- Tap the orange plus (+) icon in the lower right corner.
- Select New Profile and complete the Ballistic Profile section.
- In the Ballistic Turret section:
- Toggle it ON.
- Enter the data exactly as etched on your Ballistic Data Ring.
- Toggle RSR ON and fill out the remaining fields.
- Tap the Back button (top left) to save.
- Go to Device Manager and sync the new profile to your Radikl Smart Scope or Laser Rangefinder.
Moving a scope with a Ballistic Data Ring to a new rifle
- When mounting your scope on a new rifle, it’s best to create a new ballistic profile. Follow these steps:
- Open the Revic Ops App and go to the Profile Manager.
- Tap the orange plus (+) icon in the lower right corner.
- Select New Profile and complete the Ballistic Profile section.
- In the Ballistic Turret section:
- Toggle it ON.
- Enter the data exactly as etched on your Ballistic Data Ring.
- Toggle RSR ON and fill out the remaining fields.
- Tap the Back button (top left) to save.
- Go to Device Manager and sync the new profile to your Radikl Smart Scope or Laser Rangefinder.
Safety Warning
The Acura BR10 is designed to meet FDA eye safety requirements and is classified as eye-safe to Class 1M limits, which means that virtually no hazard is associated with directly viewing the laser output under normal conditions. As with any laser device, however, reasonable precautions should be taken in its operation.
- Avoid staring into the transmit aperture while firing the laser.
- Do not look at high intensity light sources such as the sun through the BR10.
- Only use a CR2 Battery as a power source for your Acura BR10.
- Keep your Acura BR10 out of reach of children.